
Want to create a professional football graphic without tracing or complex paths? The Shape Builder tool makes it surprisingly easy.
This technique combines three powerful Illustrator features. Shape Builder merges and splits objects. Snap to Point ensures perfect alignment. Plus, the Properties panel gives you precise control over dimensions.
Let’s build two different football styles. One uses flowing curves. The other features a classic hexagonal pattern. Both look polished and work great for logos or sports designs.
Create the Classic Curved Football
Start with the foundation. Make a 300px circle and center it on your artboard.
Now duplicate that circle twice. Select the first duplicate and open the Properties panel. Change the width to 450px (that’s 150% bigger). Duplicate the original circle again and make this one 600px (200% bigger).
Here’s where it gets interesting. Turn on Smart Guides so objects snap together. Duplicate your center 300px circle and hold Shift while dragging it down. Watch for the snap indicator. Stop when the bottom edge clicks to the bottom of your largest circle.
Delete the outermost 600px circle. You won’t need it anymore.
Add the Triangle Framework
Create a triangle using the Polygon tool. Set it to three sides. Drag the triangle so its top point snaps to the top center of the ellipse you just moved downward.
Switch to the Selection tool. Hold Shift and drag the triangle larger until both bottom corners snap to the sides of that same ellipse. Check the top point. Sometimes it drifts off-center. Adjust if needed.
Now for some duplication magic. Select both outer ring shapes together. Drag them down and right until the leftmost edge of the ellipse clicks onto the left side of your triangle.
Duplicate those rings again. This time drag left until the rightmost edge clicks onto the triangle’s right side. Select and delete the triangle itself. You’re done with it.
Shape Builder Creates the Curves

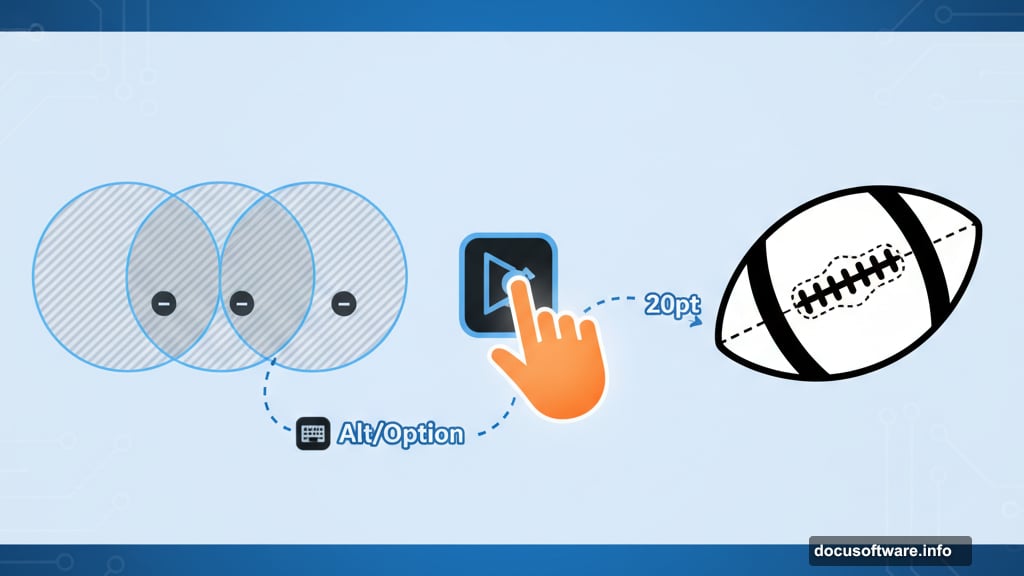
Switch to the Shape Builder tool. Hold Alt (or Option on Mac) and draw through the outer bits of your overlapping ellipses. This erases everything outside the actual ball shape.
Then drag through specific sections to build those classic football swoops. These become the curved panels on the ball’s sidewall.
Quick cleanup step. Ungroup any shapes that Illustrator automatically grouped. Select all the messy edge bits and delete them. Group everything together and set the stroke width to 20pt.
Open Properties and resize the whole football to 400px. Perfect.
Build the Hexagonal Pattern Version
This style looks more modern. Start fresh with a new 400px circle.
Create a hexagon using the Polygon tool. Set it to six sides and make it 70px. Align both shapes to the center of your artboard.
Duplicate the hexagon and stack five copies vertically down the middle of your circle. Make sure they touch edge-to-edge.
Lock the original circle so you don’t accidentally move it. Select all five hexagons. Turn on Snap to Point in the View menu. Drag this strip of hexagons to the right.
Align the Hex Pattern
Grab the Direct Selection tool. Click a specific anchor point on the left side of one hex shape. Drag it until these hexagons align with the valley areas between your original hex strip.
The hexagons should nestle together like a honeycomb. Duplicate the pattern until you have five columns across. Use Snap to Point with the Direct Selection tool to align everything perfectly.
Set all hexagon fills to white. Give them a 3pt black stroke. Select the center hexagon plus a few around it. Fill these with black to create that classic football pattern.
Apply the Clipping Mask
Group all your hexagon shapes together. Duplicate the original 400px circle and place it above the hex group in your Layers panel.
Select both the new circle and the hex group. Hit Cmd+7 (Mac) or Ctrl+7 (Windows) to create a clipping mask. The hexagons now stay within the circle boundary.
Pro tip: You can still drag the hex shapes around inside the mask. Move them until the pattern looks perfect on your ball surface.
Add Realistic Depth
Select the layer group containing your hex shapes. Go to Effect > Warp > Inflate. Set the horizontal value to 100%.
This warps the flat hexagon pattern into a curved surface. It makes your football look three-dimensional instead of flat.
Play with the warp settings if you want. Sometimes a slightly lower percentage looks better depending on your hex size and spacing.
Why This Technique Works
Most people try drawing footballs freehand or tracing photos. Both approaches take forever and rarely look professional.
Shape Builder eliminates the guesswork. It handles all the path intersections automatically. You just drag to merge or delete shapes.
Plus, Snap to Point prevents alignment mistakes. Your shapes lock together perfectly every time. No eyeballing required.
The hex pattern method works for any spherical object. Soccer balls, basketballs, even abstract geometric spheres. Just change the polygon sides and spacing.
Both football styles scale perfectly to any size. They’re vector shapes, so they stay sharp whether you need a tiny icon or a billboard graphic. Change colors instantly. Modify the pattern. Add gradients or textures later.
The Shape Builder tool seems simple but unlocks powerful possibilities. Combine basic shapes in creative ways. Build complex graphics fast. That’s the real value of mastering this technique.