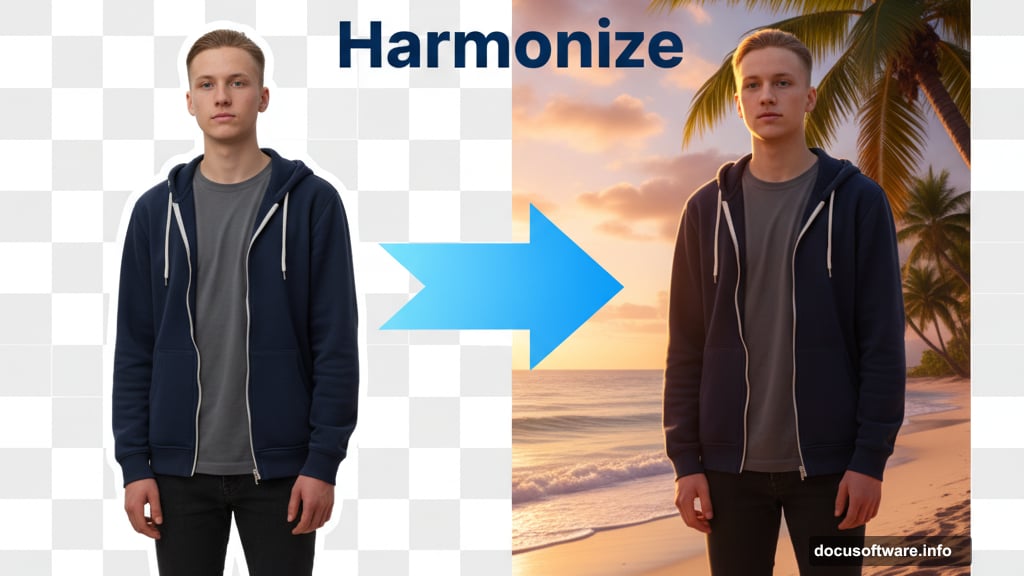
Photoshop beta dropped a feature that sounds almost too good to be true. Called Harmonize, it automatically blends separate images together with matching lighting, colors, and even shadows. One click. Done.
But there’s a catch. Actually, several catches. Plus, a clever workaround that makes this tool way more useful than Adobe intended.
Let me show you how this works and whether you should worry about your compositing skills becoming obsolete.
What Harmonize Actually Does
Think of Harmonize as auto-pilot for image blending. You drop one photo onto another, click a button, and Photoshop generates matching lighting and shadows using generative AI.
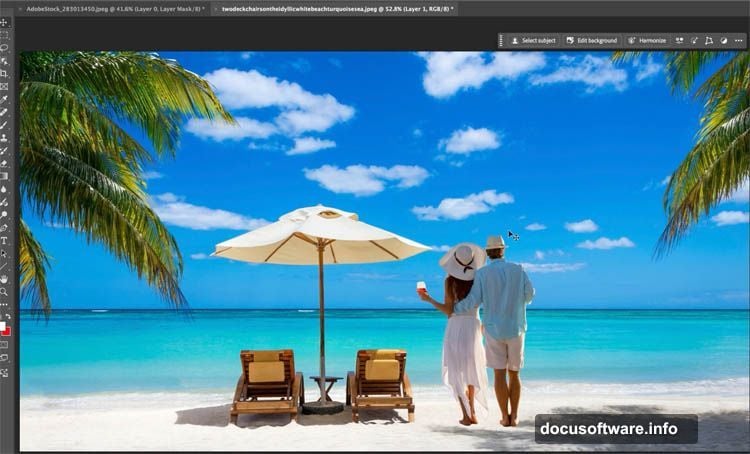
Here’s the basic workflow. Take a photo of people with the background removed. Drag them onto a beach scene. They look fake because the lighting doesn’t match and there’s no shadow.
Click Harmonize in the taskbar. Wait a few seconds. Now the lighting matches, shadows appear, and the whole thing looks believable.
Photoshop creates a new generative layer on top. It combines both layers while matching lighting conditions. The tool even masks out unchanged areas, showing just what it modified from the original background.
Pretty impressive. But here’s where things get tricky.
The Resolution Problem Nobody Mentions
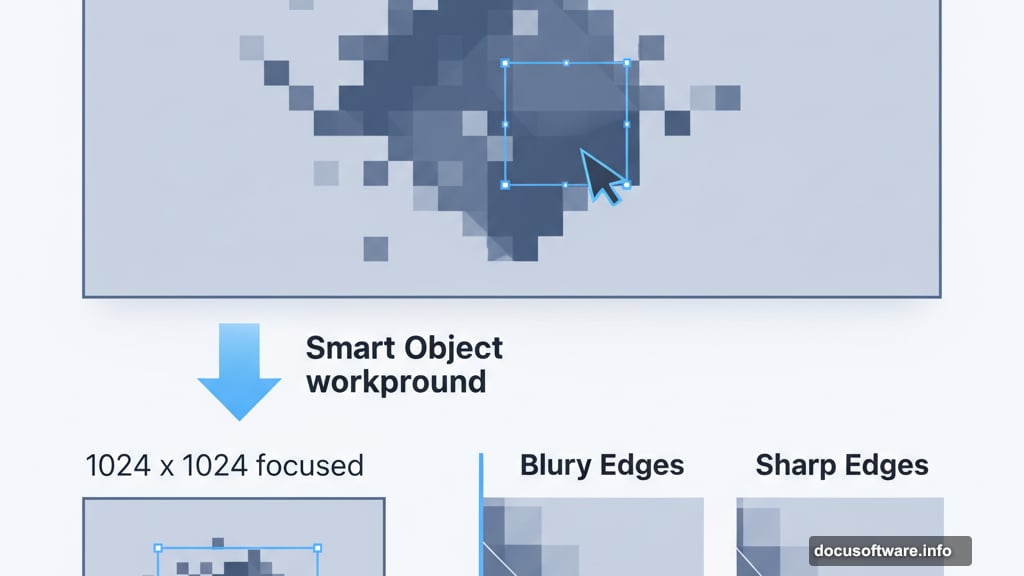
Harmonize generates images at 1024 x 1024 pixels maximum. That resolution stretches across your entire canvas, regardless of actual size.
So if you’re working on a 4000 x 3000 pixel image, you’re spreading 1024 pixels across that whole space. The background looks fine because the mask reveals the original. But your subject? Soft and fuzzy.

Look closely at the people you just composited. The edges blur. Details soften. Shadows look muddy. You’re basically generating way more area than needed and wasting precious resolution on empty space.
This isn’t a minor issue. It’s the difference between professional work and obvious AI shortcuts.
The Resolution Hack That Actually Works
Smart photographers figured out a workaround. Instead of harmonizing the entire canvas, you generate just the area you need.
Here’s how it works. Select your background layer. Use the rectangular marquee tool to make a selection around your subject. Make it big enough to capture lighting context and room for shadows, but no bigger than necessary.

Press Cmd/Ctrl+J to copy that selection onto a new layer. Now Cmd/Ctrl+Click both this new layer and your subject layer to select them together.
Right-click and choose Convert to Smart Object. Both layers combine into one smart object. Double-click the smart object to open it in a new window.
Notice something? The canvas is much smaller now. Only the area you selected, not the entire original image.
Click Harmonize inside this smaller canvas. Choose your preferred variation. Save and close the window.
Back in your main document, the smart object updates with the harmonized result. But this time, that 1024 x 1024 resolution concentrates on your subject area instead of stretching across miles of empty background.
The difference is dramatic. Shadows look crisp instead of fuzzy. Subject details stay sharp. The composite actually holds up under scrutiny.
Harmonize Does Reflections Too
This feature isn’t just about shadows. Drop a boat onto a lake scene and click Harmonize. The tool generates water reflections automatically while fixing color matching.
It understands context surprisingly well. Reflections appear beneath objects sitting on water. Shadows fall beneath objects on solid ground. The AI recognizes what kind of surface it’s working with.
Still not perfect, though. Sometimes reflections look too uniform. Other times they miss subtle ripple effects. But for quick mockups? Pretty solid.
Should You Even Bother Learning Compositing Anymore?
Valid question. If AI can auto-blend images in seconds, what’s the point of spending hours learning manual techniques?

Think about Lightroom’s Auto button for a second. Do you click it and call it done? Or do you use it as a starting point, then fine-tune everything to match your vision?
Harmonize works the same way. Great for beginners. Fantastic for quick mockups. But it can’t read your mind about creative direction.
I tested this on one of my composites. The original took hours of manual work. I painted custom lighting onto the model to match a glowing bow effect. Very stylized, very intentional.
Then I tried Harmonize on the same base images. The AI generated realistic lighting and shadows. Technically correct. But completely missed the dramatic, stylized look I wanted.
Manual work let me tell a specific story. Harmonize gave me generic realism. Both valid, but serving different purposes.
When AI Helps vs When It Hurts
Here’s my honest take after testing extensively. Harmonize excels at realistic lighting matches for straightforward composites. Product shots, basic photo manipulations, client mockups where speed matters more than artistic vision.
But skilled manual work still crushes AI for anything requiring creative interpretation. Fantasy composites. Stylized portraits. Conceptual art. Anything where “technically correct” isn’t the goal.
Plus, you can combine approaches. Use AI for initial blending and time-consuming shadows. Then paint over with custom lighting to match your vision. Best of both worlds.
The resolution limitations matter more than Adobe admits. Until they fix that, professional work demands the manual skills we’ve been developing for years.
One More Reality Check
Harmonize burns one generative AI credit per use. Not a huge deal if you’re paying for Creative Cloud anyway. But it adds up fast when you’re exploring variations or working on multiple projects.
Manual compositing? Zero credits consumed. Just time and skill.
Also worth noting: Harmonize occasionally makes weird choices. Shadows falling in impossible directions. Colors that technically match but feel wrong for the scene. Reflections that don’t quite align with object positions.
These mistakes remind you that AI doesn’t understand photography the way humans do. It pattern-matches from training data. Sometimes brilliantly. Sometimes awkwardly.
Your eye catches these problems immediately. Fixing them manually often takes longer than just doing it right from the start.
My Actual Workflow Now
I still enjoy manual compositing. The process feels creative and intentional in ways that clicking Harmonize doesn’t replicate.
But I’m not a purist. When deadline pressure hits or clients need quick concepts, Harmonize saves hours. Especially combined with the resolution hack for maintaining quality.
Smart approach? Use extraction tools for cutting out subjects. Those work remarkably well. Then composite manually for final lighting and shadows. Or use Harmonize as a base layer and paint refinements on top.
The tool helps most when you already understand compositing principles. You’ll know when it gets things wrong and how to fix them. Beginners might not catch the mistakes or know how to correct them.
That’s why developing core skills still matters. Harmonize extends your capabilities. It doesn’t replace understanding light, shadow, perspective, and color theory.
Keep learning. Keep practicing. But definitely add this tool to your workflow when it makes sense.