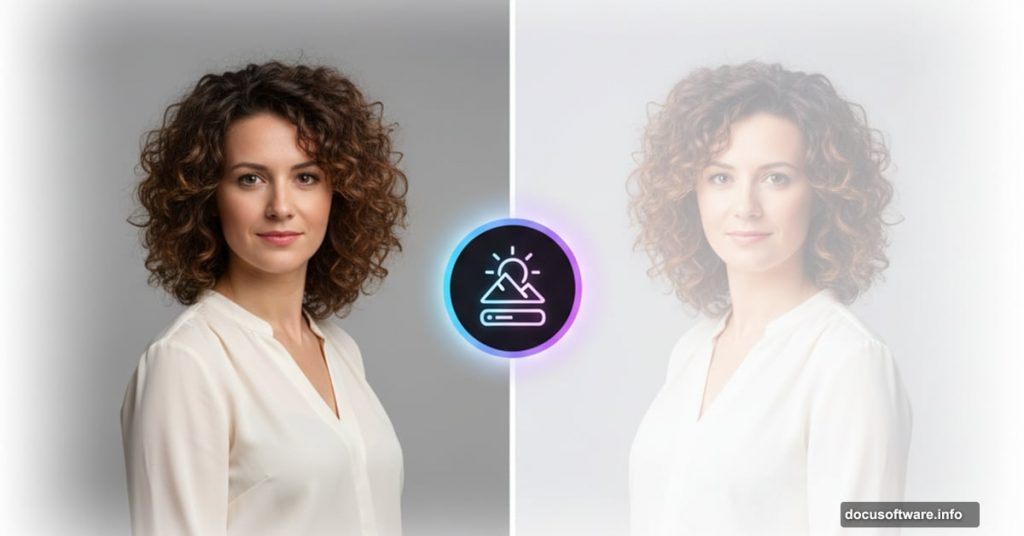
Wedding photographers swear by it. Portrait shooters can’t get enough of it. And lifestyle content creators build entire brands around it.
The light and airy aesthetic transforms ordinary photos into dreamy, ethereal images. Plus, you don’t need expensive presets or complicated techniques to nail this look. Everything you need already lives inside Photoshop’s Camera Raw filter.
Let me show you exactly how to create this popular style while keeping skin tones natural and beautiful.
Why Camera Raw Beats Regular Adjustments
You might wonder why we’re using Camera Raw instead of standard adjustment layers. Simple answer: the Dehaze slider.
That tool adds the perfect white overlay without flattening your image. Regular Shadow adjustments can’t match that effect. Moreover, Camera Raw keeps everything organized in one place instead of juggling multiple adjustment layers.
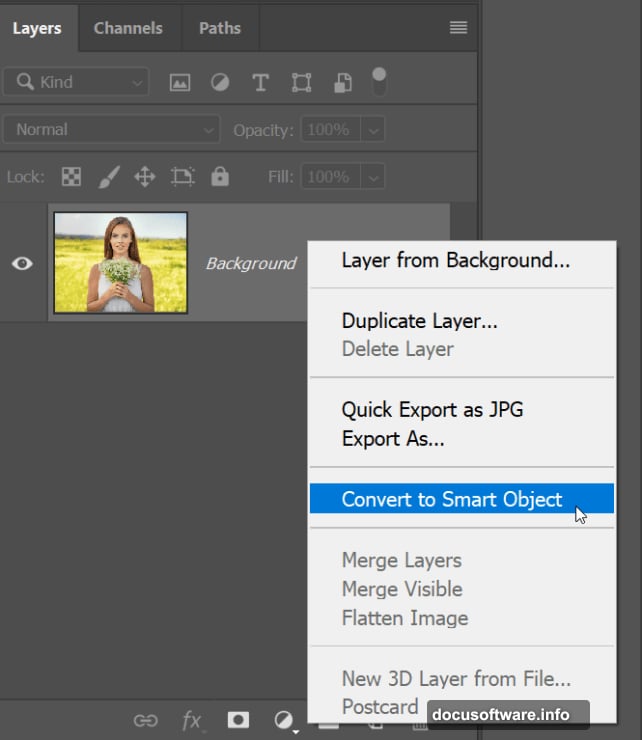
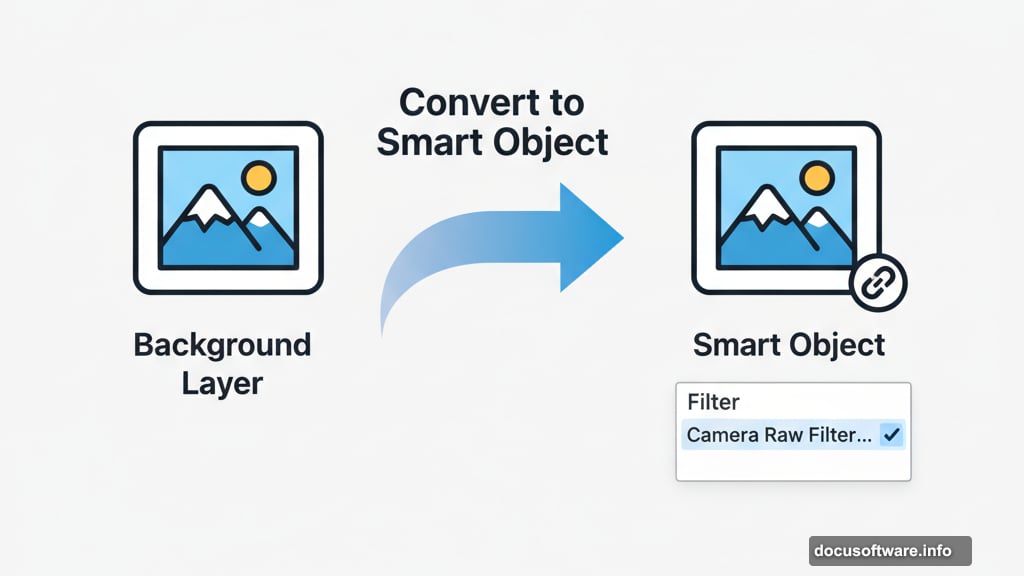
But here’s the real trick. Converting your layer to a Smart Object first means you can tweak settings anytime. No permanent changes. No starting over if something looks off.
Smart Object Setup Saves You Later
First things first. Open your photo in Photoshop and right-click the background layer. Select “Convert to Smart Object” from the menu.
This step matters more than you think. Without it, every Camera Raw adjustment becomes permanent. With it, you can revisit and refine your edits whenever inspiration strikes.
Then navigate to Filter > Camera Raw Filter to open the editing panel. Now we’re ready to build that signature light and airy vibe.

Desaturate Without Washing Out Skin
Here’s where most tutorials get it wrong. Dropping overall saturation makes everything look flat and lifeless. Skin tones especially suffer from this approach.
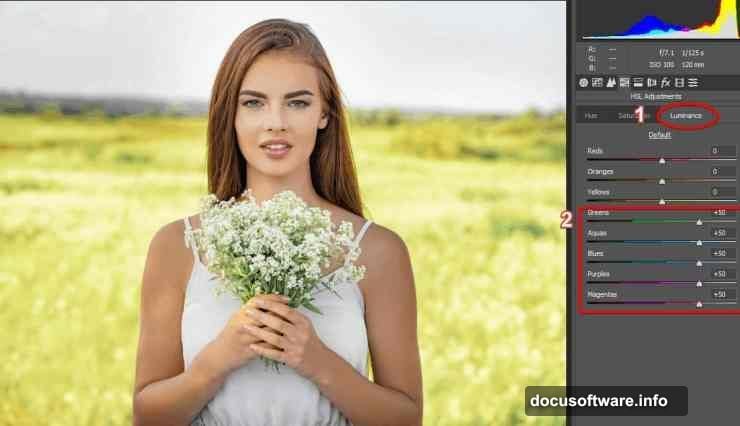
Instead, go to HSL Adjustments > Saturation. Set saturation to -50 for every color except reds, oranges, and yellows. Those three colors control skin tones in most photos.
This selective desaturation keeps faces looking healthy while softening background elements. Your subject stays vibrant against the dreamy backdrop. It’s a crucial distinction that separates amateur edits from professional results.
Brighten Smartly With Luminance Control
Next, click over to the Luminance tab. Increase luminance to +50 for all colors except reds, oranges, and yellows once again.
Why skip those three? Same reason as before. You’re brightening the overall scene without overexposing skin or creating that washed-out look nobody wants in portraits.
The combination of reduced saturation and increased luminance creates that soft, glowing foundation. But we’re not done yet. The magic really happens in the next steps.
Add Haze for That Dreamy Overlay
Now comes the secret weapon. The Dehaze slider works differently than you might expect.
Drag it into negative numbers to add haze rather than remove it. This creates a beautiful white overlay effect that screams “light and airy.” Unlike simply boosting shadows, this technique maintains depth while achieving that soft, romantic feel.

Start around -20 to -30 and adjust based on your image. Too much looks foggy. Too little won’t achieve the effect. You’ll know when you hit the sweet spot because the whole image will gain that signature glow.
Drop Whites Without Losing Contrast
Head to Tone Curves > Point for the finishing touch. Grab the top-right anchor point and drag it down slightly. This drops the white values.
But don’t stop there. Add a new point in the middle of the curve and move it up to the center line. This crucial step maintains proper exposure while reducing harsh contrast.
The result? Low contrast without underexposure. Your photo keeps its brightness while achieving that soft, effortless quality. It’s the difference between “light and airy” and “just washed out.”
Fine-Tune Colors for Extra Polish
Almost done. Go back to the Hue tab if you want to add creative color shifts.
For example, moving yellows and greens toward the right gives foliage a subtle blue tint. This works beautifully for outdoor portraits and wedding shots. It adds to that ethereal, almost magical quality.
Experiment based on your specific image. Not every photo needs this step. But when it works, it elevates the entire aesthetic. Click OK when you’re satisfied with all your adjustments.
Edit Anytime With Smart Objects
Remember that Smart Object conversion from step one? Here’s where it pays off.
Double-click “Camera Raw Filter” in the Layers panel anytime you want to change settings. The filter reopens with all your previous adjustments intact. Tweak and refine without starting from scratch.
This flexibility matters during client work or when building a cohesive portfolio. You can maintain consistency across multiple images by saving and reusing your settings.
What Makes This Technique Work
The light and airy look succeeds because it flatters subjects while creating emotional impact. Soft colors and gentle contrast feel romantic, peaceful, and timeless.
Wedding couples love it. Portrait clients request it constantly. Social media algorithms reward it with engagement. So understanding this technique opens doors whether you’re shooting professionally or building your photography skills.

Plus, once you master the basics, you can develop your own variations. Some photographers push the haze further for ultra-dreamy results. Others keep it subtle for a barely-there glow. The fundamentals remain the same while leaving room for personal style.
Common Mistakes to Avoid
Don’t oversaturate skin tones trying to compensate for reduced color. If faces look orange or overly pink, dial back the Saturation adjustments on reds and oranges. Natural skin always beats artificial glow.
Similarly, watch for blown-out highlights when adding haze. The Dehaze slider can push bright areas too far. Keep an eye on dress whites, sky details, and light sources. You want soft, not destroyed.
Finally, resist the urge to apply the same settings to every photo. Lighting conditions, colors, and subjects vary. Use these steps as a framework, then adjust based on what each image needs.
This technique works across portrait styles from maternity shoots to engagement sessions. Master it once, use it forever. Your clients will notice the difference immediately.