
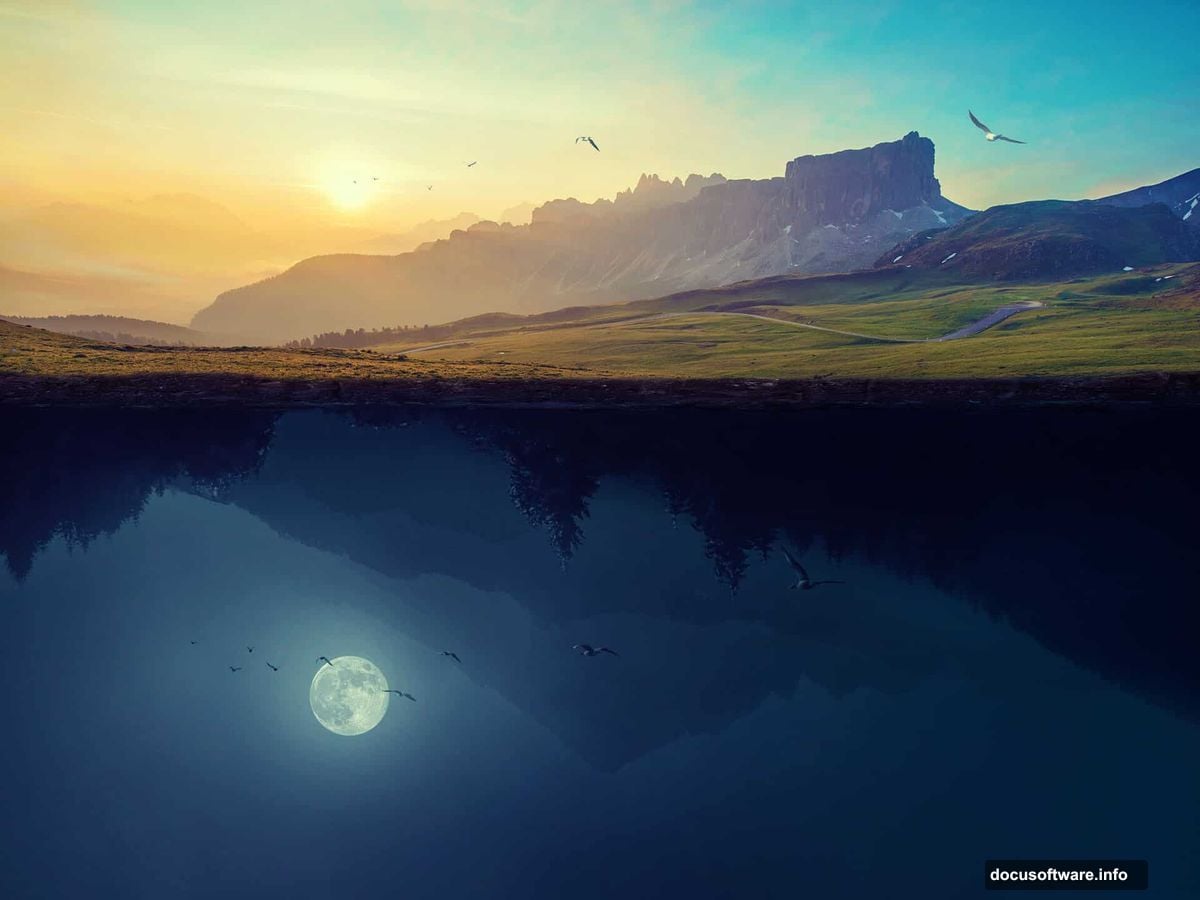
Ever wanted to create landscapes that break the rules of physics? The kind where mountains hang upside down and day meets night in impossible ways?
Surreal photo manipulation isn’t just for pros with years of experience. In fact, anyone with Photoshop and some patience can craft mind-bending images that make viewers do a double-take. Plus, the techniques you’ll learn apply to tons of other creative projects.
Let’s build an upside-down world together. No magic required. Just smart layering and a few adjustment tricks.
What You’ll Need Before Starting
Gather your stock images first. You’ll work with multiple sky photos, landscape shots, mountains, and some birds for extra atmosphere.
Make sure your images have similar lighting conditions. Mixing harsh midday sun with soft twilight creates jarring results. Also, higher resolution photos give you more flexibility when scaling and positioning elements.
Create a new 2000×1500 pixel document in Photoshop. That size gives you room to work without overwhelming your computer. Fill the canvas with white to start with a clean slate.
Build Your Foundation Sky
Import your first sky image and drag it across the canvas using the Move Tool. Position it so the most interesting cloud formations show prominently.
The sky sets the mood for everything else. So take time to get this right. Show enough variety in the clouds without making it too busy.
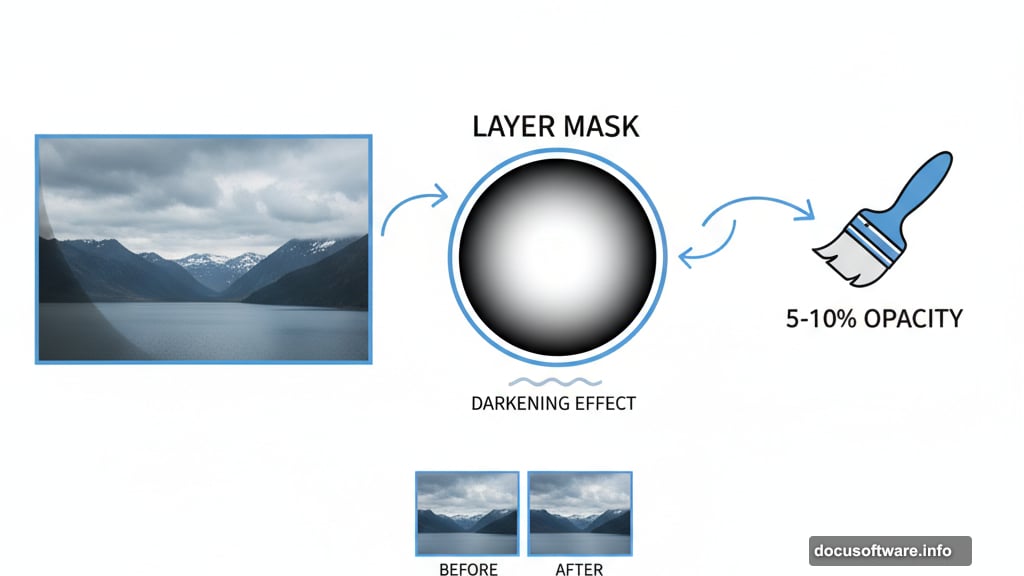
Now add a Curves adjustment layer to brighten things up. Push the curve upward to create that hazy, dreamy quality surreal landscapes need. But don’t go overboard. You want ethereal, not washed out.
Here’s a crucial trick most tutorials skip. Paint on the layer mask with a soft black brush at 5-10% opacity. Focus on the lower left corner of your sky. That subtle darkening creates depth and guides the viewer’s eye naturally through the composition.
Layer Your Landscape Elements
Drop your first landscape image onto the upper portion of the canvas. Hit Ctrl+T to resize it until it fills the space you want.
Add a layer mask immediately. Use a medium-soft black brush to erase the bottom edge. You want a gradual fade, not a hard line. This blending technique makes elements look like they belong together instead of just pasted on top.
Next comes the fun part. Place your second landscape image below the first one. But before you position it, flip it vertically through Edit > Transform > Flip Vertical.
This flipped landscape becomes your underground world. Position it in the lower section and add another mask. Paint away parts of its sky with a 40-50% opacity brush. The trees and mountains should blend seamlessly into your base sky layer.
Kill the Color Oversaturation
Flipped landscapes often look too vibrant. Real underground areas wouldn’t have bright, saturated colors. So fix that with a Hue/Saturation adjustment layer.
Set the adjustment as a Clipping Mask so it only affects your flipped landscape. Drop the Saturation slider down to -55. That desaturated look immediately makes the inverted world feel more mysterious and underground.
Follow up with a Curves adjustment layer, also clipped to the landscape. Darken it considerably. Then grab your soft black brush again and paint on the mask over trees and important details you don’t want completely lost in shadow.
This selective darkening creates focal points. Your eye naturally moves to the lighter areas, which is exactly what you want in a surreal composition.
Add the Impossible Mountains
Import your mountains stock image below everything else. Flip it vertically like you did with the second landscape.
Position these inverted mountains in the lower section of your scene. They become the impossible geography that sells the surreal concept.
Here’s where it gets interesting. Change the blend mode to Hard Light at 100% opacity. That mode makes the mountains interact with the layers above in unexpected ways. They’ll pick up colors and tones from your existing elements, creating cohesion without extra adjustment layers.
Hard Light mode can produce dramatic results. But if it feels too intense, try Overlay or Soft Light instead. Each blend mode creates different atmospheric effects worth experimenting with.
Refine Details That Matter
At this stage, your basic composition exists. But it probably looks flat. That’s normal. Real depth comes from small refinements most people rush past.
Zoom in to 100% and examine edges where elements meet. Soft brushes help with blending, but they can create muddy transitions. Switch to a harder brush at lower opacity for crisp-yet-natural edges.

Look for lighting inconsistencies. If your sky suggests light coming from the right, make sure your landscape shadows match. Use Dodge and Burn tools to subtly adjust highlights and shadows until the lighting feels unified.
Add subtle color tints with Color Balance adjustment layers. Warm tones (yellows, oranges) in highlights make images feel inviting. Cool tones (blues, purples) in shadows create mystery and depth. Small shifts make huge differences.
Bring Your Scene to Life
Static landscapes need movement to feel alive. That’s where birds come in.
Import bird silhouettes and scatter them across your sky. Vary their sizes to suggest different distances. Larger birds appear closer, smaller ones farther away. This simple trick adds instant depth perception.
Place some birds near the “boundary” between your right-side-up and upside-down worlds. That positioning reinforces the surreal concept without being obvious about it.

Adjust bird opacity if they feel too prominent. Around 70-80% opacity makes them feel like they belong in the atmospheric haze rather than pasted on top.
Master the Final Polish
Your composition needs cohesion. Individual elements might look good, but they need to feel like one unified image.
Add a Gradient Map adjustment layer at the very top of your layer stack. Choose a subtle gradient that shifts your overall color palette slightly. Blue-to-orange gradients work brilliantly for surreal landscapes, creating that dreamy day-meets-night quality.
Drop the Gradient Map opacity to 20-30%. Full strength overpowers everything. You want just a hint of color harmony tying everything together.
Create a new layer and fill it with 50% gray. Set this layer to Overlay mode. Now use white and black brushes at very low opacity to dodge and burn across the entire image. This manual adjustment gives you precise control over every highlight and shadow.
Finally, add a subtle vignette. Create a Curves adjustment layer and pull the curve down to darken everything. Then fill the layer mask with black and use a huge, soft white brush to paint darkness back into the corners. That subtle edge darkening draws attention to your central composition.
Why This Technique Actually Works
Surreal photo manipulation succeeds when impossible elements follow consistent rules. Your upside-down landscape works because you maintained lighting consistency, matched color tones, and used realistic blending throughout.
The key isn’t perfection. It’s believability within the surreal concept. Viewers accept the impossible premise because everything else follows natural visual logic.
These same techniques apply to countless other projects. Fantasy scenes, album covers, advertising concepts, or just personal art that makes people stop scrolling. Master these fundamentals and you can create any impossible world your imagination conjures.
Start experimenting. Flip reality. Break the rules of physics. Make viewers question what they’re seeing. That’s the real power of photo manipulation done right.