Photoshop‘s most powerful features hide in plain sight. Most designers never move beyond basic layers and filters. But combining shape layers, smart objects, and vector masks unlocks entirely new creative possibilities.
This tutorial walks through building a complex mixed-media artwork from scratch. You’ll work with stock images, custom Illustrator shapes, and Photoshop’s advanced composition tools. By the end, you’ll understand techniques that professional designers use daily.
Fair warning. This isn’t a beginner tutorial. You need basic Photoshop knowledge and access to Adobe Illustrator for certain steps. But if you’re ready to level up your skills, let’s dive in.
Setting Up Your Canvas
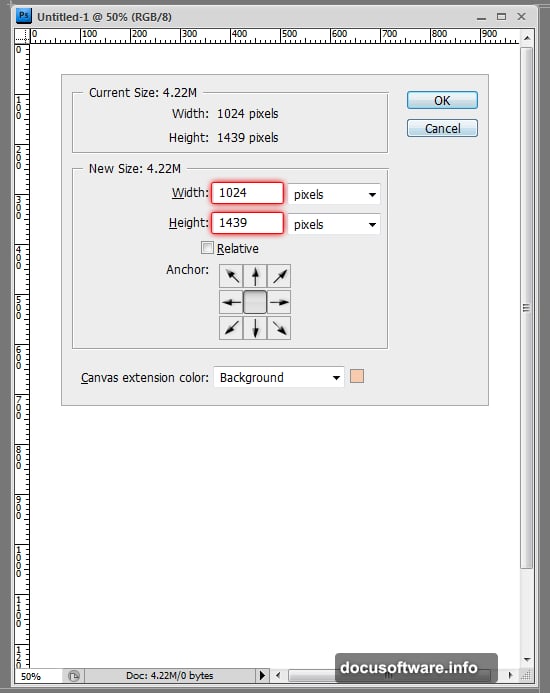
Start with a new document in Photoshop. The exact dimensions don’t matter initially. In fact, you can adjust canvas size anytime during the process.
Create a file around 2000×2000 pixels at 300 DPI. That gives enough resolution for detailed work. Plus, you can always scale down later without losing quality.
Building the Foundation with Vector Shapes

Here’s where shape layers shine. They use vector paths instead of pixels. So you can resize, rotate, and modify them without quality loss.
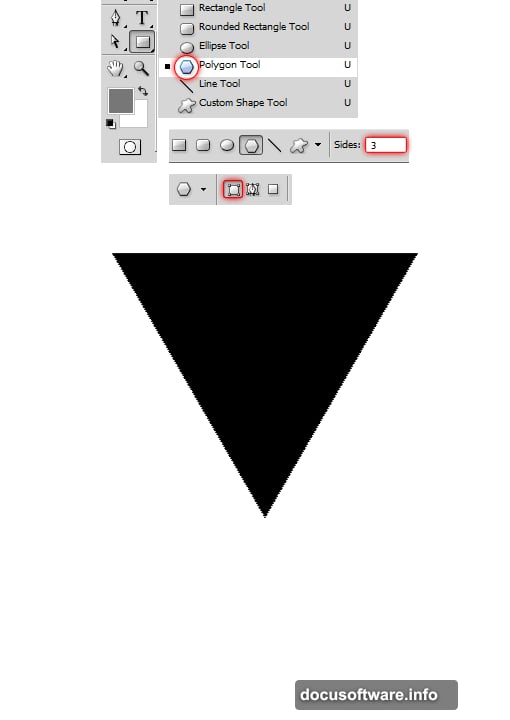
Select the Polygon Tool from the toolbar. Change the sides count to 3. Make sure you choose the Shape Layers option before drawing. This creates an editable vector path automatically.
Draw your triangle. Now comes the clever part.
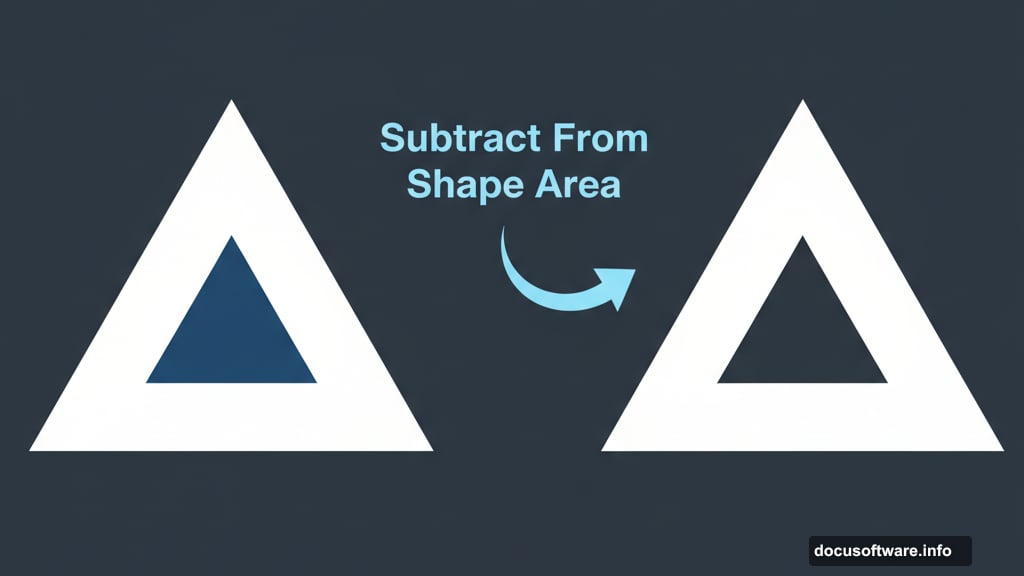
Copy the triangle’s path and paste it. Scale down the duplicate and position it inside the original. Then select Subtract From Shape Area. This cuts a hole through the triangle using the smaller path.
Why does this matter? Because you’re working non-destructively. The original shape remains editable. You can adjust the hole size or position anytime without starting over.
Adding Geometric Elements

Next, create rectangular shapes using the Rectangle Tool. These define the composition’s structural elements.
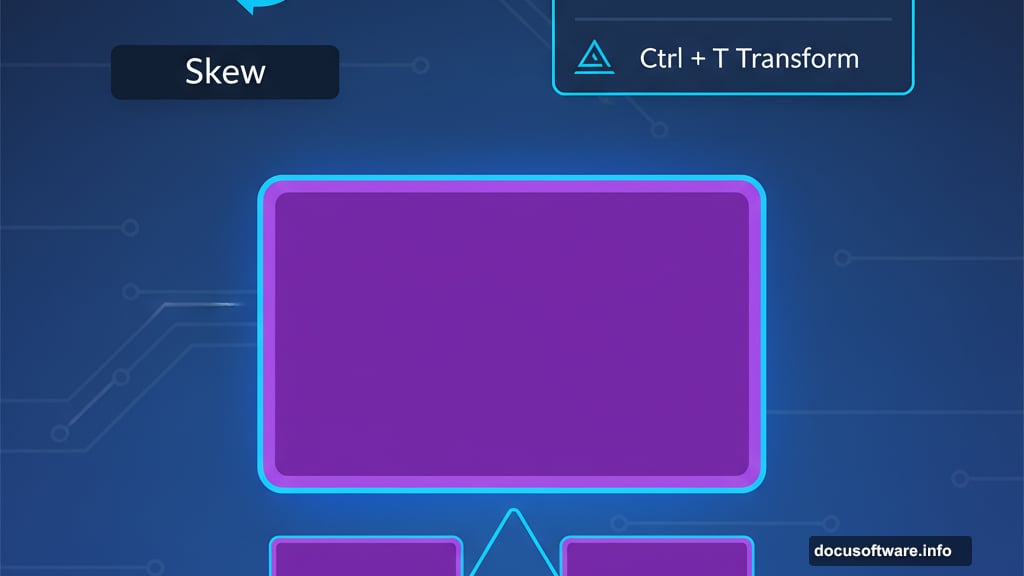
Press Ctrl + T to enter transform mode. Right click and choose Skew. This lets you create angled shapes that complement the triangle.
Duplicate the skewed rectangle by pressing Ctrl + J. Then press Ctrl + T again and select Flip Horizontal. Now you have matching angled shapes.
Position these slanted rectangles over the triangle. Rotate the first shape by exactly -60 degrees. Use the Info palette (F8) to check your rotation angle precisely.
Rotate and position the second shape to match. Place both shapes underneath the triangle layer. This creates a cohesive geometric base for your artwork.
Working with Stock Images
Download the required stock images before proceeding. You’ll need photos of models, textures, and decorative elements. The tutorial resources include specific links for each asset.

Import your main model image. Use the Quick Selection Tool or Pen Tool to isolate the subject. For complex selections, the Pen Tool gives cleaner results despite taking longer.
Create a layer mask for the model. This preserves the original image while hiding unwanted areas. Plus, you can refine the mask anytime without permanent changes.
Integrating Textures and Patterns
Textures add depth and visual interest. Import paper textures, watercolor effects, and halftone patterns from the resource list.
Place each texture on a new layer. Experiment with blending modes like Multiply, Overlay, and Soft Light. Different modes produce dramatically different effects.
Adjust opacity to fine-tune the texture intensity. Most textures work best between 30-70% opacity. Lower opacity creates subtle effects. Higher opacity makes textures more prominent.
Adding Decorative Elements
Import the decorative assets. Hot air balloons, patterned spheres, and wing stock images create visual interest.
Convert these elements to Smart Objects before scaling. Right click the layer and choose Convert to Smart Object. This preserves image quality when resizing.
Position decorative elements throughout the composition. Vary sizes and rotation angles for dynamic arrangement. Overlap some elements to create depth.
Color Correction and Adjustment
Now unify all elements with color adjustments. Create a Curves adjustment layer above your working layers.
Adjust the RGB curve to set overall brightness and contrast. Then switch to individual color channels. The Red, Green, and Blue channels control color balance independently.
Add a Hue/Saturation adjustment layer. Shift the overall hue slightly to create color harmony. Reduce saturation for muted tones or increase it for vibrant effects.
Adding Paint Splatters and Drips
Import brush stroke images and paint drip resources. These organic elements contrast nicely with geometric shapes.
Place paint elements on separate layers. Use layer masks to blend them smoothly. Erase hard edges for natural integration.
Change blending modes to Screen or Lighten for bright paint splatters. Use Multiply for darker drips that appear behind other elements.
Creating Depth with Shadows
Select layers that should cast shadows. Right click and choose Blending Options. Enable Drop Shadow from the layer styles menu.
Adjust shadow distance, spread, and size. Keep shadows consistent across elements. All shadows should appear from the same light direction.
Alternatively, create custom shadows manually. Duplicate an element’s layer. Fill it with black. Apply Gaussian Blur. Then position it beneath the original layer and reduce opacity.
Fine-Tuning and Refinement
Zoom in and check edge quality. Clean up any rough selections using a small brush on layer masks. This attention to detail separates amateur from professional work.
Add subtle color variations using adjustment layers with masks. Apply different color grades to different areas. This guides the viewer’s eye through the composition.
Create a vignette effect using a Curves adjustment. Mask the center and darken the edges. This draws focus toward the composition’s center.
Final Touches and Export
Group related layers to organize your document. Name groups clearly. Future you will appreciate this organization when making revisions.
Create a new layer at the top of the stack. Press Shift + Ctrl + Alt + E to stamp all visible layers. This creates a flattened copy while preserving your working layers.
Apply final sharpening to the stamped layer. Use Unsharp Mask or Smart Sharpen. For web images, sharpen at 100-150%. For print, use lower amounts around 50-75%.
The Bigger Picture
This tutorial demonstrates professional workflow techniques. Shape layers, smart objects, and adjustment layers form the foundation of non-destructive editing.
Most importantly, you learned to think in layers. Professional designers rarely flatten their work until the final export. Keeping elements separate allows unlimited revisions without quality loss.
Practice these techniques across different projects. The specific design doesn’t matter as much as understanding the underlying methods. Master these tools and you’ll work faster while producing better results.
Post Title: Photoshop Mixed Media Tutorial: 11 Essential Tips
Meta Description: [Photoshop](https://www.adobe.com/products/photoshop.html)’s most powerful features hide in plain sight. Most designers never move beyond basic layers and filters. But combining