Sharks cruising through New York City streets sounds impossible. But that’s exactly what makes it perfect for digital art.
This Photoshop tutorial transforms that wild concept into reality. You’ll composite multiple shark images with urban photography, blend them naturally into the scene, and add atmospheric effects that sell the illusion. Plus, the techniques work for any surreal photo manipulation project.
No advanced skills required. Just patience and willingness to experiment with layers.
Gather Your Source Images First
Before touching Photoshop, collect your materials. You’ll need high-resolution photos of sharks, New York City architecture, seagulls, and cloud textures.
Quality matters here. Low-resolution sharks won’t blend convincingly with crisp city photos. Look for images with similar lighting conditions. That saves hours of color correction later.
Stock photo sites work fine. But public domain resources like Unsplash or Pixabay offer free alternatives. Just verify licensing before using images commercially.
Set Up Your Canvas Properly
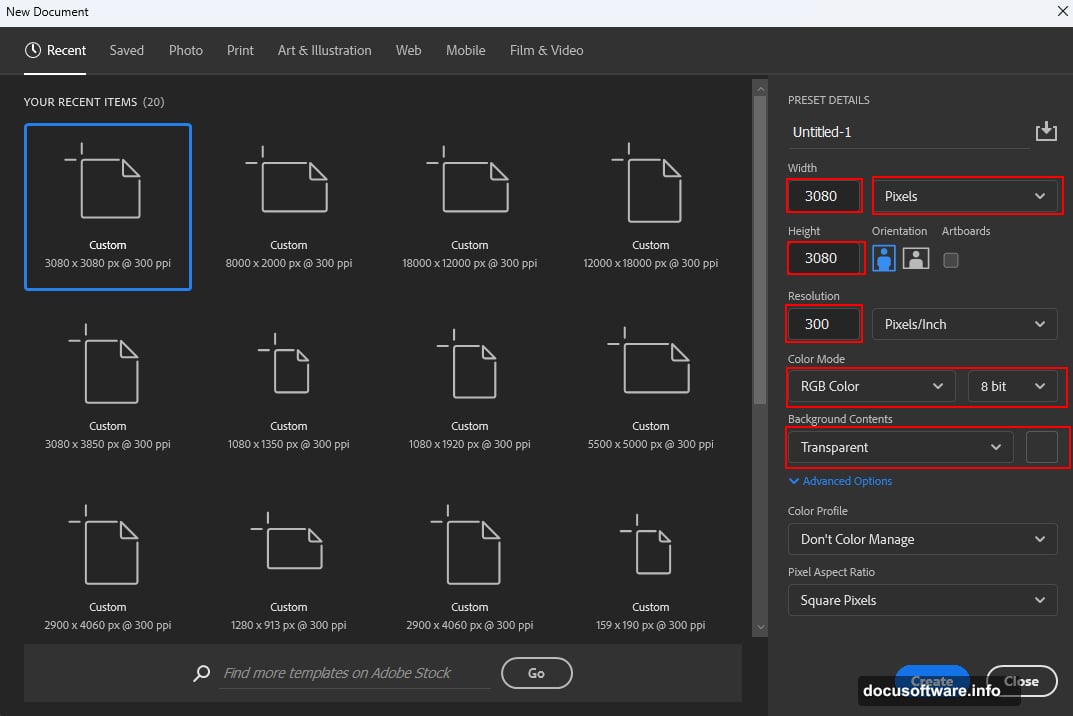
Start with the right document settings. Create a new file at 3080×3080 pixels with 300 DPI resolution. That gives you room to work without losing quality.
Choose RGB color mode for digital display. CMYK only matters for print projects. Set your background to transparent initially. You’ll add the city backdrop next.
Square dimensions simplify composition. However, feel free to adjust based on your final output needs. Instagram posts? Stick with square. Desktop wallpaper? Go wider.
Place and Position the City Background
Import your New York City photo using File > Place. This treats it as a Smart Object, preserving quality through transformations.
Use Free Transform (Ctrl/Cmd + T) to scale and position the image. Hold Alt + Shift while dragging corners to maintain aspect ratio. Center the most dramatic buildings in your frame.
Don’t worry about perfect positioning yet. You’ll refine composition once sharks are added. Focus on getting the overall perspective right first.
Adjust Background Color and Tone
Add a Color Balance adjustment layer above your city photo. Push midtones slightly toward blue-cyan to create an underwater atmosphere.
Next comes a Hue/Saturation layer. Reduce saturation by 15-20% to desaturate the scene. Vibrant colors distract from the main subject. Muted tones feel more cohesive.
Finally, add a Gradient Map set to black-and-white. Change blend mode to Soft Light at 50% opacity. This adds subtle contrast without crushing details.
Extract Your First Shark
Open your shark image in a new document. Use the Lasso Tool (L) to roughly select around one shark. No need for pixel-perfect selection at this stage.
Copy your selection (Ctrl/Cmd + C) and paste it into your main composition (Ctrl/Cmd + V). Scale it down significantly with Free Transform. Sharks should look massive but still proportional to buildings.
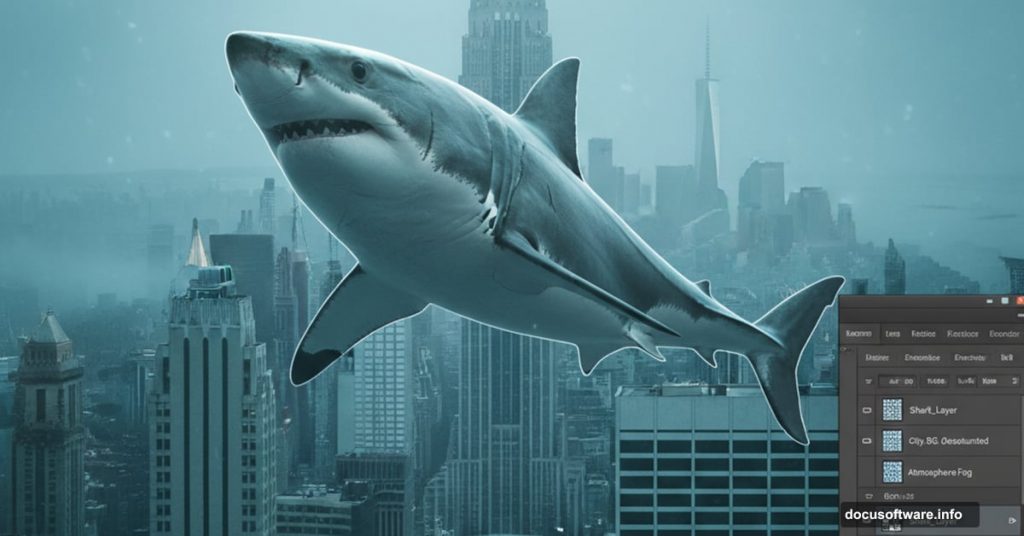
Position the first shark between buildings at street level. This establishes your impossible reality. The shark swims where cars should drive.
Add Multiple Sharks at Different Depths
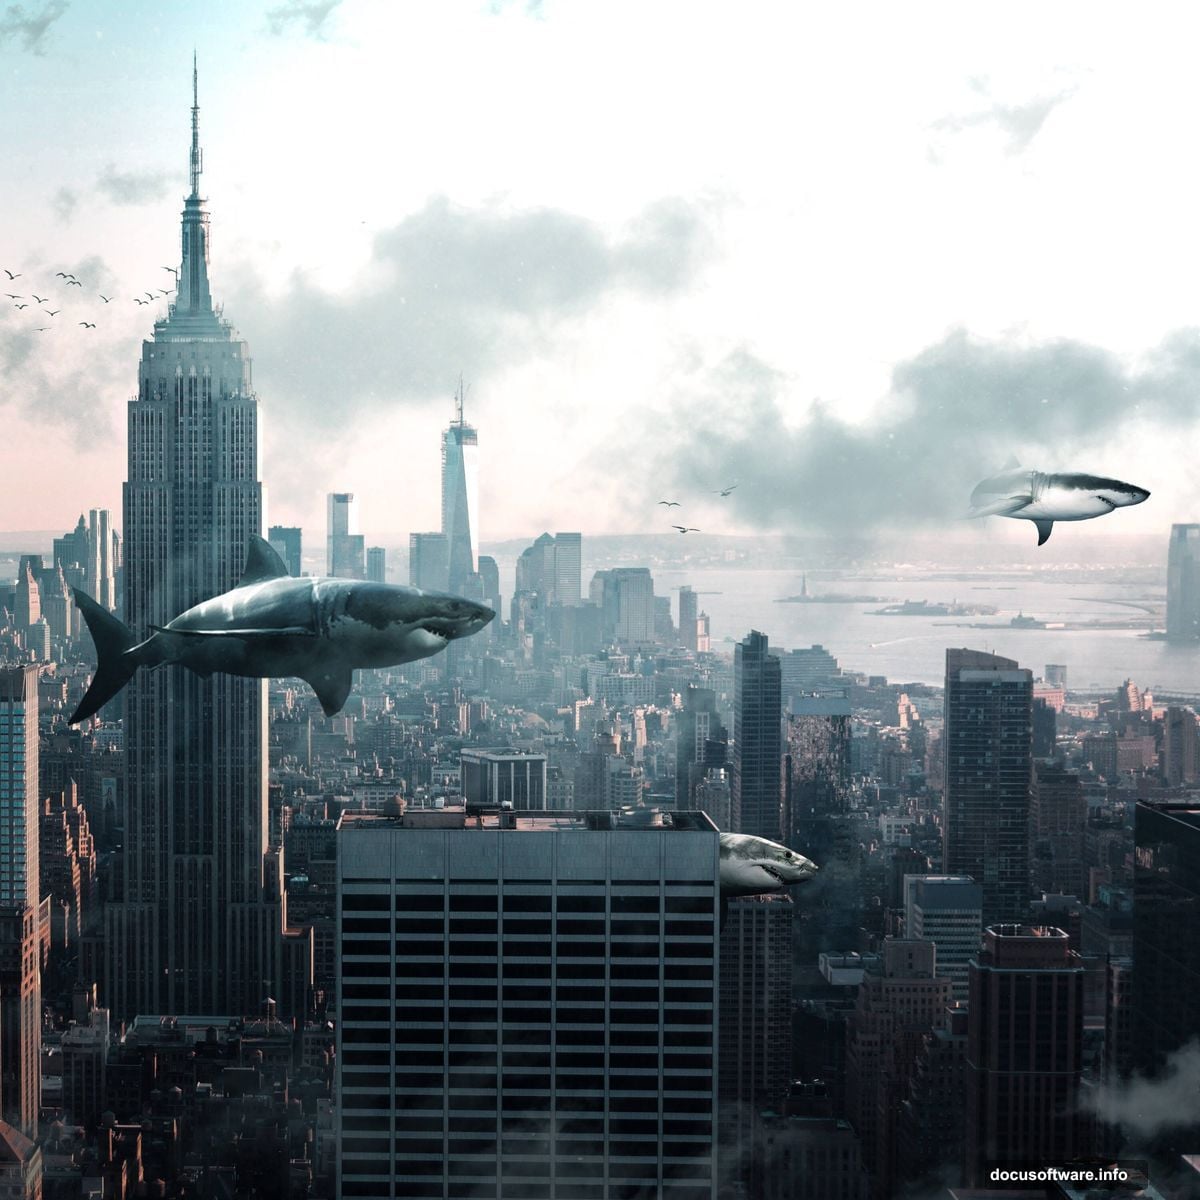
Repeat the extraction process for two more sharks. Vary their sizes to create depth perception. Smaller sharks appear farther away. Larger ones dominate the foreground.
Position them at different heights and angles. One might emerge from behind a skyscraper. Another could swim directly overhead. Avoid perfectly horizontal alignments. Nature isn’t that organized.
Create layer masks for each shark. Use a soft round brush with black foreground color to blend edges where sharks overlap buildings. This sells the illusion that buildings partially obscure the sharks.
Refine Shark Integration with Shadows
Sharks floating in air need shadows on buildings below. Create a new layer set to Multiply blend mode beneath each shark layer.
Use a large soft brush with dark blue-gray color. Paint shadows on building facades where sharks would block sunlight. Keep shadows subtle. Overly dark shadows look artificial.
Blur these shadow layers slightly with Gaussian Blur (Filter > Blur > Gaussian Blur). Set radius around 15-20 pixels. Sharp-edged shadows scream “fake.”
Match Shark Colors to Scene Atmosphere
Each shark needs color adjustment to match your blue-tinted cityscape. Add Hue/Saturation adjustment layers clipped to individual shark layers.
Shift hues slightly toward blue. Reduce saturation by 10-15%. This makes sharks feel part of the same environment rather than cut-and-paste additions.
Also add Curves adjustment layers clipped to sharks. Lift shadows slightly and pull down highlights. This reduces contrast, making sharks appear affected by atmospheric haze like distant buildings.
Add Atmospheric Perspective with Haze
Distant objects appear lighter and less detailed due to atmospheric perspective. Replicate this effect on your background shark.
Create a new layer above your furthest shark set to Screen blend mode. Use a large soft white brush at low opacity (20-30%). Gently paint over the distant shark to add haze.
This pushes the shark back in space visually. The effect should be subtle. Too much whitewash looks like fog instead of atmospheric depth.
Introduce Birds for Scale Reference

Flying seagulls provide scale reference and enhance the surreal atmosphere. Import seagull images or use bird brushes if available.
Scatter birds at various sizes throughout the composition. Smaller birds near distant buildings. Larger birds in the foreground. This reinforces depth perception.
Place some birds near sharks for dramatic scale comparison. A seagull next to a massive shark emphasizes how enormous these creatures are. Plus, it adds narrative tension to the scene.
Layer in Cloud Textures
Cloud textures add dimension to your sky and help blend everything together. Import cloud photos or use cloud brushes on new layers.
Set cloud layers to Soft Light or Overlay blend modes at reduced opacity (30-50%). This integrates clouds without making them overpowering.
Position clouds strategically to frame your main sharks. Clouds can also obscure awkward areas where elements don’t blend perfectly. They’re your creative problem-solvers.
Add Grain and Texture for Cohesion

Overlaying subtle texture unifies disparate photo sources. Create a new layer above all other elements.
Fill it with 50% gray (Edit > Fill > 50% Gray). Apply Filter > Noise > Add Noise at 3-5%. Set the layer to Overlay blend mode at 20-30% opacity.
This adds film grain that makes digital composites feel more organic. It’s especially effective for surreal scenes where you’re combining many different photos.
Apply Camera Raw for Final Color Grading
Flatten your image or create a stamp visible layer (Ctrl/Cmd + Alt + Shift + E). Then apply Camera Raw filter (Filter > Camera Raw Filter).
Adjust temperature slider toward blue for cooler tones. Increase clarity slightly to enhance midtone contrast. Pull down highlights and lift shadows for balanced exposure.
In the Color Mixer panel, shift blue hues toward cyan and reduce blue saturation slightly. This creates the underwater-meets-urban atmosphere you’re after. Play with split toning to add complementary color accents in highlights and shadows.
Export Your Final Composition

Save your layered PSD file first. Always keep an editable version for future tweaks.
Then export your final image. For web use, File > Export > Save for Web with JPEG quality around 80-90%. For print, save as high-quality JPEG or TIFF at full resolution.
Consider creating multiple versions at different aspect ratios. Square for Instagram, horizontal for desktop wallpaper, vertical for phone backgrounds.
Why This Tutorial Actually Teaches You
Most Photoshop tutorials just list steps without explaining principles. That’s frustrating when you want to apply techniques to different projects.
This shark composite teaches core concepts. Layer masking for blending. Color adjustment for atmospheric matching. Strategic use of depth cues. These skills transfer to any photo manipulation work.
Plus, surreal scenes are forgiving. Nobody knows what flying sharks “should” look like. So you can experiment freely without worrying about photorealism. That makes it perfect for developing your composite skills.
The real lesson isn’t about sharks. It’s about making impossible scenes feel believable through smart use of light, color, depth, and atmospheric effects.