Photo manipulation sounds intimidating. But it’s just combining images in creative ways.
This tutorial breaks down how to create a surreal fisherman scene using basic Photoshop tools. You’ll learn adjustment layers, masking, and blending techniques that work for any manipulation project. Plus, these skills transfer to countless other designs.
No advanced expertise required. Just patience and willingness to experiment.
Set Up Your Canvas Right
Start with proper dimensions. Your foundation determines everything else.
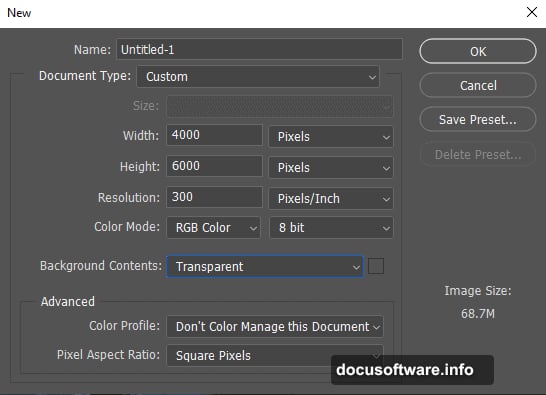
Go to File > New and input these settings:
- Width: 4000 pixels
- Height: 6000 pixels
- Resolution: 300 DPI
- Color Mode: RGB Color 8-bit
- Background: Transparent
Why these numbers? High resolution gives you flexibility later. You can scale down without losing quality. But scaling up from low resolution creates blurry results.
Transparent backgrounds let you work cleanly. No white edges sneaking into your final composition.
Place and Position Your Subject
Import your main subject using File > Place. This brings images in as smart objects.
Smart objects preserve original quality. You can resize them multiple times without degradation. Regular layers lose quality with each transformation.
For this fisherman scene, place your subject first. Then position him where he’ll sit in the final composition. Use the transform tool (Ctrl/Cmd + T) to resize and rotate as needed.
Master the Pen Tool for Clean Selections

The Pen Tool creates precise selections. It beats the lasso tool for complex shapes.
Select the Pen Tool (P) and click points around your subject’s edges. The tool creates paths between points. Take your time with curves and angles.
Once you’ve closed the path, right-click and choose Make Selection. Set Feather Radius to 0.5 pixels. This creates slightly soft edges that blend naturally.
Now you can delete backgrounds cleanly. Create a layer mask, set foreground to black (press D for default colors), and hit Alt + Delete. The background vanishes while preserving your subject.
Build Depth With Multiple Elements
Surreal scenes need multiple photo elements. This tutorial uses Earth, stars, and moon imagery.
Import each element separately using File > Place. This maintains editing flexibility. Position Earth behind your subject to create a massive backdrop.
Hold Alt + Shift while resizing to maintain proportions. Drag from corner handles to scale evenly.
The order matters. Background elements go below foreground subjects in your layers panel. This creates natural depth perception.
Blend Elements With Adjustment Layers
Adjustment layers make colors and tones match across different photos. They’re non-destructive, so you can tweak settings anytime.
For the Earth layer, add Hue/Saturation adjustment. Click the adjustment layer icon at the bottom of your layers panel. Reduce saturation slightly so the Earth doesn’t overpower your subject.
Then add a Curves adjustment. Darken the Earth by pulling the curve line downward. This creates nighttime atmosphere.
Each adjustment layer affects only the layers beneath it. You can organize adjustments in folders to control what they affect.
Create Seamless Transitions With Layer Masks
Layer masks hide parts of layers without deleting them. This technique saves you from permanent mistakes.
Select your stars layer and click the layer mask icon. Choose the Brush Tool (B) with these settings:
- Size: 400 pixels
- Hardness: 0%
- Foreground color: Black
Paint along the horizon line where stars meet Earth. The soft brush creates gradual transparency. Stars fade naturally into the background.
If you paint too much, switch foreground to white and paint it back. Layer masks give you endless experimentation without consequences.
Add Atmospheric Lighting Effects
Lighting sells the illusion. Your moon needs to glow convincingly.

Import the moon image and position it in your sky. Create a new layer beneath the moon. Use a soft white brush to paint glow around the moon’s edges.
Set this glow layer to Soft Light or Overlay blending mode. Reduce opacity until it looks natural, usually around 40-60%.
Then add a Curves adjustment to the moon itself. Brighten the highlights and slightly increase contrast. This makes it pop against the dark sky.
Create Realistic Water Reflections
Water reflections ground fantasy scenes in reality. They tell viewers’ brains this scene could exist.
Duplicate your subject layer. Flip it vertically using Edit > Transform > Flip Vertical. Position this flipped version below your subject to create a mirror image.
Add motion blur to the reflection using Filter > Blur > Motion Blur. Set the angle to match your water’s perspective. Distance around 20-30 pixels works for most scenes.
Reduce the reflection’s opacity to 30-40%. Water never reflects at full strength. Then add a layer mask and use a gradient to fade the reflection as it extends downward.

Add Water Ripples for Movement
Still water looks fake. Ripples bring life to your scene.
Find a water ripple texture or photograph. Import it and position where your subject meets the water. Use the transform tool to adjust perspective.
Set the ripple layer’s blending mode to Soft Light or Overlay. This lets the ripples interact with layers beneath. Reduce opacity until ripples look subtle, not overpowering.
The key is restraint. Real water ripples are often barely visible. They suggest movement without screaming for attention.
Fine-Tune With Color Grading
Color grading unifies your composition. It makes separate photos feel like one cohesive image.

Create a Color Balance adjustment layer at the very top of your layers stack. Add slight blue to shadows for nighttime coolness. Add subtle yellow to highlights for moonlight warmth.
Then add a final Curves adjustment. Create an S-curve by pulling highlights up slightly and shadows down slightly. This adds contrast and punch to the entire image.
Keep adjustments subtle. You’re enhancing mood, not creating Instagram filters.
Export for Maximum Quality
Save your work as a PSD file first. This preserves all layers for future edits.
For sharing online, export as JPEG. Go to File > Export > Save for Web. Choose JPEG quality around 80-90%. This balances file size with visual quality.
For print work, export as TIFF or high-quality JPEG at full resolution. Prints need more data than screens.
Always keep your layered PSD. You’ll want to make changes later. Everyone does.