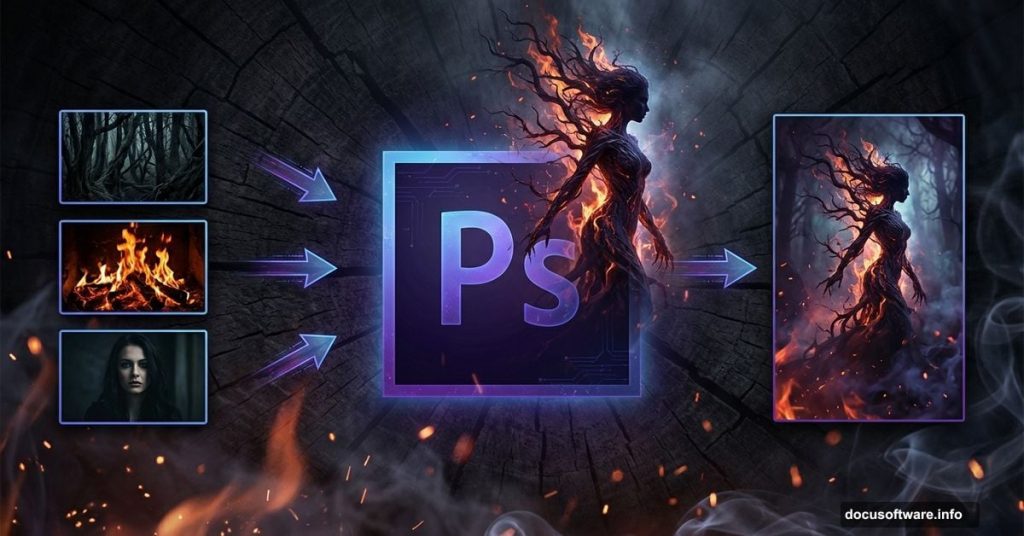
Want to create something genuinely unsettling in Photoshop? This tutorial shows you how.
You’ll build a haunting abstract scene featuring a flame-wrapped tree woman. Plus, you’ll learn professional manipulation techniques that work for any dark fantasy project. The process covers lighting effects, texture blending, and seamless photo compositing.
Best part? These techniques work beyond this specific project. Use them for album covers, book illustrations, or portfolio pieces that demand attention.
What You’ll Actually Learn
This isn’t just about copying steps. You’ll master skills that apply to dozens of future projects.
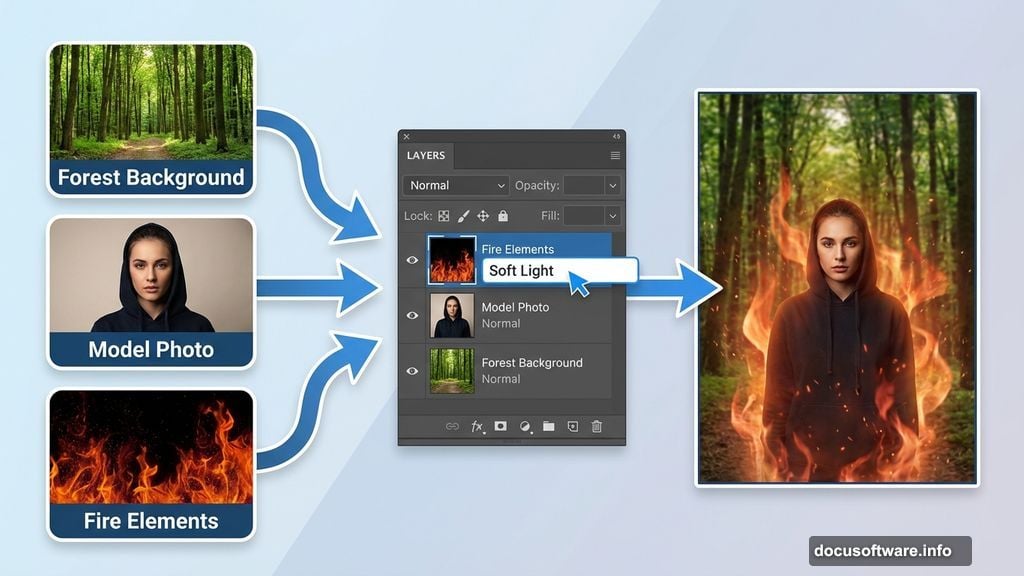
First, you’ll learn how to blend multiple photos seamlessly. The tutorial uses forest backgrounds, fire elements, and a model photo. But the blending techniques work for any combination of images.
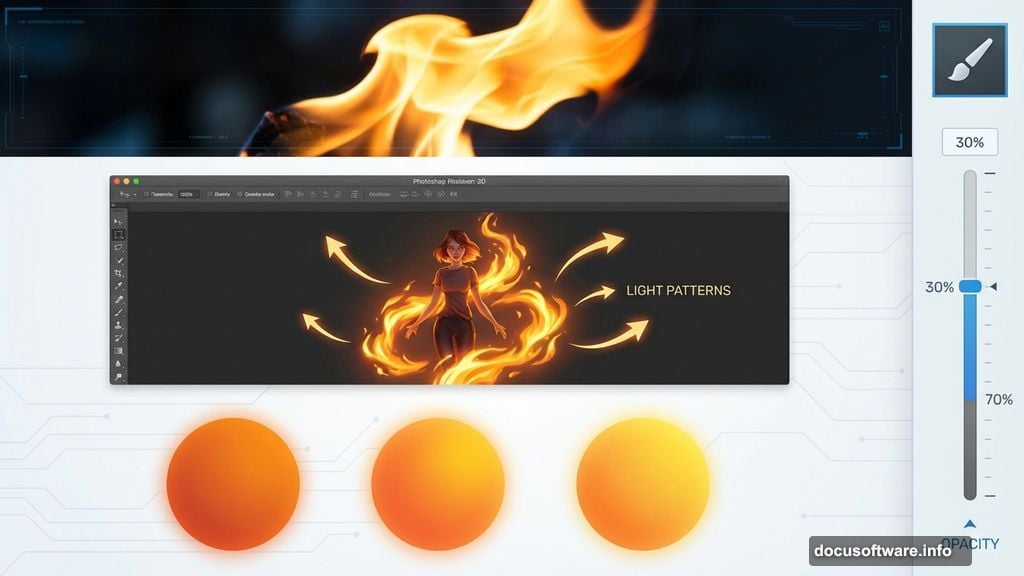
Second, you’ll discover how to create realistic lighting effects. Fire casts specific light patterns. Once you understand the principles, you can simulate any light source convincingly.
Third, you’ll practice texture application. Textures add depth and atmosphere. The tutorial shows exactly where and how to apply them for maximum impact.
Gathering Your Resources
Before starting, collect your source images. You’ll need several specific elements.
A model photo forms your central figure. Choose one with clear lighting and good contrast. The original tutorial uses a specific stock photo, but any similar image works fine.
Forest backgrounds create your environment. Look for misty or atmospheric shots. They blend more naturally than crisp, sharp landscapes.
Fire and flame elements add drama. Stock fire photos work great. Just ensure they’re high resolution for best results.
Finally, grab texture images. Wood, branches, skulls, and organic textures all contribute to the dark aesthetic. DeviantART and free stock sites offer tons of options.
Building the Foundation
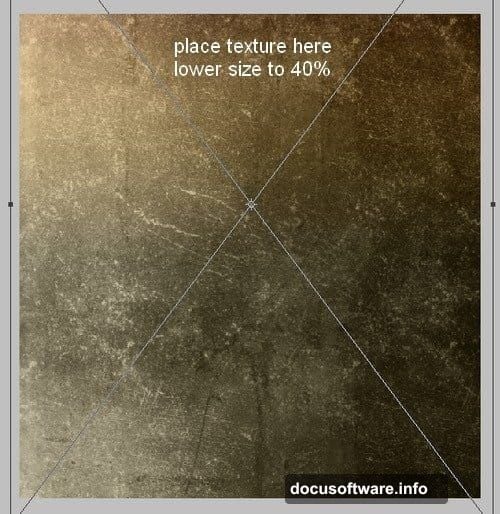
Start with a blank 1000×1050 pixel canvas. White background works fine for now.
Drop your base texture onto the canvas. Scale it down to about 40% using Free Transform (Ctrl+T). This texture forms your atmospheric foundation.
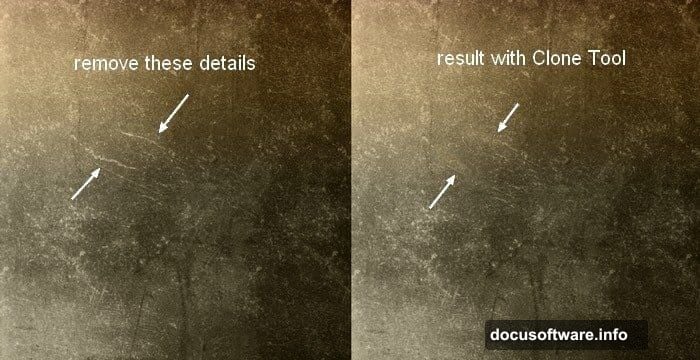
However, most textures need cleanup. Create a new layer and grab the Clone Stamp tool. Remove distracting elements or blemishes. Take your time here. A clean base makes everything easier later.
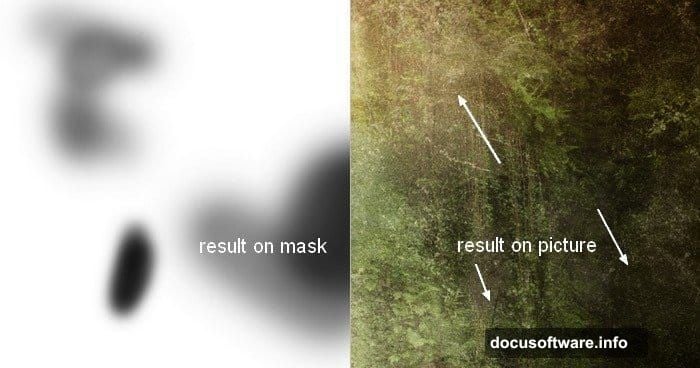
Now place your forest background over the texture. Here’s the trick: change the blend mode to Soft Light at 100%. This creates an ethereal, ghostly effect instantly.
But don’t stop there. Add a layer mask to the forest layer. Use a soft black brush at 30-70% opacity to blur edges and create depth. Focus on keeping central areas sharp while fading the periphery.
Creating Atmospheric Depth
Duplicate your forest layer and flip it horizontally (Edit > Transform > Flip Horizontal). Position it on the opposite side.
This mirror technique adds symmetry and fills your composition. But raw mirroring looks obvious. Use layer masks to blend the edges seamlessly. Remove any telltale repetition.
Next, group your forest layers together (Ctrl+G). This keeps your workspace organized. More importantly, change the group blend mode from Pass Through to Soft Light 100%.
Why does this matter? When you adjust layers inside a group with Soft Light mode, those adjustments only affect the grouped layers. This gives you precise control.
Add a Curves adjustment layer inside your forest group. Drag the curve down slightly to darken the scene. Then use the layer mask to control where darkening appears. Paint with black on the mask to protect brighter areas.
Adjusting Background Lighting
Time to control your overall lighting mood. Create a Curves adjustment layer above your forest group.
Pull the curve down to darken your entire background. This creates contrast for your main subject later. But blanket darkening looks flat.
So grab a soft black brush on the Curves layer mask. Paint over areas where you want more light. Central areas typically need more brightness to guide viewer attention.
Create a second Curves layer for additional control. Layer multiple subtle adjustments instead of one extreme change. This approach looks more natural and gives you flexibility.
Positioning Your Main Subject
Extract your model from her background. Any method works—pen tool, quick selection, or Select and Mask. Just ensure clean edges around hair and details.
Place her at the top center of your composition. You don’t need her full body for this effect. Crop at the waist or wherever feels right.
Scale her appropriately using Free Transform. She should dominate the composition but still feel part of the environment. Around 60-70% of the canvas height usually works well.
Blending Fire and Organic Elements
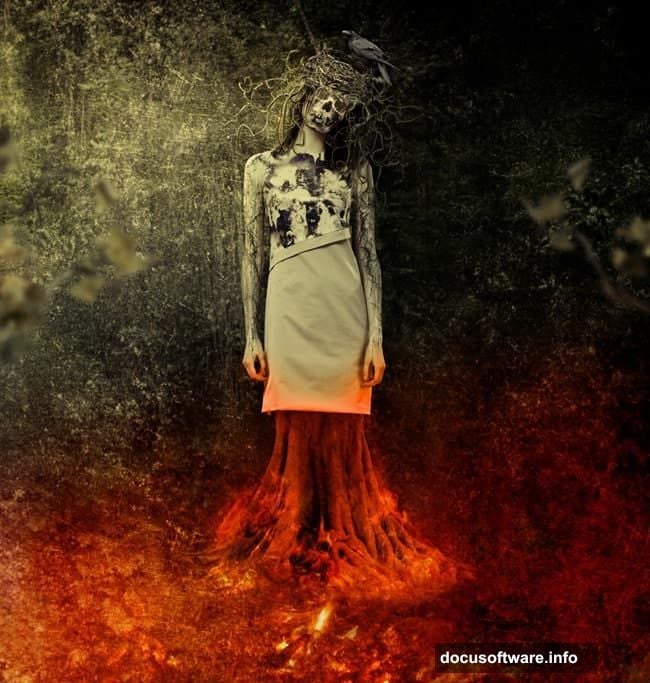
This is where your scene transforms from simple composite to dark art. Add your fire elements around the model.
Place fire photos and change their blend mode to Screen or Lighten. These modes eliminate black backgrounds automatically. Position flames to appear growing from or wrapping around your subject.
Use layer masks to blend fire naturally. Flames should fade at edges, not cut off abruptly. Vary your brush opacity for realistic falloff.
Add tree branches next. These create structure and frame your composition. Position them to interact with your model—growing from her arms, wrapping around her body, or extending from her hair.
For branches, try Multiply or Darken blend modes. Adjust opacity until they feel integrated rather than pasted on top.
Adding Texture and Details
Textures elevate your piece from good to professional. Apply them strategically, not everywhere.
Wood textures work great on the model’s skin. Use Overlay or Soft Light blend modes at 30-50% opacity. This creates an organic, tree-like appearance without completely obscuring her features.
Add smaller details like crows, nests, or vines. Place them thoughtfully to guide the eye through your composition. Every element should have a purpose.
Use the same blending and masking techniques. Layer masks remain your best tool for seamless integration.
Fine-Tuning Your Lighting
Your fire elements should cast light. But raw fire photos don’t automatically illuminate surrounding areas.
Create new layers set to Screen or Linear Dodge blend modes. Use soft orange or yellow brushes to paint light falloff around flames. This simulates actual fire glow.
Keep the light subtle. Too much looks carky and fake. Reference real fire photos to understand how light behaves.
Add highlights to your model where fire would hit her. A soft brush on a new layer with Linear Dodge mode works perfectly. Focus on the side facing your primary fire sources.
Creating Color Harmony
Your various elements probably have different color tones. Unify them with selective color adjustments.
Add a Color Balance adjustment layer. Push shadows toward blue or cyan for a cooler, more ominous mood. Add warmth to highlights with yellow and red.
A Photo Filter adjustment layer also works well. Orange or sepia filters create warmth. Blue filters add coldness and distance.
However, don’t overdo color grading. Subtlety creates atmosphere. Heavy-handed adjustments scream amateur work.
Final Polish and Export
Zoom out and evaluate your composition with fresh eyes. Look for areas that feel unfinished or disconnected.
Add a final Curves layer for overall contrast. A subtle S-curve usually improves punch without destroying details.
Sharpen strategically using a High Pass filter or Smart Sharpen. Focus on your main subject. Background elements can stay slightly soft for depth.
Finally, flatten your image if needed and export. For web use, save as JPEG at 80-90% quality. For print, keep it as TIFF or high-quality JPEG.
Beyond This Project
These techniques extend far beyond one dark fantasy piece. Master them and you can create any atmospheric composite.
The key principles remain constant. Blend modes control how layers interact. Layer masks create seamless integration. Adjustment layers give you flexible, non-destructive control.
Plus, lighting makes or breaks realism. Always consider your light sources. Make sure shadows and highlights follow consistent logic.
Practice these skills on different projects. Try sci-fi scenes, surreal portraits, or product mockups. The same core techniques apply across genres.
Most importantly, don’t just copy tutorials step-by-step. Understand why each technique works. Then adapt them to your own creative vision. That’s how you develop a unique style instead of just recreating others’ work.