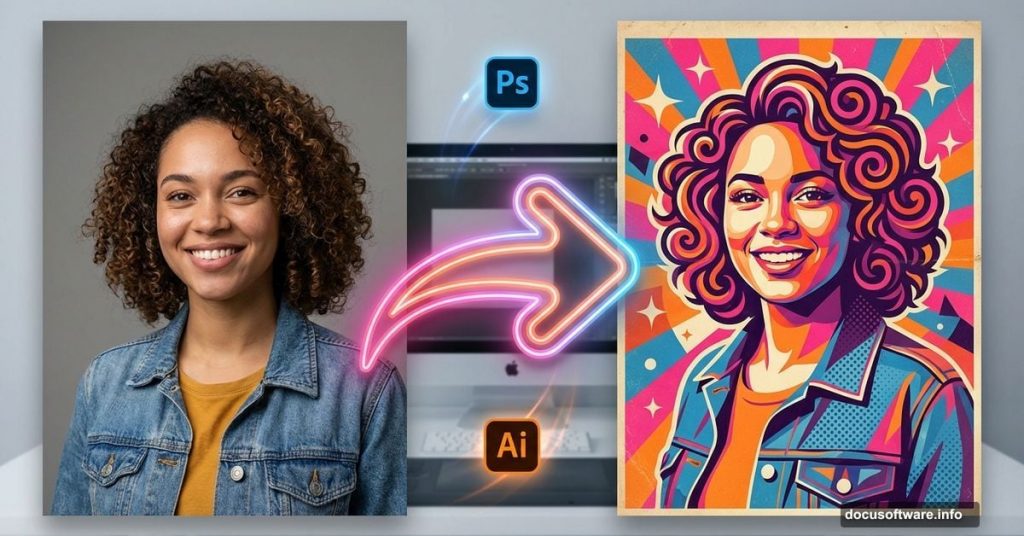
Got a photo you want to transform into eye-catching retro artwork? This technique combines Photoshop‘s selection tools with Illustrator‘s vector magic to create vibrant, vintage-style posters.
You’ll need basic Illustrator experience to follow along. But don’t worry. I’ll break down each step so you can recreate this effect and adapt it for your own projects.
What You’ll Need
Before diving in, grab these essential resources. You’ll need a model photo with soft lighting and minimal shadows. Plus, stock images of a galaxy background and an umbrella work great for this style.
The technique works best with portraits that have plain backgrounds. That makes selection much easier. Choose images with neutral tones that won’t fight against the colorful retro effects you’ll add later.
Setting Up Your Canvas
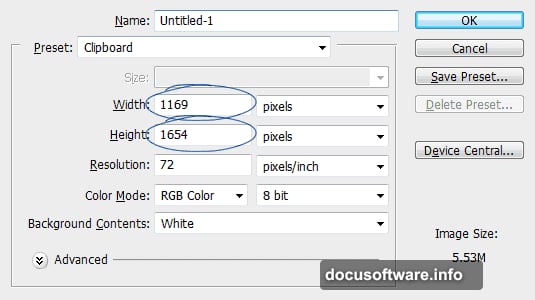
Start with a canvas size around 1169×1654 pixels. However, feel free to adjust based on your needs. The aspect ratio matters more than exact dimensions.
Replace that stark white background with something neutral. Create a new layer and fill it with #e0ddd8. This warm, off-white tone gives you a better foundation for judging colors as you work.
Think of it like priming a canvas before painting. That neutral base helps your eyes see the true colors you’re adding.
Isolating Your Subject
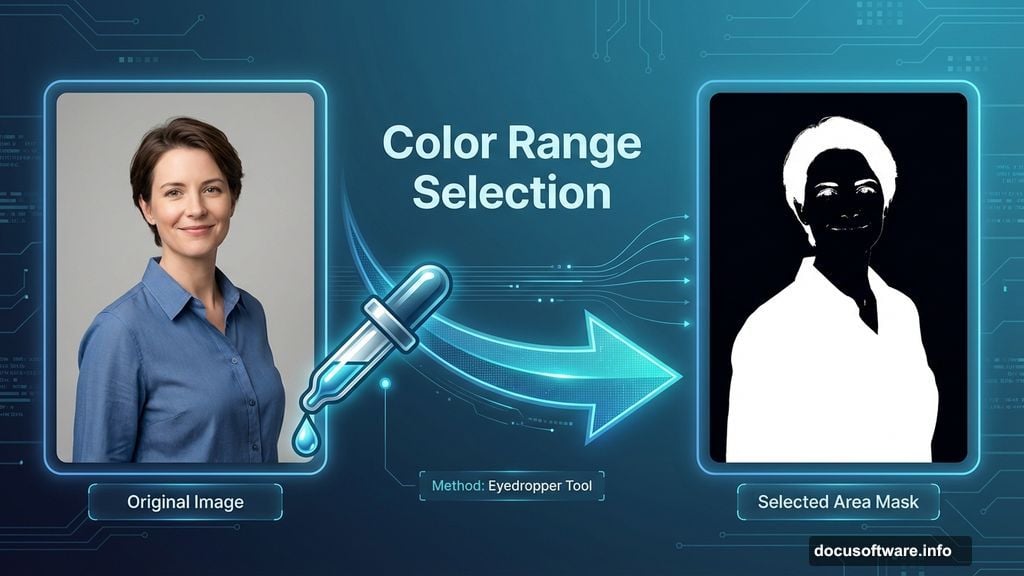
Here’s where Photoshop’s Color Range command shines. Navigate to Select > Color Range and sample the background color with the eyedropper. The command highlights everything matching that color.
You’ll see a black and white preview showing your selection. White areas represent selected pixels. Some gray areas might appear on corners or near your subject. That’s normal. We’ll clean those up next.
Press OK to confirm. Then invert your selection with Ctrl + Shift + I. Now you’re selecting the model instead of the background.
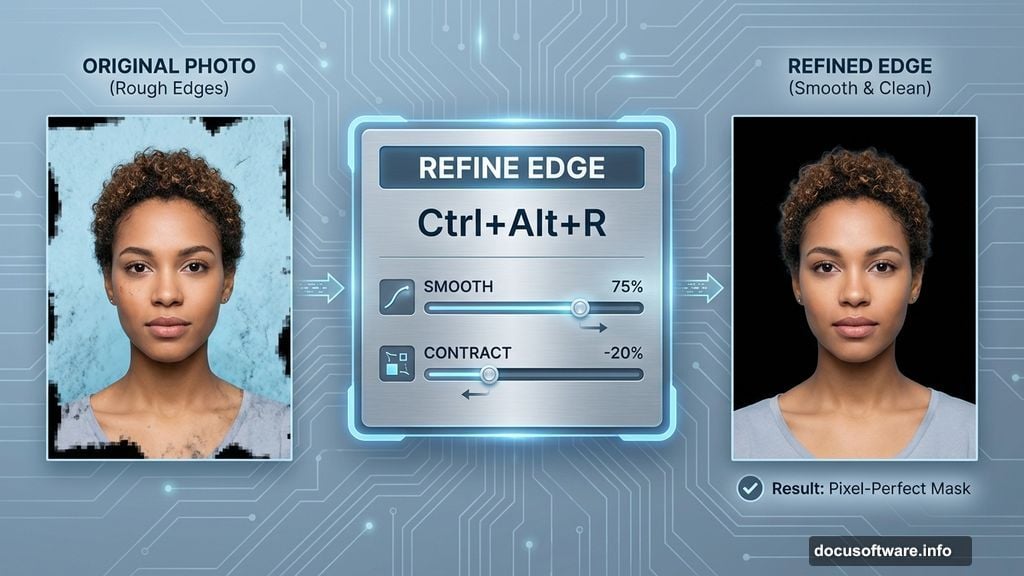
Refining Your Selection
Time to polish that selection using Refine Edge. Press Ctrl + Alt + R to open this powerful tool. It’s basically a one-stop selection cleanup shop.
Switch the preview to “On Black” so you can see exactly how your edges look. Slightly smooth the selection and contract it just a bit. This removes any background pixels clinging to the edges.
The Refine Edge command handles tricky areas like hair much better than manual selection. It analyzes edge pixels and makes smart decisions about what belongs in your selection.
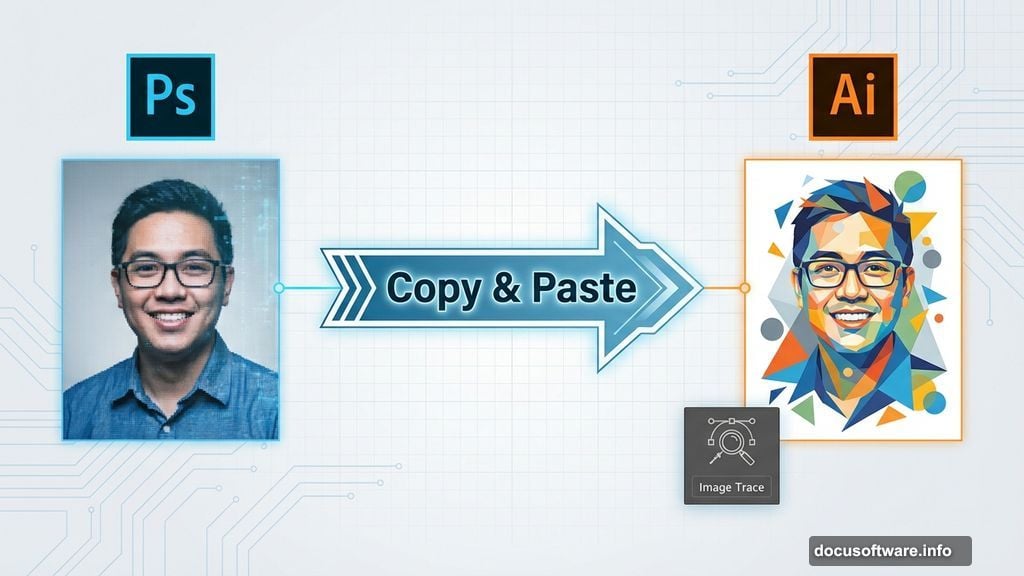
Creating Vector Contours in Illustrator
Now comes the fun part. Copy your selected model and paste it into Adobe Illustrator. This is where you’ll trace those distinctive vector shapes that define retro poster art.
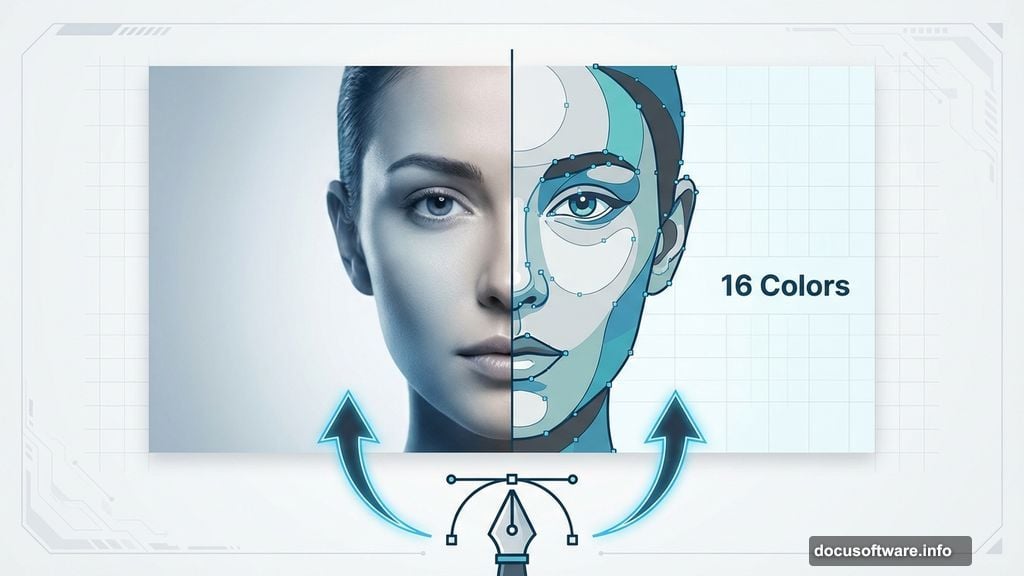
Use Illustrator’s Image Trace feature to convert your photo into vector paths. Experiment with the preset options. The “16 Colors” setting often produces great results for this style.
However, you’ll want to manually trace certain areas for more control. The Pen Tool becomes your best friend here. Trace around major features like the face, hair, and clothing with smooth, simplified paths.
Building Colorful Shapes
Retro posters use bold, flat colors instead of photographic detail. Select different traced areas and fill them with vibrant hues. Don’t worry about perfect realism. That’s not the goal.
Choose colors that complement each other but create strong contrast. Think bright oranges, deep purples, hot pinks, and electric blues. The more unexpected your color choices, the more retro the vibe.
Moreover, simplify your shapes as you go. Combine smaller details into larger color blocks. Retro posters sacrifice fine detail for bold visual impact.
Adding Background Elements
Import your galaxy stock image into the background. Place it behind your traced figure. Adjust the opacity so it doesn’t overpower your main subject.
Next, add that umbrella or other props you’ve chosen. Use the same Image Trace technique to convert them to vectors. Then fill with colors that tie into your overall palette.
Layer these elements thoughtfully. Background items should support your main subject without competing for attention. Think of building depth through overlapping shapes.
Creating Texture and Grain
Perfect vector shapes look too clean for authentic retro style. Head back to Photoshop to add texture. Create a new layer and fill it with 50% gray. Then apply Filter > Noise > Add Noise.

Set the noise to around 10-15% with Gaussian distribution. Change the layer blend mode to Overlay or Soft Light. This adds subtle grain that mimics vintage printing techniques.
You can also add paper textures or halftone patterns. These imperfections sell the retro aesthetic. Real posters from the 60s and 70s had printing artifacts. Your digital version should reference that history.
Fine-Tuning Colors and Contrast
Adjustment layers give you non-destructive color control. Add a Curves adjustment to boost contrast. Push the highlights brighter and the shadows deeper.
Then try a Hue/Saturation adjustment to shift your overall color temperature. Warming things up slightly often enhances the retro mood. But trust your eyes. There’s no single “correct” look.
Color Balance adjustments help too. Add a bit more cyan to shadows and yellow to highlights. This creates that slightly faded, sun-bleached quality vintage posters develop over time.
Adding Typography
Retro posters demand bold, geometric fonts. Think thick sans-serifs or stylized scripts. Place your text using Photoshop’s Type Tool. Don’t be shy about making it big.
Experiment with unusual placements. Overlap text with your subject. Rotate it at dramatic angles. Break the rules that modern design typically follows.
Color your text to contrast with the background but harmonize with your overall palette. White or cream text with dark outlines often pops nicely against busy backgrounds.
Final Polish
Step back and evaluate your composition. Are there any dead spaces that need filling? Could certain areas use more contrast or detail?
Add small decorative elements like stars, circles, or geometric patterns. These fill negative space and reinforce the playful retro vibe. Just don’t overdo it. Even busy retro designs need breathing room.
Finally, consider adding a subtle vignette. Darken the corners slightly to draw eyes toward the center. This finishing touch helps your poster feel complete and intentional.
Why This Technique Works
This method combines the best of both tools. Photoshop handles photos and texture brilliantly. Illustrator creates those crisp vector shapes impossible to achieve with pixels alone.
By bouncing between both programs, you gain precise control over every element. The workflow might seem complex at first. But after creating a few posters, it becomes second nature.
Plus, you can adapt this technique endlessly. Try different color schemes. Experiment with various photo subjects. Each iteration teaches you something new about color, composition, and style.
The retro aesthetic remains popular because it’s visually striking and nostalgic. These posters grab attention in ways realistic photos often can’t. So master this technique and you’ll have a valuable creative skill for both personal projects and client work.