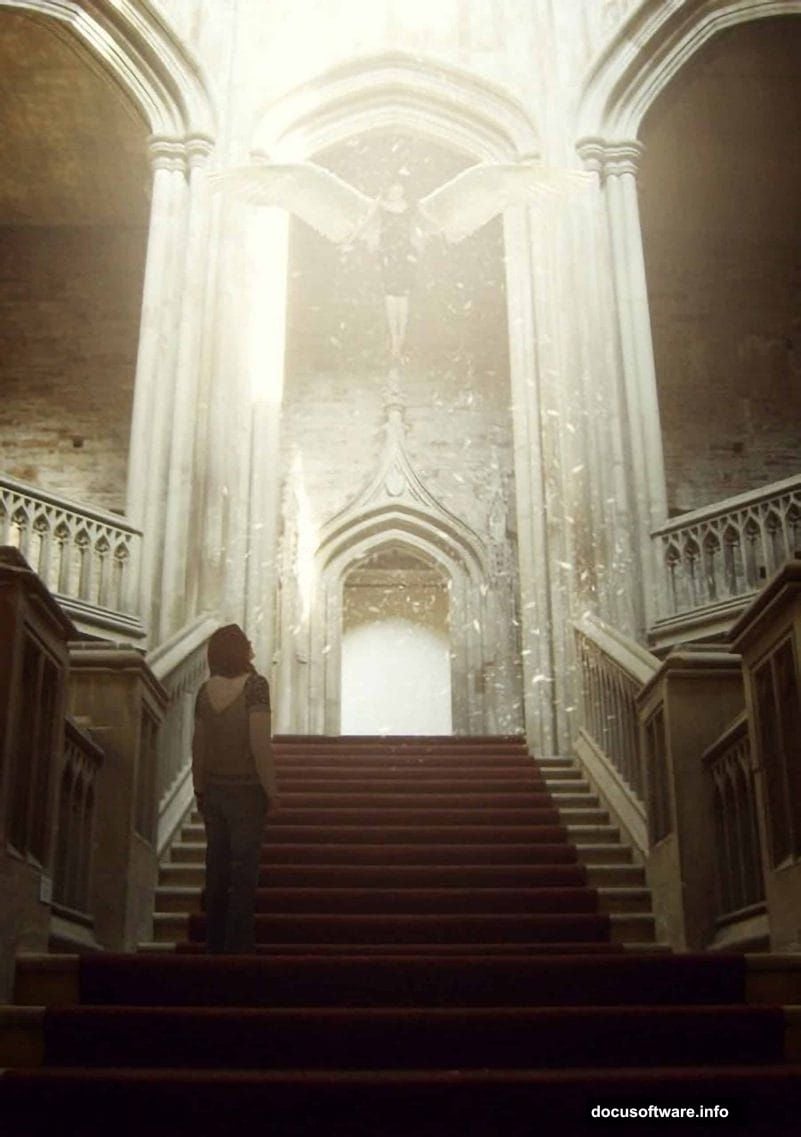
Want to create stunning angel imagery in Photoshop? This mystical photo manipulation technique transforms ordinary stock photos into ethereal heavenly scenes.
Most angel tutorials fall flat because the lighting feels fake. But this method shows you how to blend multiple images, create convincing celestial light, and add professional soft-focus effects that make the final result look genuinely otherworldly.
Let’s break down the core techniques that make this work.
Set Up Your Canvas for Maximum Detail
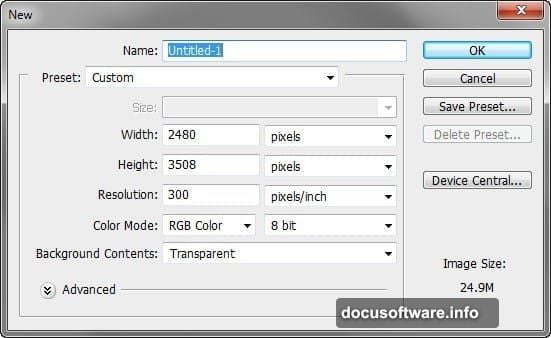
First, create a high-resolution workspace. Go to File > New and punch in these settings:
- Width: 2480 pixels
- Height: 3508 pixels
- Resolution: 300 pixels/inch
- Color Mode: RGB Color
- Background: Transparent
Why these dimensions? This gives you print-quality output at roughly 8×11 inches. Plus, working at higher resolution means you can scale down later without losing detail. That matters when you’re adding subtle lighting effects.
The transparent background is crucial too. It lets you see exactly how your composited elements interact without a distracting backdrop.
Build the Castle Interior Foundation
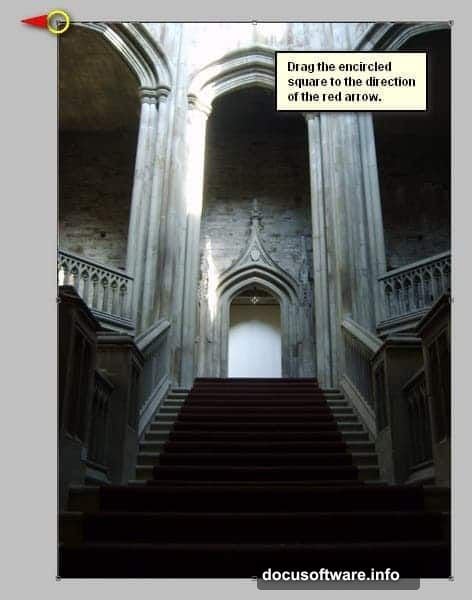
Now grab your castle stairway stock image. Press V to activate the Move Tool, then drag the image onto your canvas.
Here’s where beginners mess up. Don’t just plop the image down and hope it fits. Instead, position it strategically so the perspective lines guide the viewer’s eye upward toward where your angel will appear.
Next, press Ctrl/Cmd + T to activate Transform. Drag the corner handles to resize the image until it fills your canvas. But here’s the trick: right-click and select Distort from the contextual menu. This lets you adjust individual corners independently to correct perspective issues.
Drag the corners until the stairway lines feel natural and lead the eye upward. That creates the visual flow your composition needs.
Fix the Lighting Before Adding Elements
Raw stock photos rarely have perfect lighting. So before you add anything else, adjust the castle image’s exposure.
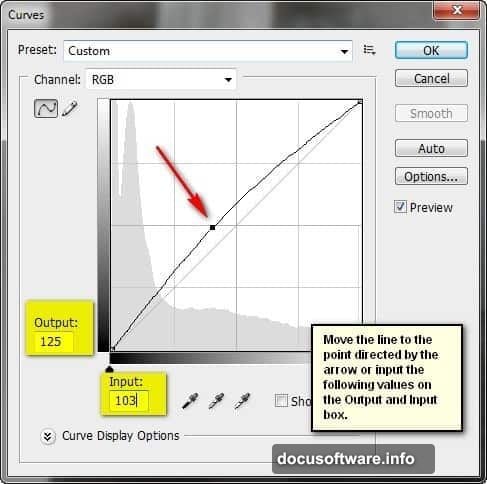
Select the layer and press Ctrl/Cmd + M to open Curves. Drag the curve line until your Output reads 125 and Input shows 103. This brightens midtones without blowing out highlights.
Why adjust lighting first? Because every element you add later needs to match this base lighting. If you skip this step, your angel will look pasted on rather than integrated into the scene.
Plus, brightening the base image now gives you headroom to add dramatic light rays later without oversaturating the entire composition.
Layer Organization Saves Hours Later
Before moving forward, group everything you’ve done so far. Select all your layers and press Ctrl/Cmd + G. Rename this group “Background.”
This seems tedious now. But trust me, when you’re juggling 20+ layers for wings, light rays, and effects, clear organization prevents disasters. You’ll thank yourself when you need to adjust that castle lighting three steps from now.
Add Your Angel Figure with Proper Positioning
Open your angel stock image. Use the Move Tool (V) to drag it onto your main canvas.
Position matters more than you think here. Place the figure so it appears to be rising from the stairway rather than floating randomly in space. The feet should align roughly with the top steps, creating that “lifting off” moment.

Press Ctrl/Cmd + T again to resize. But here’s the critical part: the angel should be smaller than you initially think. Oversized figures destroy the sense of scale and depth. Aim for proportions that feel natural relative to the castle architecture.
Blend the Figure Using Layer Masks
Never use the eraser tool for blending. Ever. Instead, add a layer mask to your angel layer by clicking the mask icon at the bottom of the Layers panel.
Grab a soft brush (B), set the foreground color to black, and paint over the edges where the angel meets the background. This creates smooth transitions rather than harsh cutouts.
Vary your brush opacity between 30-50%. Multiple light passes give you better control than one heavy stroke. Focus especially on the feet and lower body where the figure transitions from solid to ascending.
Attach Wings That Look Naturally Connected
Import your angel wings stock image. Position the wings behind your figure layer so the attachment point sits between the shoulder blades.
Use Transform (Ctrl/Cmd + T) to rotate the wings into a realistic angle. Wings shouldn’t point straight up or droop down. Instead, angle them slightly upward and outward, like a bird mid-flight. That conveys the rising motion you’re after.
Add a layer mask to the wings too. Blend the connection point where wings meet the back using the same soft brush technique. This makes the wings appear to genuinely emerge from the figure rather than hovering behind it.
Create Heavenly Light Rays That Feel Real
Here’s where the magic happens. Create a new layer above everything else. Grab the Brush Tool and select a soft, large brush (around 800-1000px).
Set your foreground color to white. Click once near the top center of your canvas where the “heavenly light” source would be. Don’t drag or paint – just one single click creates a soft glow.
Now lower that layer’s opacity to around 40-60%. This creates the base ambient light. But real light isn’t just a soft blob. So create another layer and use a smaller, harder brush to paint thin light rays emanating downward from your light source.
Vary the ray lengths and intensities. Some should be bright and obvious, others barely visible. This variation makes the light feel atmospheric rather than artificial.
Set these ray layers to Screen or Linear Dodge blend mode. Suddenly your light interacts with the underlying layers instead of just sitting on top of them.
Add Atmospheric Particles for Depth
Real heavenly scenes have dust particles, light particles, or floating elements. Download a snowflake or particle brush pack. Create a new layer and scatter particles throughout the scene, concentrating them near the light source.
Key technique: use different particle sizes. Large particles near the camera (bottom of frame) and smaller ones near the top create depth through atmospheric perspective.
Lower the particle layer opacity to around 20-30%. Particles should enhance the atmosphere, not dominate it. You want viewers to sense them rather than stare at them.
Balance Your Composition with Curves
Now that all elements are in place, the overall image probably feels unbalanced. Some areas might be too bright, others too dark.
Create a Curves adjustment layer above everything. Gently adjust the curve to balance highlights and shadows. This unifies all your separate elements into one cohesive image.
But here’s the trick: don’t make everything the same brightness. Keep the light source area bright and the bottom darker. That tonal variation guides the eye upward toward the angel, which is exactly what you want.
Apply Soft-Focus for That Dreamy Quality
Mystical images need that slightly soft, dreamy quality. But don’t just apply Gaussian Blur to everything – that looks amateurish.
Instead, create a merged copy of all visible layers by pressing Ctrl+Alt+Shift+E (Cmd+Option+Shift+E on Mac). This creates a new layer containing everything flattened.
Go to Filter > Blur > Gaussian Blur and apply a radius of about 15-20 pixels. This will look terrible at first. Now lower the layer opacity to just 20-25% and set the blend mode to Screen.
Suddenly you have that soft, glowing quality that makes the image feel ethereal without losing important details. The blend mode and low opacity let the sharp details underneath shine through while adding just enough softness.
Fine-Tune Colors for Cohesion
Almost done. But all your stock images probably have slightly different color tones. That breaks the illusion.
Add a Color Balance adjustment layer at the top of your layer stack. Push the midtones slightly toward cyan and blue to create that cool, heavenly color palette. Real heavenly light in art typically skews cool rather than warm.
Then add a Hue/Saturation adjustment layer. Lower the saturation by about 10-15%. Oversaturated images feel cartoonish. Slightly desaturated images feel more mystical and refined.
Export for Maximum Quality
When you’re satisfied, it’s time to export. Go to File > Save As and choose TIFF format if you plan to print this. TIFF preserves maximum quality without compression artifacts.

For web use, save as PNG to maintain the transparent background if needed, or JPEG at 90% quality for solid backgrounds. But keep that original PSD file with all layers intact. You’ll want to tweak things later, trust me.
Common Mistakes That Ruin Angel Manipulations
The biggest error? Harsh edges on your composited elements. Every element needs careful masking and edge blending. Spend time on this step. It’s the difference between amateur and professional work.
Second mistake: ignoring light direction. Your light rays, figure highlights, and shadow directions must all agree on where the light comes from. Inconsistent lighting screams “fake composite.”
Third issue: over-processing. Beginners tend to crank every adjustment to 100%. Subtlety wins in photo manipulation. Most adjustments should sit around 20-40% intensity, not maxed out.
Why This Technique Works for Other Projects
These same principles apply beyond angel scenes. Any fantasy or supernatural photo manipulation needs believable light, careful blending, and atmospheric effects.
The soft-focus technique works great for dream sequences, memories, or flashback effects in visual storytelling. The light ray method adapts perfectly to sci-fi portals, magical effects, or divine intervention scenes.
Master these core skills and you can tackle basically any advanced photo manipulation project that requires compositing multiple elements into one convincing scene.