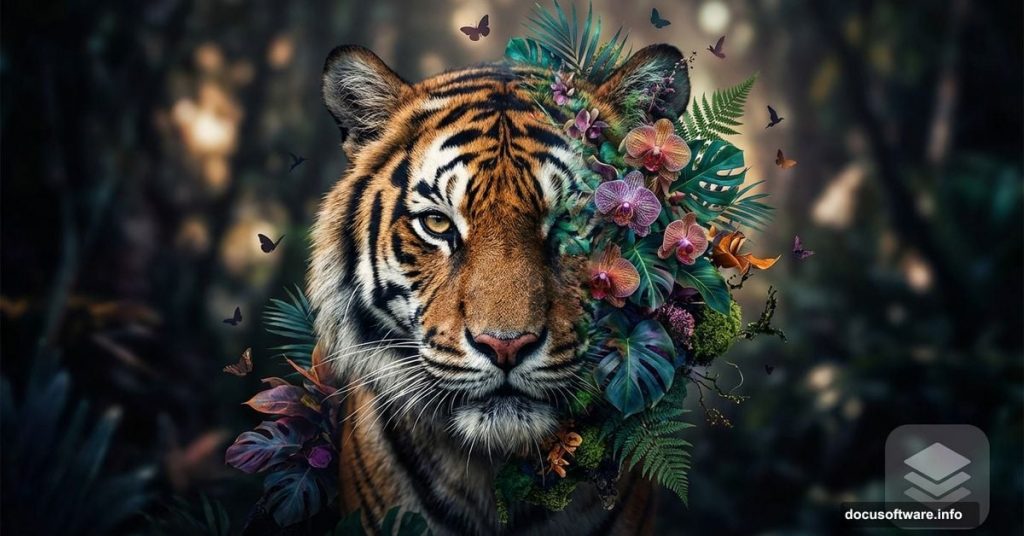
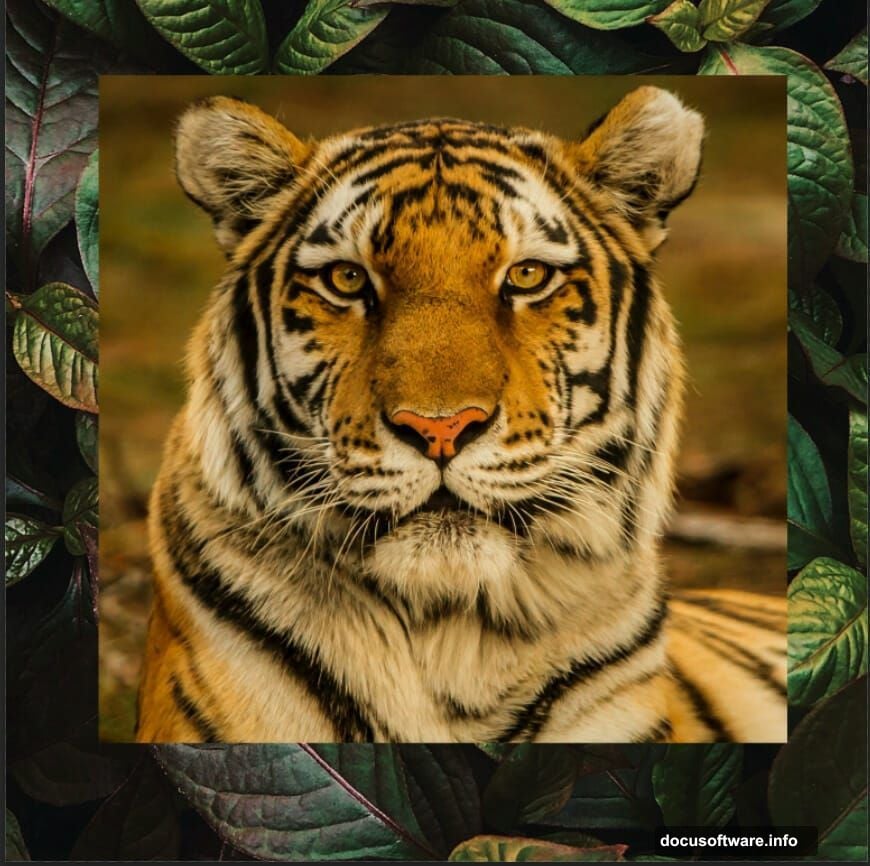
Want to blend nature and wildlife into something striking? This photo manipulation technique transforms an ordinary tiger portrait into a botanical artwork that stops scrollers mid-feed.
The process takes about 45 minutes once you know the steps. Plus, it works with any animal photo you like. Let’s break down exactly how to build this effect from scratch.
What You’ll Need Before Starting
Gather these resources first so you’re not hunting mid-project:
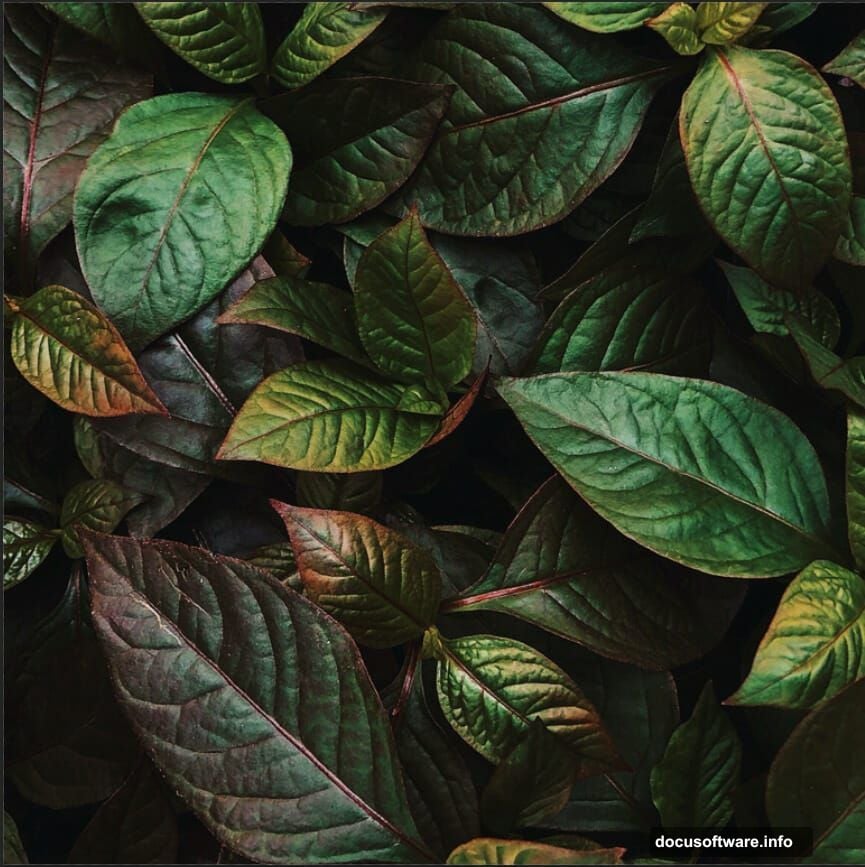
- High-resolution tiger photo with clear facial features
- Leaf texture or foliage background image
- Bird silhouettes (three different poses work best)
- Butterfly image with transparent background
- Photoshop CC or CS6 (earlier versions work but lack some filters)
Make sure your images are at least 2000px on the longest side. Low-resolution photos create pixelated final results that look amateur.
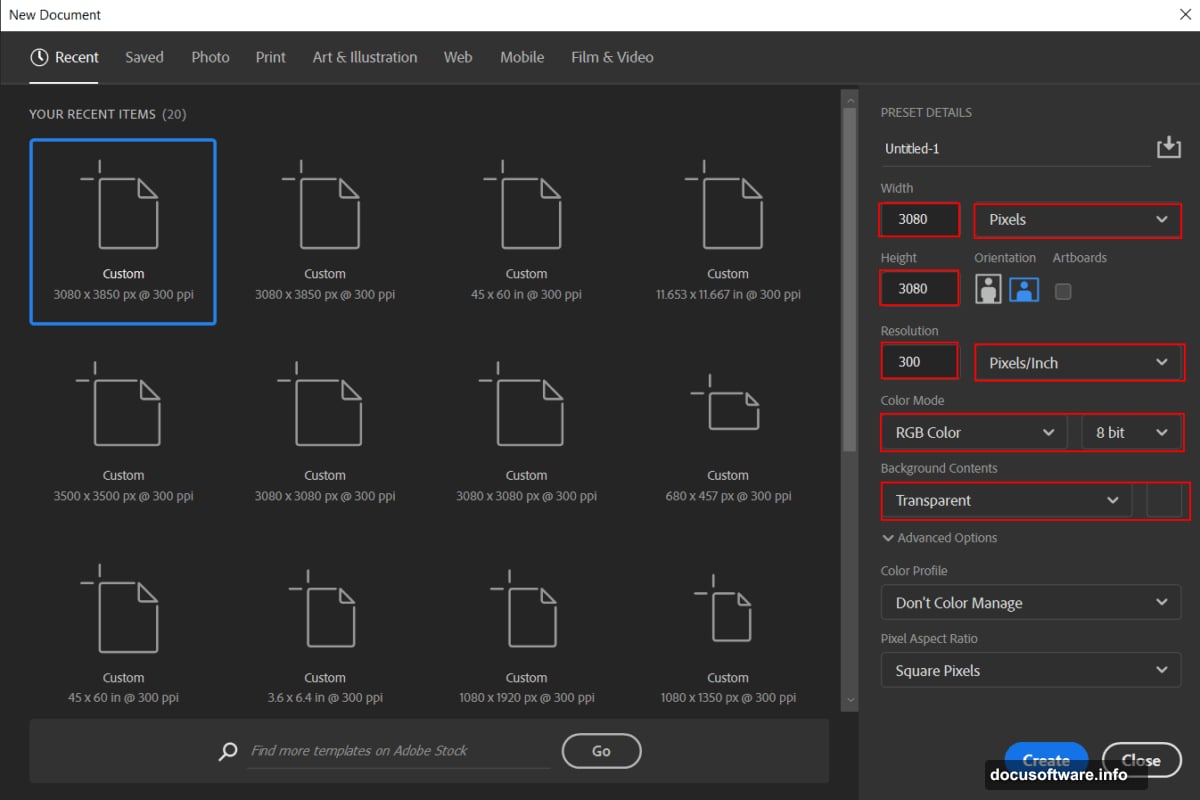
Set Up Your Canvas Right
First, create your workspace with proper dimensions. Go to File > New and punch in these specs:
- Width: 3080px
- Height: 3080px
- Resolution: 300 DPI
- Color Mode: RGB
- Background: Transparent
Why 3080px square? That size gives you flexibility for both print and web. You can always scale down later without losing quality. But scaling up from smaller dimensions? That creates blur and artifacts.
Build Your Base Layer
Now place your leaf background. Navigate to File > Place and select your foliage image.
Once it appears on canvas, press Ctrl/Cmd + T to activate Transform mode. Hold Alt + Shift (just Alt in newer Photoshop CC versions) and drag corner handles to resize proportionally. Position the leaves to fill your entire canvas.
The background sets your color palette and mood. So choose wisely here. Dense jungle leaves create drama. Soft botanical textures feel more artistic.
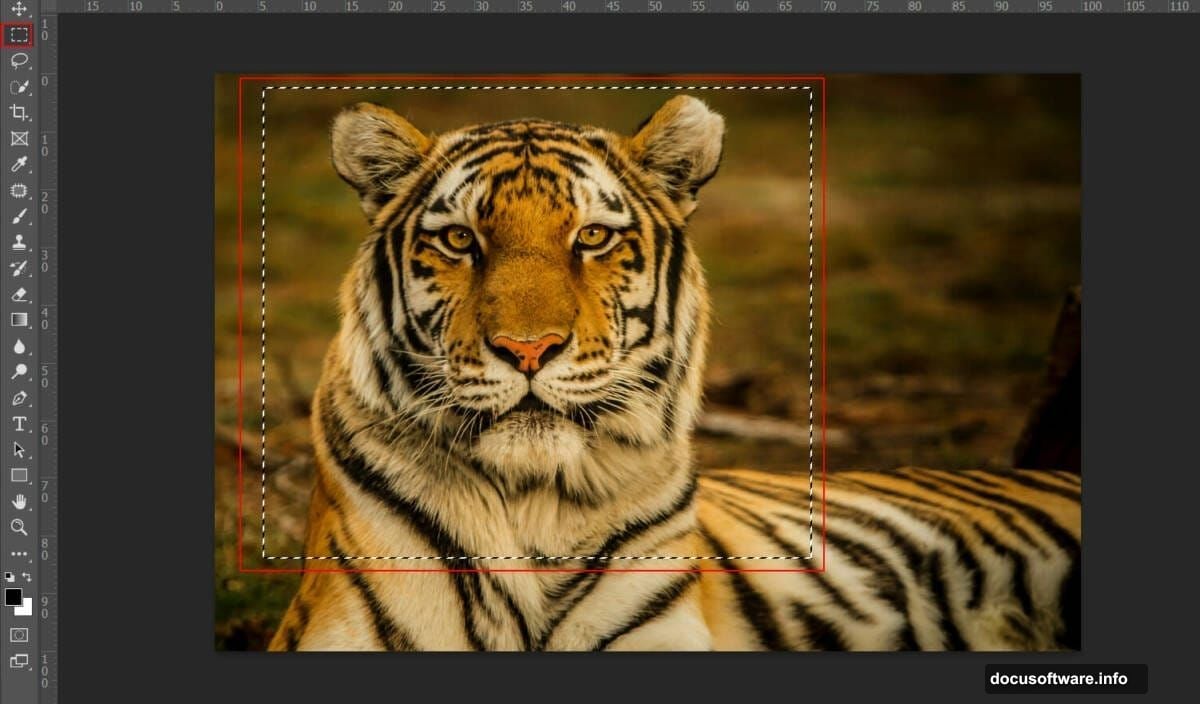
Add Your Tiger Subject
Open your tiger photo in a separate Photoshop window. Use the Rectangular Marquee Tool (M) to select the tiger’s head and upper body. Copy it (Ctrl/Cmd + C), then paste (Ctrl/Cmd + V) onto your main canvas.
Transform the tiger layer (Ctrl/Cmd + T) until it’s positioned where you want it. Typically center-frame works best, with the tiger’s face as your focal point.
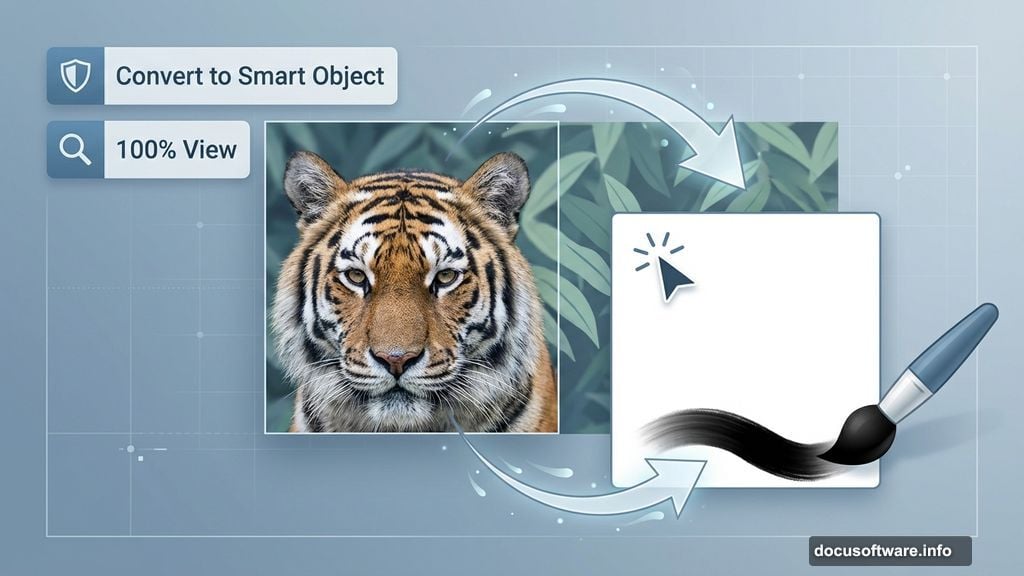
Here’s the crucial step most tutorials skip: Right-click the tiger layer and select “Convert to Smart Object.” This preserves image quality through all your edits. Without it, you’ll degrade the photo with each adjustment.
Blend Tiger With Background Seamlessly
Now comes the magic part. Click the Layer Mask icon at the bottom of your Layers panel. This adds a mask to your tiger layer.
Select a soft round brush (B key). Set foreground color to black. Paint over the edges of your tiger where it meets the background. The black paint on your mask hides those areas, creating a natural fade between tiger and leaves.
Don’t rush this step. Zoom in to 100% view. Use a medium-sized brush around main areas, then switch to a smaller brush for details around whiskers and fur edges. The goal is making the tiger appear to emerge from the foliage, not look pasted on top.
Color Match Everything
Raw photos rarely match color-wise. So let’s fix that.
Add a Color Lookup adjustment layer above your tiger. Click the adjustment layer icon (half-black, half-white circle) at the bottom of Layers panel. Select Color Lookup from the menu.
In the Properties panel, change 3DLut File to “FoggyNight.3DL.” This preset adds atmospheric color grading that ties everything together. Set the layer opacity to 50% so it doesn’t overpower your image.
Too intense? Try Moonlight.3DL or Crisp_Winter.3DL instead. Experiment until colors feel cohesive across all elements.
Enhance Lighting and Depth
Add a Curves adjustment layer. Click the adjustment icon again and select Curves. Pull the curve line up slightly in the highlights area (top right). This brightens the overall image and adds punch.
Now add another Curves layer. But this time, press Ctrl/Cmd + I immediately after creating it. This inverts the mask to black, hiding the adjustment.
Select your Brush Tool (B) with a soft round brush. Set foreground color to white. Paint over the tiger’s face, particularly the eyes and any areas you want to glow. The white reveals the Curves adjustment only where you paint, creating selective highlights.
This technique gives you precise lighting control. Paint lightly at first. Build up brightness gradually. You can always add more, but pulling back requires deleting and starting over.
Make Those Eyes Pop
Create a new blank layer above everything. Change its blend mode to Color Dodge. Set opacity to 65%.
Select your Brush Tool again. Change foreground color to medium gray (#808080). Paint directly over the tiger’s pupils and iris areas.
Color Dodge mode turns gray paint into bright, glowing highlights. This makes eyes appear luminous and alive. The effect is subtle at 65% opacity but makes a noticeable difference in the final image.
Too bright? Lower the layer opacity. Not enough? Add another paint layer and repeat. Remember: less is more with eye enhancements. Overdoing it creates an unnatural, fake look.
Layer Multiple Leaf Elements
Here’s where composition gets interesting. Import additional leaf images using File > Place. Position them around your tiger in the foreground.
Create variety by:
- Rotating leaves at different angles (hold Shift while rotating for 15-degree increments)
- Scaling some larger, some smaller
- Flipping some horizontally (Edit > Transform > Flip Horizontal)
- Lowering opacity on background leaves to create depth
Each leaf layer needs its own mask. Use the same black brush technique to blend edges naturally. The key is making viewers unable to tell where one image ends and another begins.
Add Flying Elements for Movement
Place your bird silhouettes one at a time. Position them at different heights and angles to suggest motion through space.
Birds flying toward camera should be larger. Those flying away get smaller. Vary their positions – some high, some low, some crossing the frame. This creates visual flow that guides the viewer’s eye around the composition.
Don’t forget to add subtle motion blur to birds (Filter > Blur > Motion Blur). Set angle to match flight direction and distance around 5-8 pixels. This sells the illusion of movement frozen in time.
Your butterfly works similarly. Place it somewhere prominent but not competing with the tiger’s face. Maybe landing on a foreground leaf or floating past the tiger’s ear.
Unify Everything With Color Grading
Almost done. Now let’s tie all elements together with final color adjustments.
Add a Gradient Map adjustment layer. Choose a color scheme that matches your mood:
- Warm sunset: Orange to purple gradient
- Cool mystical: Teal to deep blue
- Dramatic contrast: Dark brown to golden yellow
Set the Gradient Map opacity between 20-40%. Full strength looks too heavy-handed. Subtle color shifts feel more professional.
Apply Final Polish
Here’s the secret weapon: Camera Raw Filter. This single filter can elevate your entire composition.
First, merge all visible layers into one (Ctrl/Cmd + Alt/Option + Shift + E). This creates a composite layer at the top of your layer stack without destroying your work layers below.
Go to Filter > Camera Raw Filter. Adjust these sliders:
- Texture: +15 to +25 (adds micro detail)
- Clarity: +10 to +20 (enhances midtone contrast)
- Dehaze: +5 to +15 (cuts atmospheric haze)
- Vibrance: +10 (boosts muted colors without oversaturating)
- Saturation: -5 to -10 (pulls back intensity slightly for sophistication)
In the Effects panel, add subtle vignetting. Set Amount to -15 and Midpoint to 50. This darkens corners and focuses attention toward your center subject.
Click OK. Your image now has that polished, editorial quality that makes people stop and stare.
Common Mistakes to Avoid
After creating dozens of these composites, I’ve learned what kills the effect:
Mismatched lighting directions. If your tiger has side lighting but birds have top lighting, viewers notice. Check light source direction in all photos before starting.
Over-blending everything. Some hard edges are good. Not every element needs to fade perfectly. Strategic contrast between soft and sharp areas creates visual interest.
Ignoring scale relationships. That butterfly shouldn’t be the same size as the tiger’s eye. Maintain realistic proportions even in stylized work.
Too many adjustment layers. More isn’t better. Each adjustment degrades image data slightly. Stick to essential corrections only.
Forgetting to convert to Smart Objects. This bears repeating because it’s crucial. Smart Objects preserve quality through multiple edits. Regular layers don’t.
Make It Your Own
This technique works beyond tigers and leaves. Try it with:
- Wolves emerging from misty forests
- Eagles blending with mountain peaks
- Dolphins surrounded by coral patterns
- Owls integrated with tree bark textures
The principle stays the same: Blend your subject with complementary natural elements using masks, match colors with adjustment layers, add supporting elements for composition, then unify everything with final color grading.
The beauty of photo manipulation is there’s no single “correct” way. These steps provide the framework. But your creative decisions – which animals, which textures, which colors – make the result uniquely yours.
Play with blend modes beyond what I’ve shown. Try Color Burn, Overlay, or Soft Light on your texture layers. Experiment with different 3DLut files. Test various Camera Raw settings.
Save multiple versions as you work. Sometimes your third attempt captures magic that version ten loses. Having earlier saves lets you backtrack when you overcomplicate things.
Most importantly, step away periodically. Fresh eyes catch problems invisible after staring at a screen for hours. That disproportionate bird or glowing butterfly anomaly becomes obvious after a break.
This effect rewards patience and experimentation more than technical perfection. Give yourself permission to play, make mistakes, and discover happy accidents along the way.