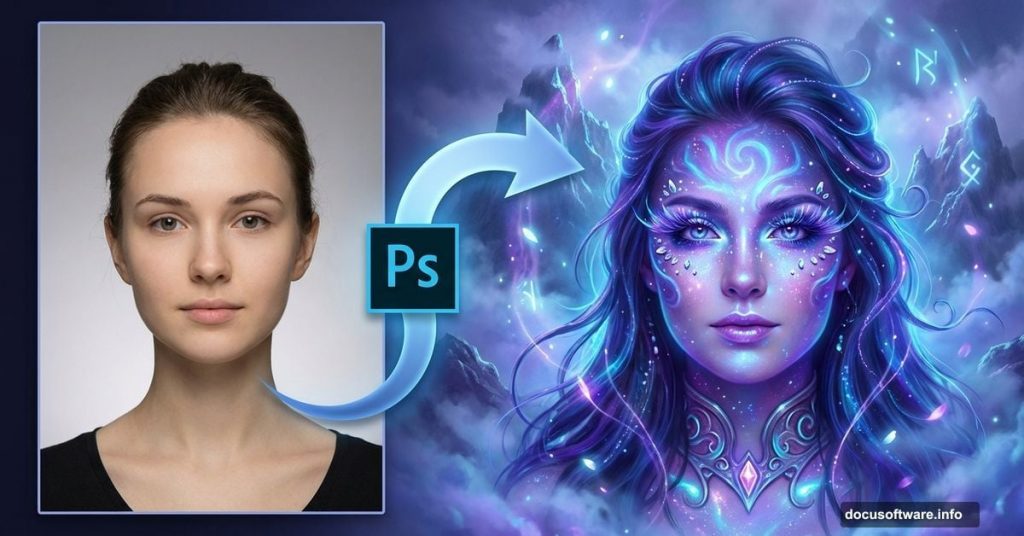
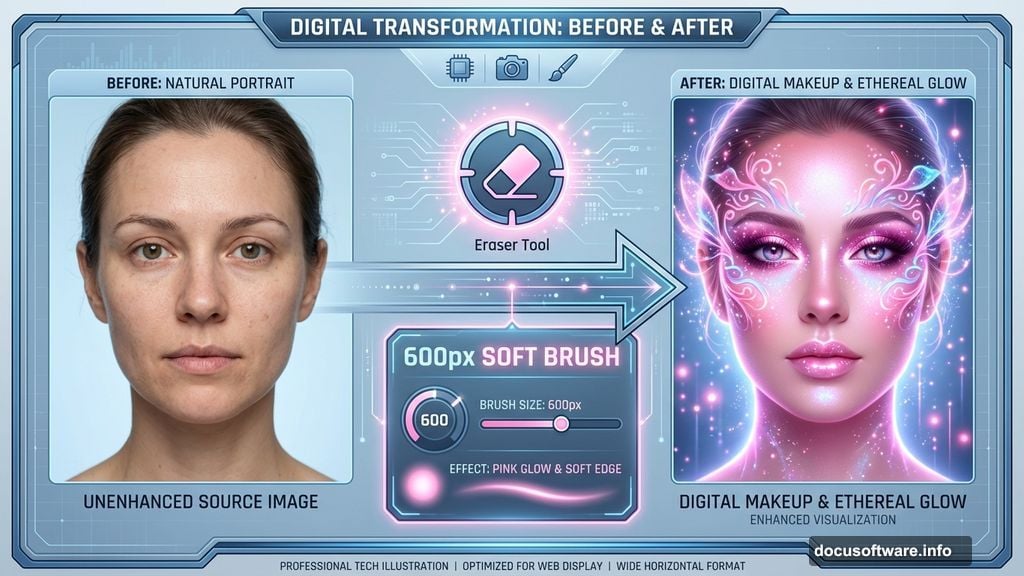
Want to transform a simple portrait into a haunting, mystical scene? This Photoshop technique shows you how to composite multiple elements and apply digital makeup for stunning results.
You’ll learn selection techniques, layer blending modes, and lighting effects that make your subject look like she stepped out of a fantasy world. Plus, I’ll show you the makeup tricks that add that final touch of magic.
Why This Technique Works for Fantasy Portraits
Digital compositing lets you create impossible scenes. You can’t hire a model and fly to mystical mountains for every shoot. Instead, you build the scene piece by piece in Photoshop.
The key is making everything feel cohesive. That means matching lighting, color tones, and atmosphere across all your elements. Get those right and viewers won’t question whether it’s real.
This tutorial uses free stock images. So you can practice without spending money on premium resources.
Start With Clean Subject Selection
Open your portrait in Photoshop. Then grab the Pen Tool (P) to trace around your subject.
Why the Pen Tool instead of Quick Selection? Because you get precise control. Hair can be tricky, but for now focus on getting a clean body outline. You’ll refine edges later.
Click point by point around your subject’s silhouette. Make sure you close the path by clicking back on your starting point. Otherwise the selection won’t work.
Once your path is complete, right-click and choose “Make Selection.” In the dialog box, set Feather Radius to 0 pixels for sharp edges. Click OK.
Now press Ctrl+J (Cmd+J on Mac) to duplicate just the selected area onto a new layer. Your subject is now separated from the original background.
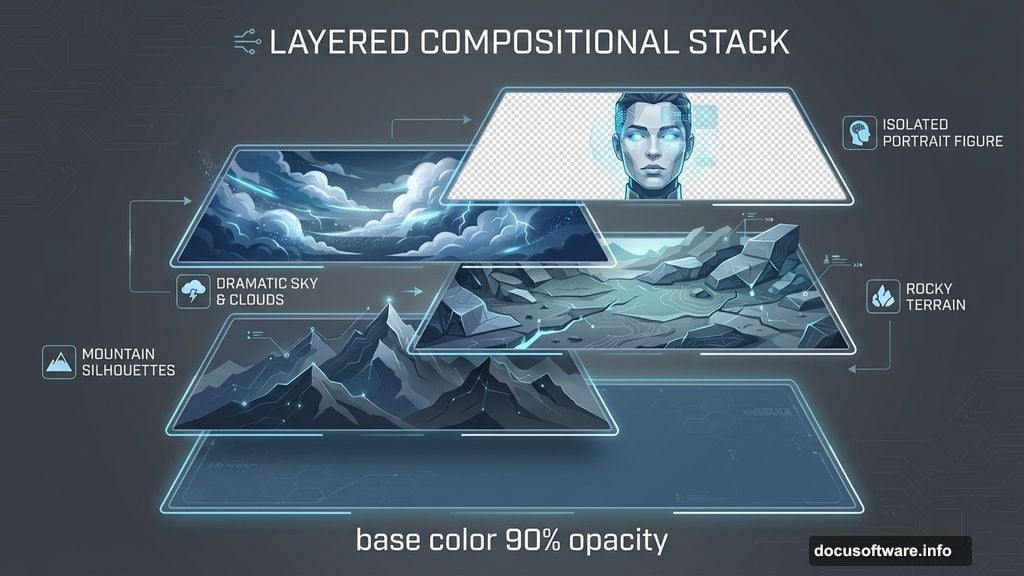
Build Your Mystical Background Layer by Layer
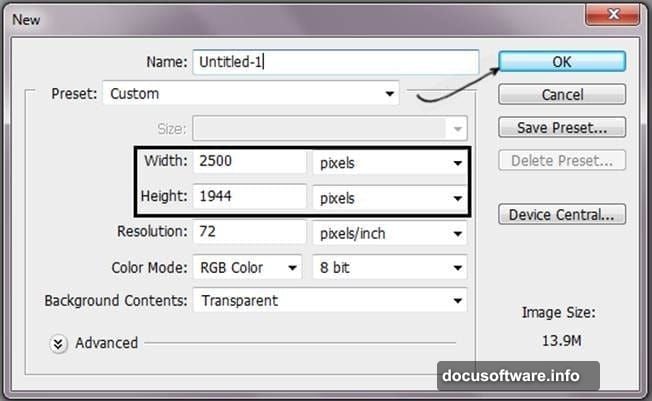
Create a new document (Ctrl+N) at 2500 x 1944 pixels. This gives you room to work without losing quality.
Start with a solid color base layer. Choose a muted blue-gray tone. This sets the overall mood. Keep saturation low and reduce opacity to 90% so it doesn’t overwhelm other elements.
Next, add your landscape elements. For this effect, you’ll need rocky terrain, distant mountains, and a dramatic sky. Place each element on its own layer. This lets you adjust them independently later.
Blend Rocks Into the Scene
Import your rock formation image. Press Ctrl+T to enter Free Transform mode. Hold Shift while dragging corners to resize without distortion. Scale it to fit your canvas.
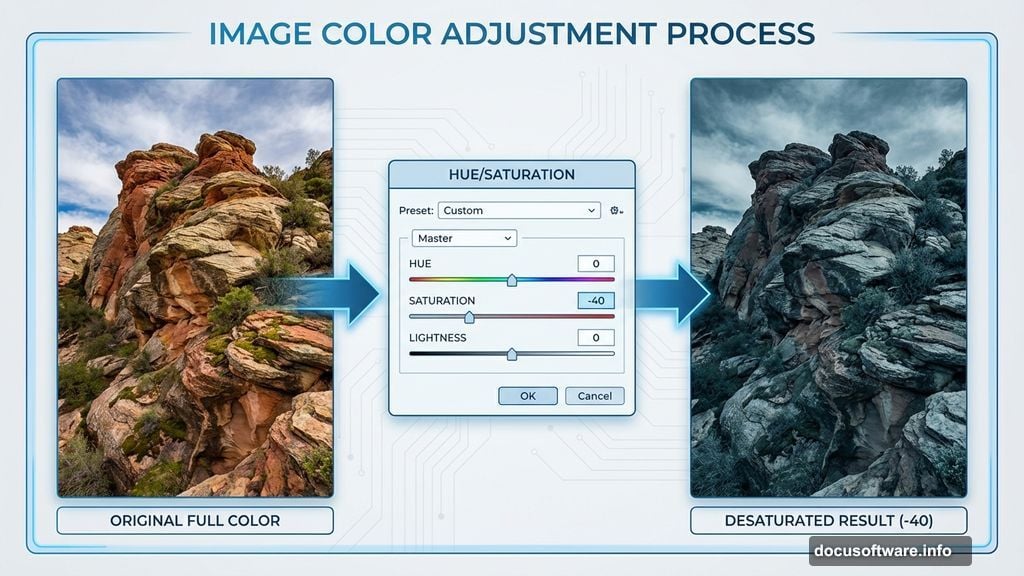
The rocks probably don’t match your color scheme yet. Go to Image > Adjustments > Hue/Saturation (Ctrl+U). Drag the Saturation slider left to -40. This desaturates the rocks to match your moody atmosphere.
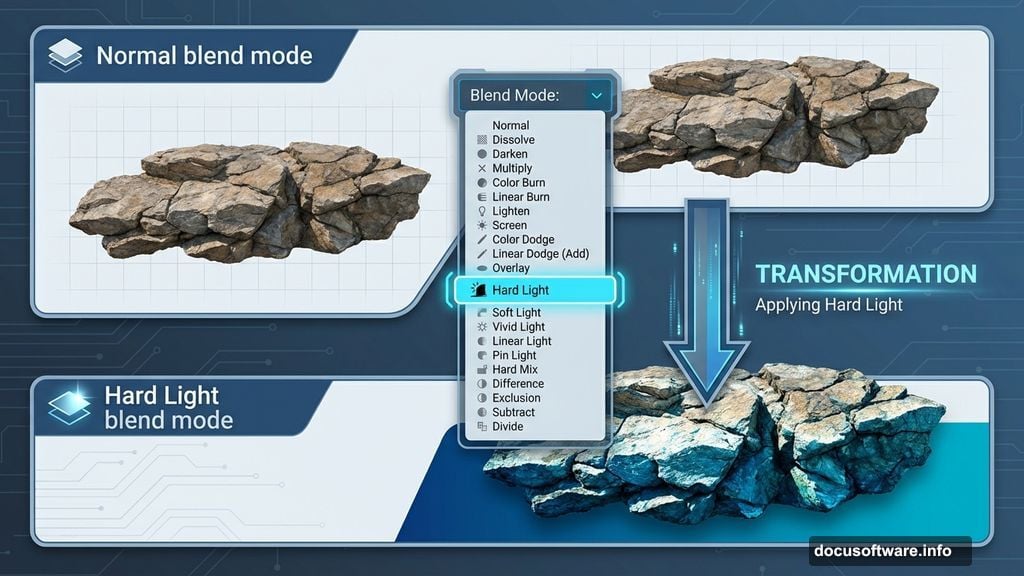
Grab the Eraser Tool (E) with a soft 600px brush. Erase the sky portion of the rock layer. Leave only the rocks themselves visible.
Now change the rocks layer blend mode to Hard Light. This integrates them with the base color while maintaining texture detail.
Stack Mountain Layers for Depth
Add your first mountain range layer. Resize it with Free Transform (Ctrl+T) to fit the composition.
Reduce layer opacity to 80%. Then use the Eraser Tool to remove any parts that overlap the rocks. You want the rocks in front for proper depth.

Import your sky image next. This adds cloud texture and atmosphere. Change this layer’s blend mode to Soft Light. This lets the clouds blend naturally with the background instead of looking pasted on.
Add a second mountain range layer. Position it behind the first mountains for atmospheric perspective. Erase any unwanted areas with a soft eraser brush.
Position Your Subject in the Scene
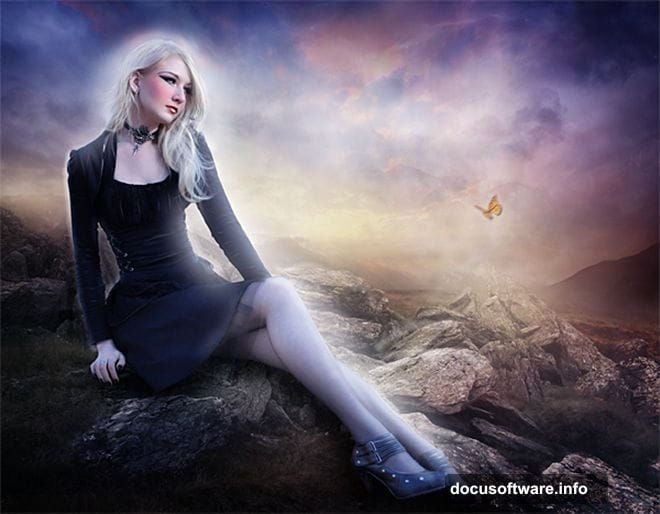
Drag your cutout subject layer into the composition. Place her in the foreground using Free Transform to scale appropriately.
She needs to feel grounded in the scene. So paint shadows beneath her feet. Create a new layer, set it to Multiply blend mode, and use a soft black brush at low opacity. Build up shadow gradually until it looks natural.
Match the Subject to Background Lighting
Your subject’s original lighting probably doesn’t match the mystical scene. Fix this with adjustment layers.
Add a Curves adjustment layer clipped to your subject layer. Drag the curve to adjust overall brightness and contrast until she matches the background lighting.
Then add a Color Balance adjustment layer, also clipped. Push the shadows toward blue to match the cool atmospheric tone. Add a touch of warmth to highlights for dimension.
Apply Digital Makeup Effects
Time for the makeup that makes this portrait pop. Create a new layer above your subject and set it to Overlay blend mode.
Pick a soft brush at 30% opacity. Choose a deep red color for lips. Paint over the lips area. The Overlay mode lets the underlying texture show through while adding color.
For eye makeup, use a dark purple or black on the same Overlay layer. Paint lightly over eyelids and beneath eyes. Build up intensity gradually with multiple passes.
Add a touch of blush to cheeks with a soft pink or peach tone. Remember, less is more. You can always add more color but removing excess is harder.
Create Glowing Skin Effect
Make a new layer set to Screen blend mode. Use a soft white brush at 10% opacity. Paint over the model’s face and exposed skin.
This creates an ethereal glow. Focus on high points like cheekbones, nose bridge, and forehead. But don’t overdo it. The goal is subtle luminosity, not radioactive skin.
Add Mystical Lighting and Atmosphere
Create a new layer above everything. Fill it with 50% gray (Edit > Fill > 50% Gray). Change the blend mode to Overlay.
Go to Filter > Render > Lens Flare. Place the flare near your light source direction. This adds atmosphere and suggests a light source.
Make another new layer. Use a large soft white brush at very low opacity. Paint gentle light rays coming from behind your subject. This separates her from the background and adds drama.
Enhance With Particles and Details
Add small atmospheric elements for extra magic. Import a butterfly image if you have one. Place it near your subject and reduce opacity slightly so it blends.
For floating particles, create a new layer. Use a small hard brush to paint white dots of varying sizes. Then blur them with Filter > Blur > Gaussian Blur (radius 2-3 pixels). Reduce opacity to 50-60%.
These tiny details make the scene feel more alive and fantastical.
Final Color Grading and Refinement
Add a Gradient Map adjustment layer at the top of your layer stack. Choose a gradient that goes from dark blue to warm yellow-orange. Set this layer to Soft Light mode at 40% opacity.
This unifies all your elements with consistent color grading. It’s the secret to making composites look professional instead of cobbled together.
Add a final Curves adjustment to fine-tune overall contrast. Push the blacks slightly darker and highlights slightly brighter for extra punch.
Sharpen for Final Output
Merge all layers into a new layer at the top (Ctrl+Alt+Shift+E). Go to Filter > Sharpen > Unsharp Mask. Use Amount: 80%, Radius: 1.0, Threshold: 0. This adds crisp detail without over-sharpening.
Zoom to 100% and check for any rough edges or color inconsistencies. Use a small soft brush to paint corrections on new layers as needed.
Why This Method Beats Auto Tools
Photoshop’s AI selection tools have improved dramatically. But for fantasy composites, manual techniques still win.
You get complete control over every element. Blend modes, opacity, and layer masks let you fine-tune precisely. Auto tools can’t replicate that level of artistic decision-making.
Plus, understanding these core techniques makes you a better digital artist. You’ll know how to fix problems when automated tools fail.
The makeup application technique works for any portrait. Once you master Overlay and Screen blend modes for color and light, you can create endless looks without destroying the original image.
This workflow seems long at first. But after practicing a few times, you’ll move through steps quickly. Most of my fantasy portraits take 30-45 minutes once I have all the stock images gathered.
Start with this technique, then experiment. Try different blend modes, add more atmospheric elements, or push the color grading in bold directions. The fundamentals stay the same, but your artistic choices make each piece unique.