
Want to transform ordinary portraits into cyberpunk masterpieces? This tutorial walks you through creating a fantasy cyborg scene from scratch.
You’ll learn how to seamlessly blend human and machine elements. Plus, we’ll add atmospheric effects that make your cyborg look like it stepped out of a sci-fi movie. The whole process takes about two hours once you get the hang of it.
Let’s dive into building your own synthetic human.
Gather Your Assets First
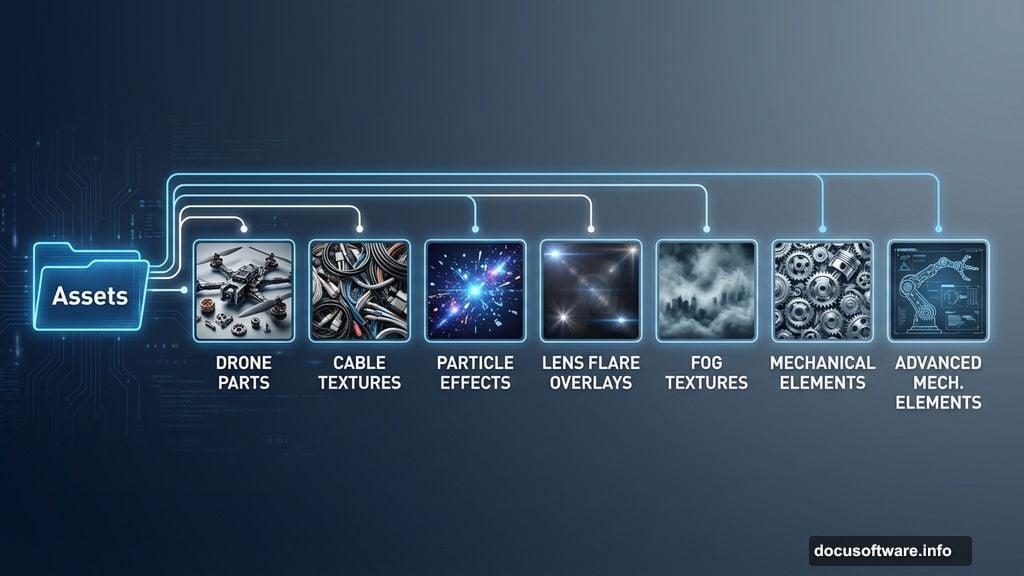
Before touching Photoshop, collect these elements. You’ll need a base cyborg body, a replacement head, mechanical parts, and atmospheric effects.
Required images:
- Full cyborg body shot
- High-resolution human head
- Drone or mechanical elements
- Cable textures
- Particle effects
- Lens flare overlays
- Fog or smoke textures
Having everything ready saves time. Otherwise you’ll constantly interrupt your workflow hunting for the right image. Trust me, it’s frustrating.
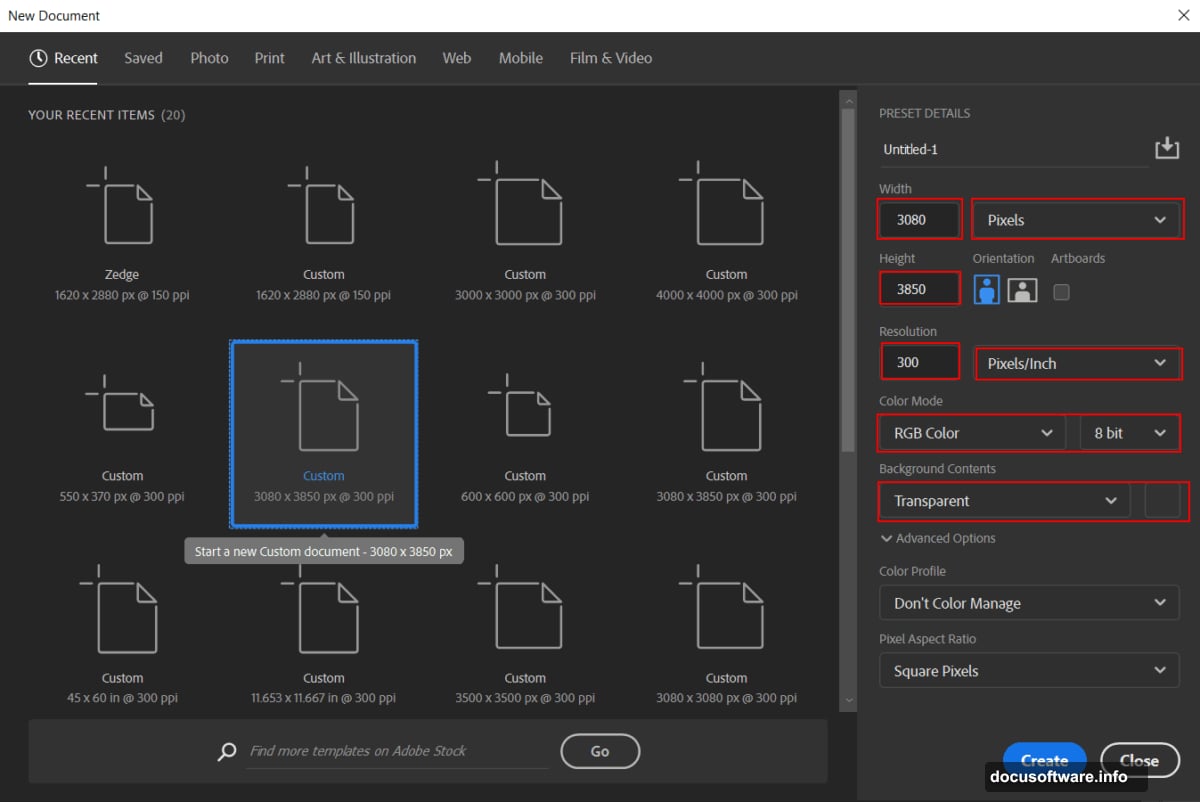
Set Up Your Canvas
Create a new document with these exact specs. Go to File > New and input the following values.
Canvas settings:
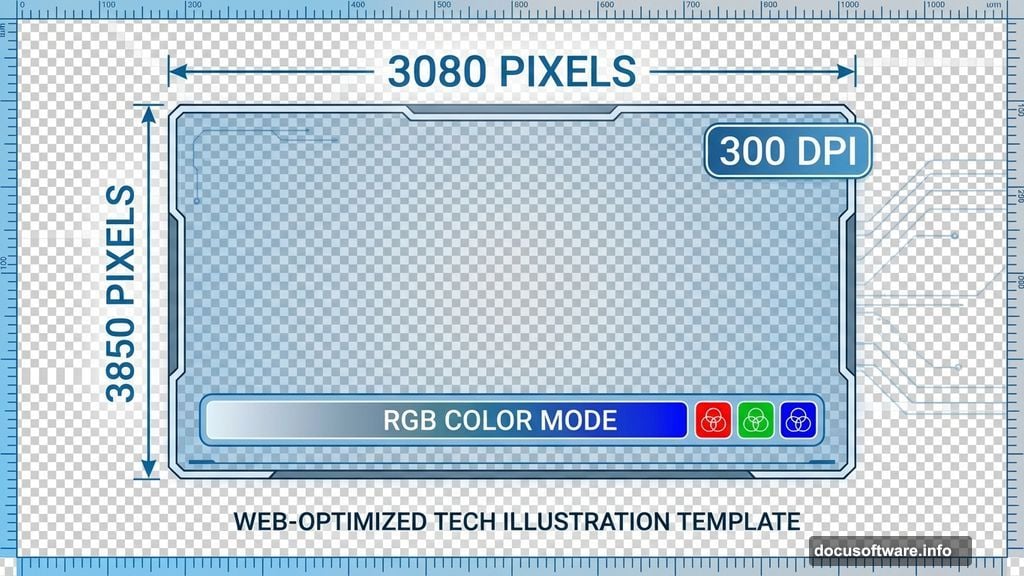
- Width: 3080 pixels
- Height: 3850 pixels
- Resolution: 300 DPI
- Color Mode: RGB, 8-bit
- Background: Transparent
Why these dimensions? They give you enough resolution for print while maintaining a portrait orientation. Plus, the 300 DPI ensures crisp details when you zoom in.
The transparent background lets you drop this cyborg into any scene later. That flexibility comes in handy for composite work.
Place Your Base Cyborg Body
Now import your cyborg body. Go to File > Place and select your base image.
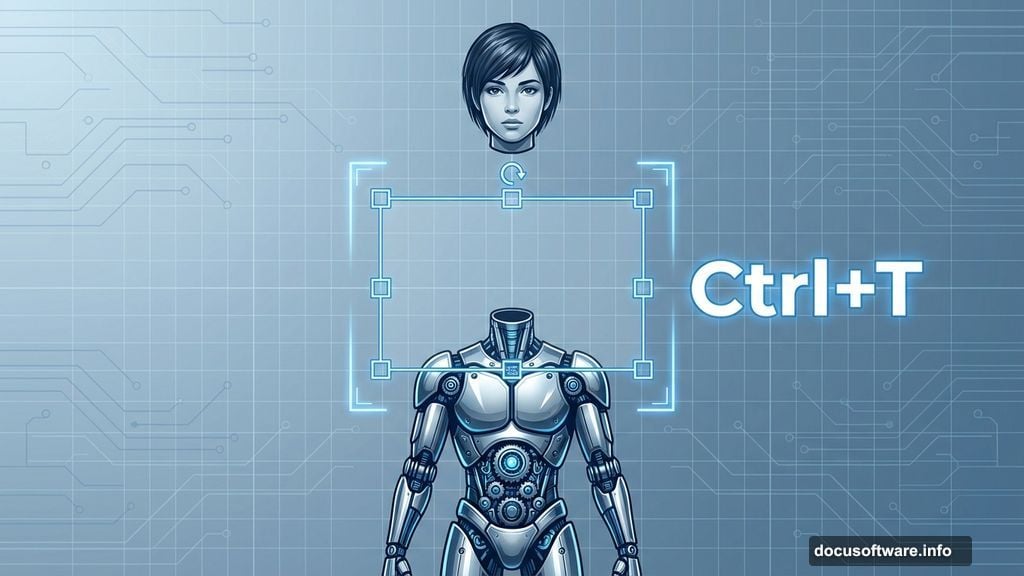
Position it using the Transform tool (Ctrl/Cmd + T). Hold Alt + Shift while dragging corners to maintain proportions. In Photoshop CC, just hold Alt. Then right-click and select Rasterize Layer.
This converts your smart object into editable pixels. You’ll need that for the blending techniques coming up.
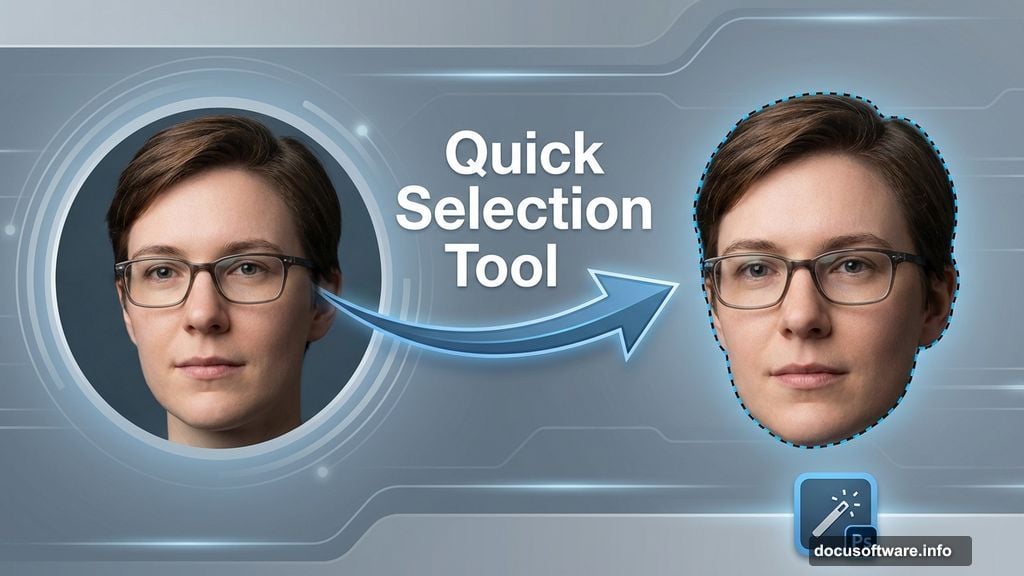
Swap the Head Seamlessly
Here’s where things get interesting. Open your replacement head image in a separate Photoshop window.
Grab the Quick Selection Tool (W) and carefully select just the head. Don’t worry about being perfect yet. You can refine edges later.
Copy the selection (Ctrl/Cmd + C) and paste it onto your main canvas (Ctrl/Cmd + V). Use Transform (Ctrl/Cmd + T) to resize and position the head. Again, hold Alt + Shift to maintain proportions.
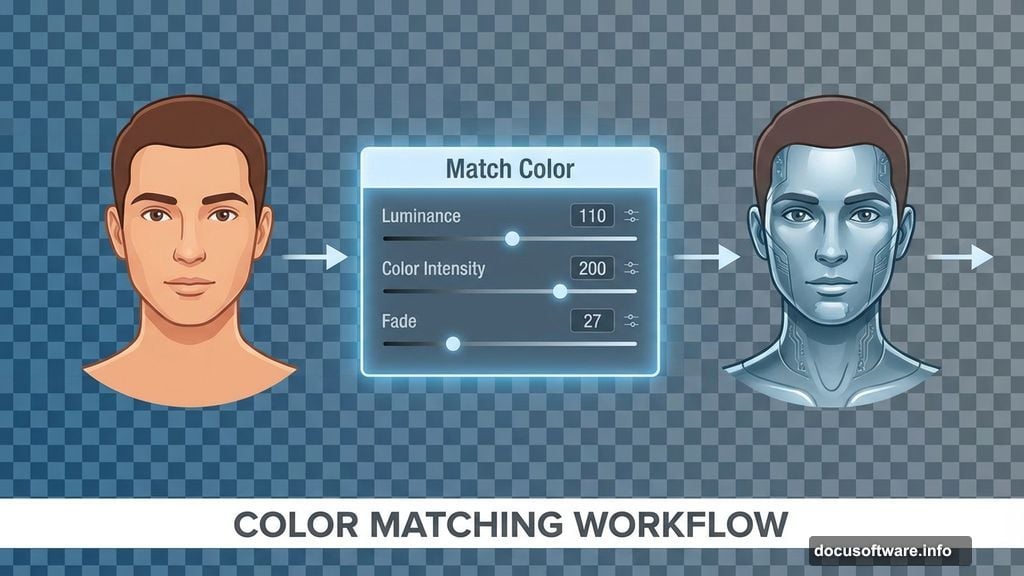
Now comes the magic part. Go to Image > Adjustments > Match Color. This makes the head match your cyborg body’s lighting and color tone.
Input these values:
- Luminance: 110
- Color Intensity: 200
- Fade: 27
- Source: Your cyborg body layer
The Match Color command analyzes both images and adjusts the head to match. It’s not perfect, but it gets you 80% there instantly. Way better than manual color correction.
Blend the Head With Curves
The head still looks pasted on. Let’s fix that with targeted adjustments.
Add a Curves adjustment layer. Then press Ctrl/Cmd + I to invert the mask to black. This hides the entire adjustment initially.
Select the Brush Tool (B) with a soft round brush. Set foreground color to white. Now paint on the left side of the head where shadows should fall.
Why this approach? You’re selectively darkening areas instead of affecting the whole head. This creates natural-looking shadows that match your light source. Plus, the soft brush creates gradual transitions instead of hard edges.
If you overdo it, just paint with black to remove the effect. Non-destructive editing saves your sanity.
Adjust Color Saturation
Add a Hue/Saturation adjustment layer. Reduce the opacity to 50%.
This subtle desaturation helps mechanical parts feel less organic. Real metal and plastic don’t have the same color vibrancy as skin. So dialing back saturation sells the cyborg illusion.
Pro tip: Don’t go too far. Completely desaturated images look dead and uninteresting. You want a slight shift, not full grayscale.
Organize With Groups
Select all your cyborg layers. Hold Shift and click from the first layer to the last. Then press Ctrl/Cmd + G to group them.
Name this group “Cyborg Base” or something descriptive. Trust me, you’ll have dozens of layers soon. Organization prevents chaos.
Groups also let you apply adjustments to multiple layers at once. That’s crucial when you need to darken or lighten the entire character together.
Add Atmospheric Depth
Create another Curves adjustment layer. Invert the mask again (Ctrl/Cmd + I).
This time, paint white on the background area behind your cyborg. Focus on windows, light sources, or any backdrop elements. This separates your subject from the background through selective brightening.
Why it works: Your eye naturally focuses on the brightest areas in an image. By brightening the background strategically, you create depth and draw attention to specific parts of your composition.
Vary your brush opacity between 30-70% for natural-looking light falloff. Hard edges scream “fake Photoshop effect.”
Integrate Mechanical Elements
Now place your drone or mechanical parts. Use the same Place and Transform workflow from earlier.
Position mechanical elements where they make logical sense. Drones hover near the head. Cables connect to ports on the body. Don’t just randomly scatter tech everywhere.
For each mechanical piece, repeat the blending process:
- Match Color to sync with your lighting
- Add Curves to create shadows
- Use layer masks to hide hard edges
- Apply subtle motion blur if the element should feel dynamic
This takes time. Don’t rush. Each mechanical element needs individual attention to feel integrated rather than pasted on.
Create Glowing Circuits
Here’s where your cyborg comes alive. Add glow effects to suggest internal power sources.
Create a new layer set to Screen or Linear Dodge blending mode. Use a soft brush with bright blue or orange color. Paint along edges where circuits might show through.
Key technique: Keep the glow subtle. Overgrown circuits look like cheap sci-fi. Real light has falloff and variation in intensity.
Layer multiple colors for visual interest. Maybe blue circuits with occasional orange accents. Monochromatic glows bore viewers quickly.
Lower the layer opacity to 40-60%. This makes the glow feel embedded in the character rather than floating on top.
Add Cable Textures
Place your cable images using File > Place. Position them logically connecting body parts or extending to off-canvas areas.
Set cable layers to Multiply or Darken blending mode. This lets the underlying cyborg show through while the cables add detail.
Use a layer mask and a soft brush to fade cable endpoints. Hard stops where cables enter the body ruin the illusion. You want smooth integration points.
Don’t overdo it. Three to five well-placed cables beat twenty random wires. Too many elements create visual noise instead of detail.
Sprinkle Particle Effects
Open your particle image. Select interesting clusters using the Lasso Tool (L) or Quick Selection (W).
Copy and paste particles onto new layers. Set blending mode to Screen or Lighten. This makes dark backgrounds disappear while keeping bright particles visible.
Scale particles to different sizes. Having all one size looks artificial. Natural particle fields have variation.
Position particles clustered around light sources or mechanical elements. Random distribution lacks narrative logic. Sparks fly from specific places, not everywhere equally.
Insert Lens Flare
Add lens flare overlays to suggest bright light sources. Place your flare image and set the layer to Screen blending mode.
Position flares strategically. One near the head suggests a headlamp or eye augmentation. Another behind the cyborg implies a bright background light.
Be subtle. JJ Abrams lens flare syndrome ruins otherwise solid work. One or two flares add punch. Ten flares scream amateur hour.
Reduce flare opacity to 30-50%. Full-strength flares overwhelm your composition. Dialed-back versions add atmosphere without dominating.
Apply Fog Layers
Place fog or smoke textures using the same workflow. Set layers to Screen or Lighten mode.
Position fog strategically to hide problem areas or add depth. Fog near the bottom grounds your cyborg. Fog in the background pushes it into atmospheric space.
Adjust fog opacity between 20-40%. Heavy fog obscures your work. Light haze adds mystery without hiding details.
Use Transform (Ctrl/Cmd + T) to stretch fog horizontally. This creates depth rather than just pasting flat textures.
Polish With Camera Raw Filter
Almost done. Now we’ll add final color grading.
Flatten your image or create a merged copy (Ctrl/Cmd + Alt + Shift + E). This creates a new layer with all visible layers combined while preserving your original layers below.
Go to Filter > Camera Raw Filter. This opens Adobe Camera Raw inside Photoshop.
Suggested adjustments:
- Increase Contrast: 15-25
- Lift Shadows: 10-15
- Pull down Highlights: -10 to -15
- Boost Clarity: 10-20
- Increase Vibrance: 10-15
These values aren’t rules. Adjust based on your specific image. The goal is punchy contrast and saturated colors without crushing blacks or blowing out highlights.
Play with the Temperature slider. Cooler temperatures (moving left) emphasize the mechanical nature. Warmer tones (moving right) add humanity.
Split toning works great for sci-fi. Add blue to shadows and orange to highlights. This creates that blockbuster movie color grade everyone recognizes.
Final Touches Matter
Zoom to 100% and scan your entire image. Look for:
- Hard edges that need softening
- Areas lacking shadows
- Overgrown glows
- Mismatched colors
- Floating elements
Fix issues with targeted adjustments. Add a gentle vignette to draw eyes inward. Maybe a subtle film grain for texture.
Don’t overthink it. At some point, you’re polishing details only you’ll notice. Finish the piece and move on to the next project.
This Technique Works Beyond Cyborgs
You just learned photomanipulation fundamentals that apply to countless projects. Head swaps, element blending, atmospheric effects, color grading—these skills transfer everywhere.
Next time, try creating a fantasy warrior with magical effects. Or a post-apocalyptic survivor with battle damage. The process remains the same. Only the elements change.
Master these techniques and you’ll create portfolio pieces that actually get attention. Generic portraits bore viewers. Sci-fi cyborgs make them stop scrolling.