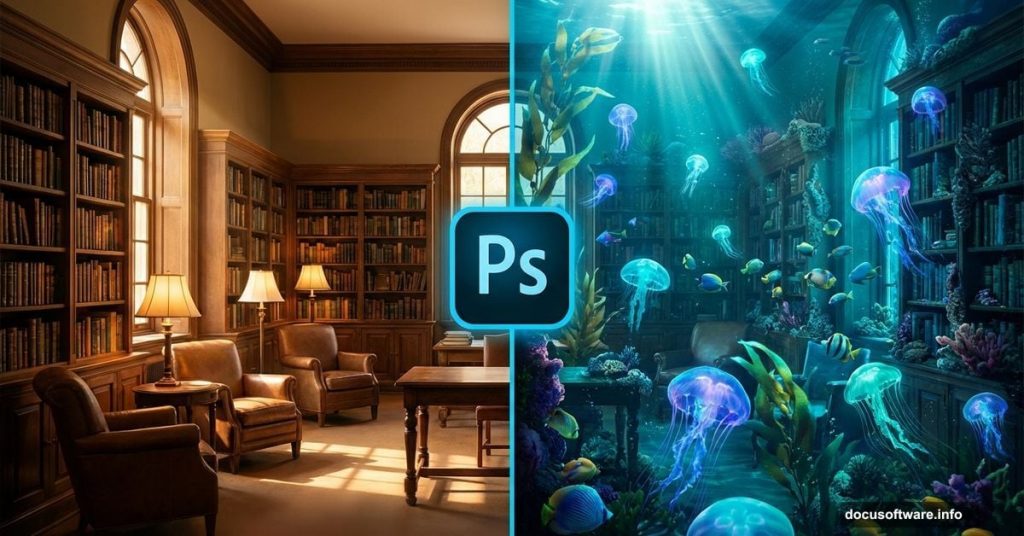
Want to create something surreal? This Photoshop tutorial shows you how to transform an ordinary library into a jellyfish aquarium. The technique works for any interior space.
You’ll learn practical photo manipulation skills that apply to countless projects. Plus, the effect looks impressive but doesn’t require advanced Photoshop knowledge. Let’s dive in.
What You’ll Need Before Starting
Gather these resources first. Having everything ready makes the process smoother.
Required Images:
- Interior photo (library, bedroom, or office works great)
- Water texture overlay
- Fish stock photos (3-4 different species)
- Jellyfish images
- Bubble overlays
Photoshop Skills Needed:
- Basic layer management
- Pen tool for selections
- Adjustment layers
- Masking fundamentals
Most beginners can complete this project in 2-3 hours. Take your time with the selection work. That’s where quality matters most.
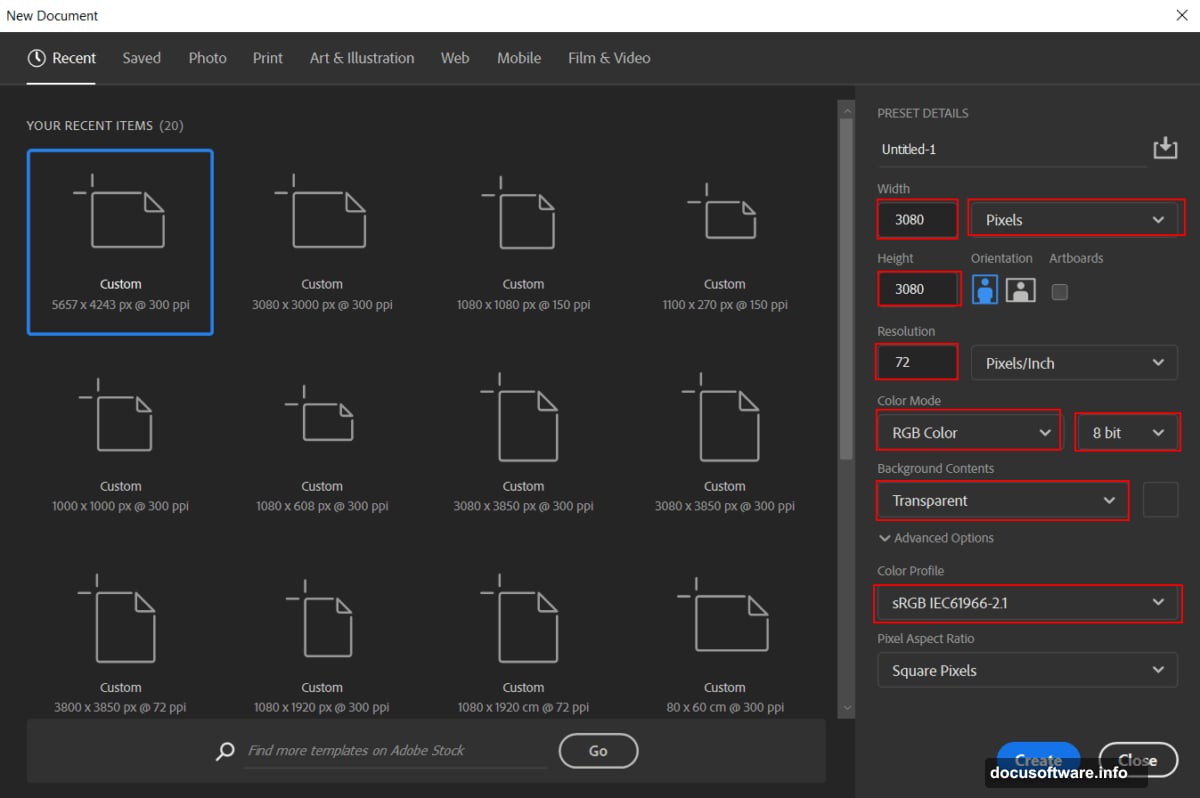
Setting Up Your Canvas
Start with the right dimensions. This prevents quality loss later.
Create a new file with these specs:
- Width: 3080px
- Height: 3080px
- Resolution: 72 DPI
- Color Mode: RGB, 8-bit
- Background: Transparent
Why these dimensions? They give you room to work without creating massive file sizes. Plus, 3080px works well for web and print at smaller sizes.
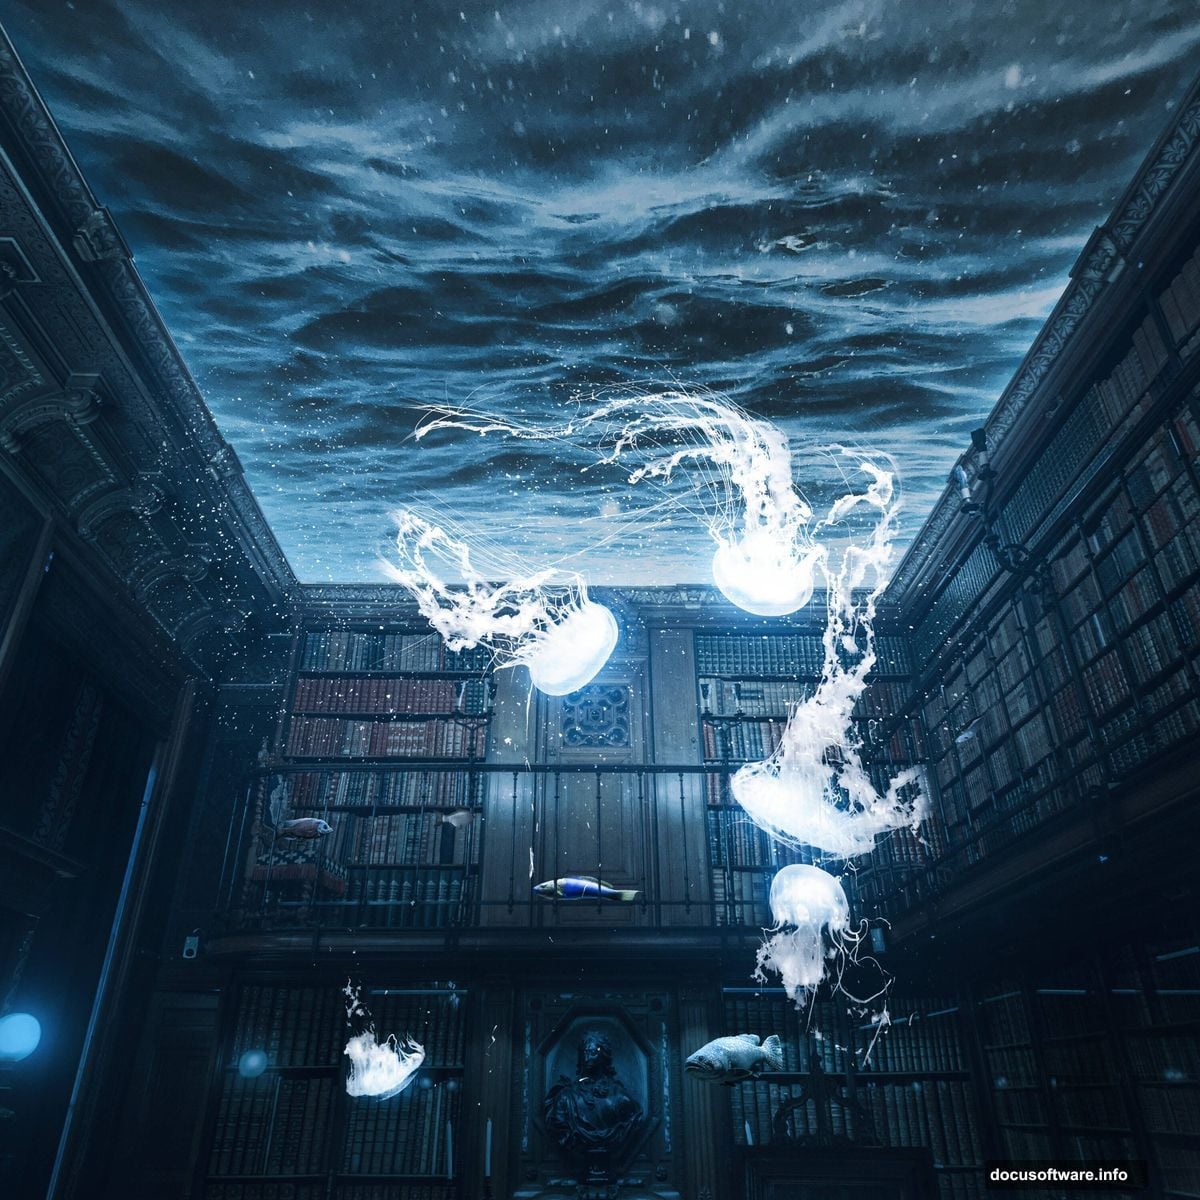
Removing the Ceiling With Pen Tool
Here’s where precision pays off. Use the Pen tool to select your room’s ceiling.
Pen Tool Basics:
The Pen tool creates paths by clicking anchor points. Each click adds a point. Connect points to form shapes.
Click where you want to start. Then click again at the next corner. Keep clicking around the ceiling perimeter. Close the path by clicking your starting point.
Pro tip: Zoom in close when placing anchor points near details. Better accuracy now means less cleanup later.
After completing your path, right-click and choose “Make Selection.” Then add a layer mask. The ceiling disappears, ready for your water effect.
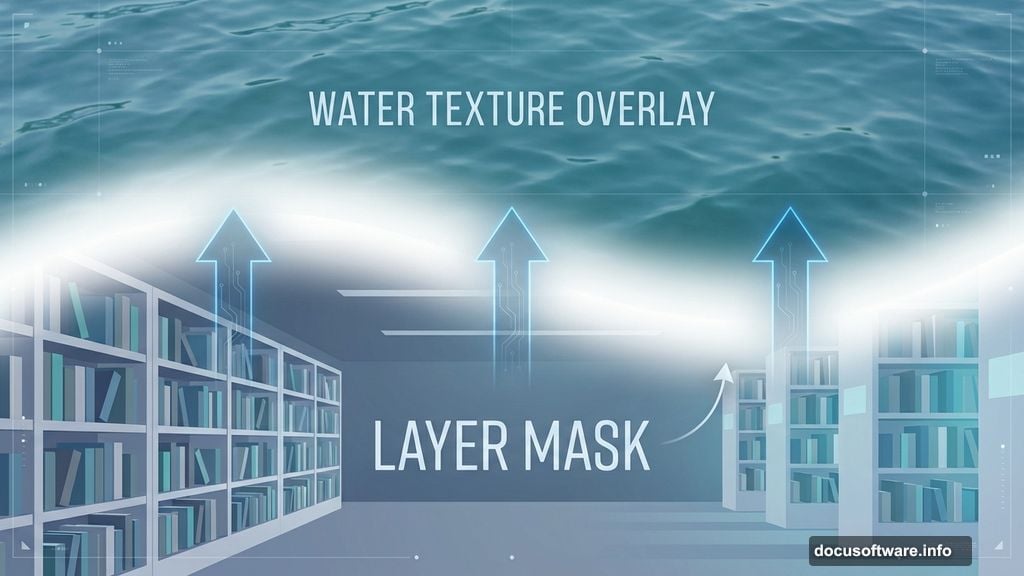
Adding Water to Replace the Ceiling
Now place your water texture where the ceiling was.
Go to File > Place and select your water texture image. Position it using Transform (Ctrl/Cmd + T). Hold Alt + Shift to scale proportionally from the center.
Make the water layer sit naturally. Blend its edges with the room using a soft layer mask. Paint black on the mask where walls meet water for smooth transitions.
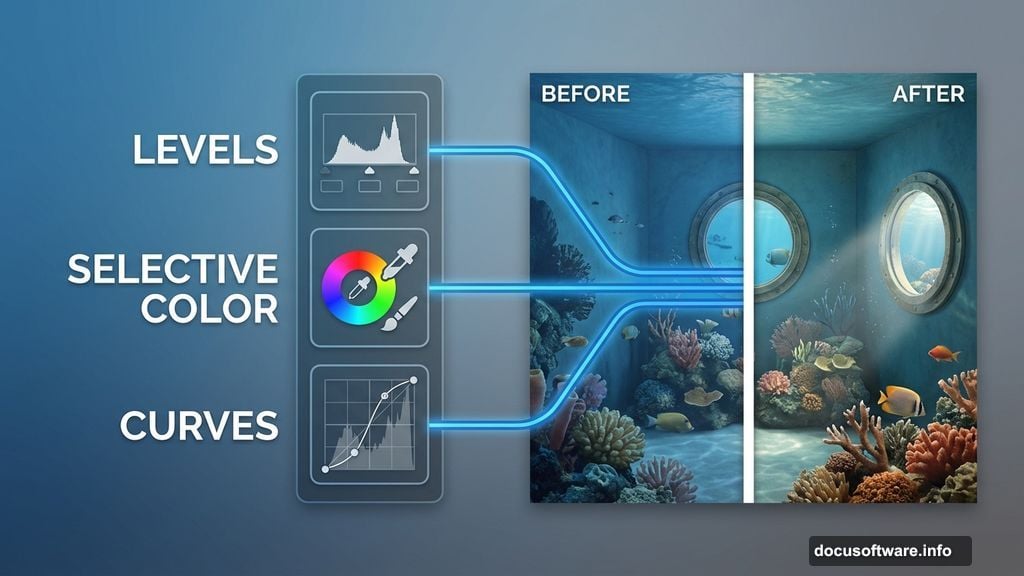
Adjusting Light and Color Balance
Raw photos rarely match. Adjustment layers fix this fast.
Add These Adjustments:
First, apply a Levels adjustment. This fixes overall brightness and contrast. Drag the black slider right slightly to deepen shadows.
Next, add Selective Color. Target blues and cyans to enhance the underwater feeling. Increase cyan in blues by 10-15%.
Then apply Curves. Click and drag the curve line to adjust specific tonal ranges. Brighten midtones slightly while keeping shadows dark.
Important: Each adjustment layer should target specific problems. Too many adjustments create muddy colors.
Painting Shadow Areas

Create depth by darkening certain areas manually.
Add a Curves adjustment layer. Set it to darken overall. Then invert the mask (Ctrl/Cmd + I). The adjustment disappears.
Now paint on the mask with a white brush. Use these settings:
- Hardness: 0%
- Opacity: 100%
- Flow: 10%
Paint gradually on walls and darker areas. Low flow lets you build up shadows naturally. This technique beats trying to get it perfect in one pass.
Enhancing Highlights and Dark Areas
Light makes scenes believable. Add it carefully.
For Highlights:
Create another Curves layer. Brighten it significantly. Invert the mask again. Paint white on areas where light would hit naturally—top of furniture, light-colored surfaces, areas near windows.
For Deep Shadows:
Repeat the process but darken the curve instead. Paint shadows into corners, under furniture, and behind objects.
Remember, underwater light behaves differently. It creates soft, diffused illumination with gentle shadows.
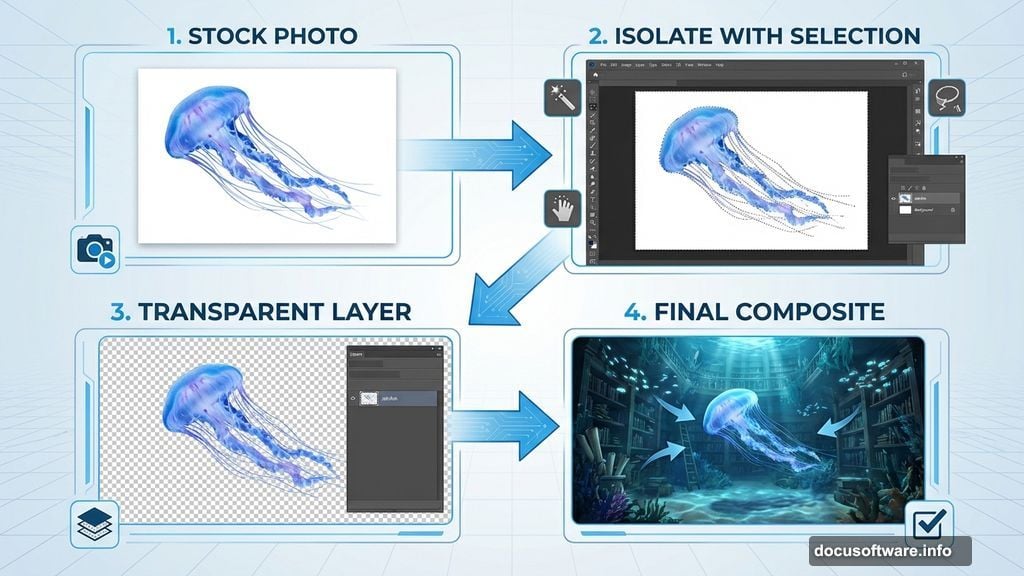
Placing Fish Throughout the Scene
Time to populate your aquarium with life.
Import each fish separately. This gives you control over positioning and lighting. Place larger fish in the foreground. Smaller fish work better in the background for depth.
For Each Fish:
- Remove the original background completely
- Adjust color to match the underwater environment
- Add slight blur to background fish
- Apply subtle glow around each fish
Use the same adjustment layer techniques from earlier. Match each fish’s color temperature to your scene.
Adding Jellyfish as Focal Points
Jellyfish create drama. Their translucent bodies catch light beautifully.
Place jellyfish strategically. Not too many—three to five works well. Position them at different depths to enhance the 3D effect.
Jellyfish-Specific Adjustments:
Make them partially transparent. Set layer opacity between 70-85%. This creates that signature translucent look.
Add an outer glow layer style. Use a soft white or light blue. This simulates how jellyfish emit subtle bioluminescence.
Creating Realistic Bubbles
Bubbles add movement and authenticity to water scenes.
Import bubble overlays or create your own. Scatter them throughout the image. Vary their sizes and opacity levels.
Bubble Placement Tips:
- Clusters look more natural than perfect spacing
- Larger bubbles near the bottom, smaller ones rising
- Some bubbles should be slightly out of focus
- Add motion blur to bubbles for movement sense
Set bubble layers to Screen blending mode. This makes them integrate better with the background.
Balancing Overall Color Temperature
Your scene needs color harmony. All elements should feel connected.
Add a Color Fill adjustment layer. Set it to a deep blue-green. Then change the blending mode to Color and reduce opacity to 15-20%.
This unifies everything. Different source photos often have different color temperatures. This adjustment makes them all feel like they exist in the same water.
Creating Light Rays and Glow Effects
Light rays add magic to underwater scenes.
Create a new layer. Set it to Screen mode. Use a soft, white brush with very low opacity. Paint diagonal streaks from top to bottom. These simulate light filtering through water.
Add glow around brighter objects. Jellyfish, light fixtures, and fish should have subtle halos. Use outer glow layer styles or paint manually on Screen mode layers.
Applying Final Camera Raw Adjustments
Camera Raw gives you powerful finishing controls.
Go to Filter > Camera Raw Filter. Make these final tweaks:
- Increase clarity slightly (5-10) for definition
- Add subtle vignette to draw focus inward
- Adjust white balance if needed
- Fine-tune shadows and highlights
Don’t overdo it. Subtle adjustments maintain the effect’s believability.
Common Mistakes to Avoid
Watch out for these issues that break immersion.
Too Much Color Saturation:
Underwater scenes should feel slightly desaturated. Overly vibrant colors look fake. Keep saturation moderate.
Inconsistent Light Direction:
All shadows should point the same direction. Mixed light sources confuse the eye.
Sharp Edges on Everything:
Water softens edges naturally. Background elements need slight blur. Only foreground subjects stay sharp.
Overcrowded Composition:
More fish doesn’t mean better. Empty space creates breathing room and emphasizes what matters.
Taking This Effect Further
This technique works beyond libraries.
Try transforming bedrooms, offices, or even outdoor scenes. The principles stay the same. Any space can become an aquarium with this method.
Experiment with different marine life. Sharks, coral, dolphins, or even fantasy creatures work great. The selection and adjustment skills transfer perfectly.
Some artists create series showing the same space flooded at different stages. Others combine this with other effects like adding broken windows or floating furniture.
The real skill isn’t following steps exactly. It’s understanding why each adjustment works. That knowledge lets you adapt the technique to any creative vision you have.