Fantasy photo manipulation intimidates many Photoshop users. The lighting seems impossible. The depth looks fake. The glow effects never quite work.
But here’s the truth. Creating magical scenes comes down to mastering three core techniques: strategic blurring for depth, layered glow effects, and smart color grading. Once you understand these fundamentals, you can transform ordinary photos into otherworldly scenes.
This tutorial walks you through building a complete fairy manipulation from scratch. You’ll learn professional techniques for atmospheric depth, ethereal lighting, and believable compositing. No magic required—just solid Photoshop skills.
Build Your Canvas and Import Assets
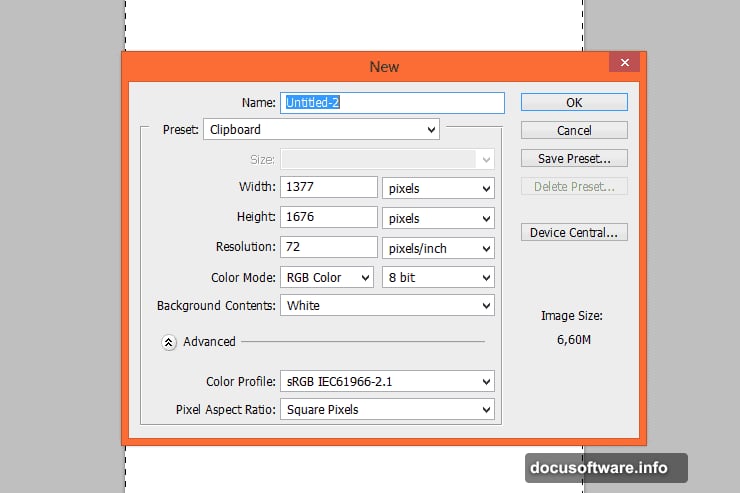
Start by creating a new portrait-oriented document in Photoshop. The exact dimensions don’t matter much, but aim for something around 2000×3000 pixels for high-quality results.
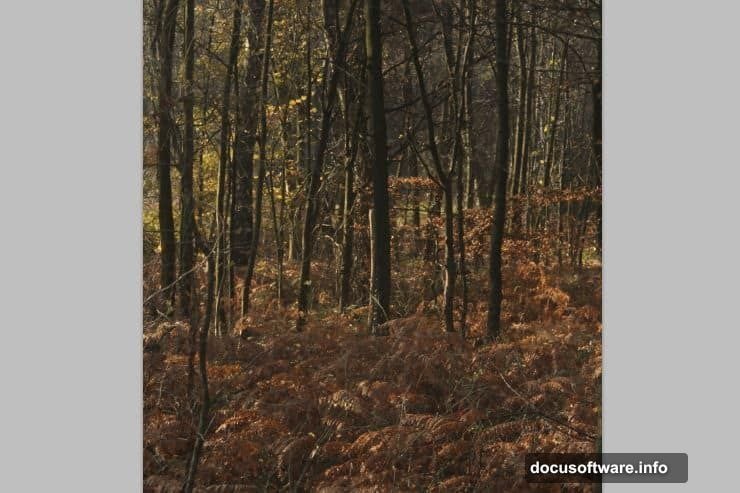
Next, place your forest background stock image. Position it to fill your canvas. This becomes your foundation layer, so take time to get the framing right before moving forward.
The background sets your entire scene’s mood. Choose wisely.
Create Realistic Depth with Strategic Blurring
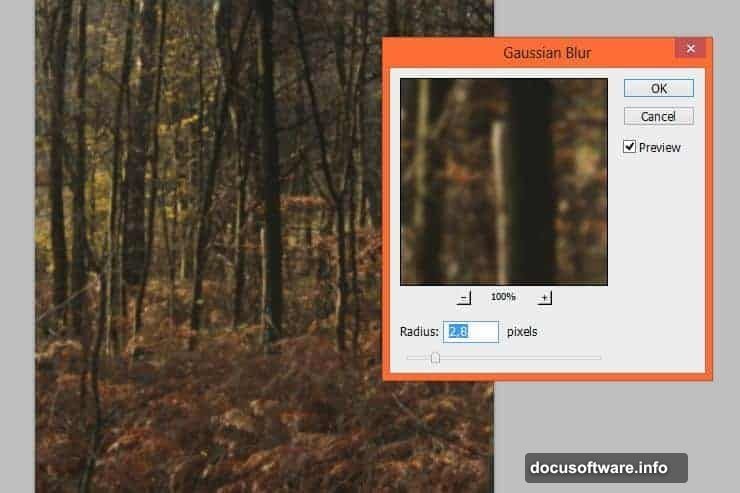
Real forests have depth. Objects closer to the camera appear sharp while distant elements blur naturally. You’ll recreate this effect using Gaussian Blur and layer masks.
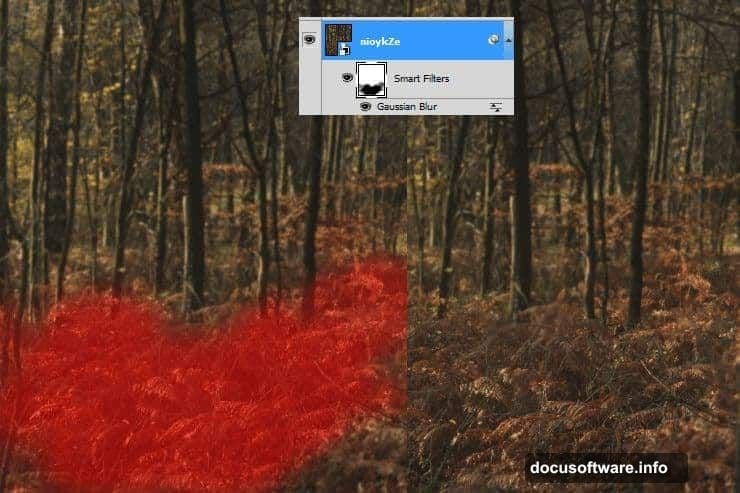
Apply a Gaussian Blur filter to your forest layer. Set the radius to around 2.8 pixels. This creates subtle softness across the entire background.
Now here’s the key technique. Click the white canvas next to the Smart Filter title to access the filter mask. Using a large, soft brush with reduced opacity, paint away the blur in the center foreground area. Start with 30-40% opacity and build up gradually.
Why does this work? Because depth isn’t uniform. The ground near your subject stays sharp while edges and distant areas fade. Varying your brush opacity creates natural transitions instead of obvious blur boundaries.
Add Extreme Background Blur for Atmosphere
Duplicate your forest layer. Right-click the Smart Filter and choose “Clear Smart Filters.” Then right-click the layer itself and select “Rasterize Layer.”
Go to Filter > Blur > Lens Blur. This filter mimics how camera lenses actually create depth of field. Play with the settings until you achieve strong background blur—think shallow depth of field on a fast lens.
Add a layer mask to this blurred layer. Carefully erase the foreground and first-layer trees. You’re creating depth zones: sharp foreground, medium background, and very blurry distant background.
Finally, reduce this layer’s opacity to around 35%. Full-strength blur looks artificial. Blending it at lower opacity creates subtle atmospheric depth that feels photographic.
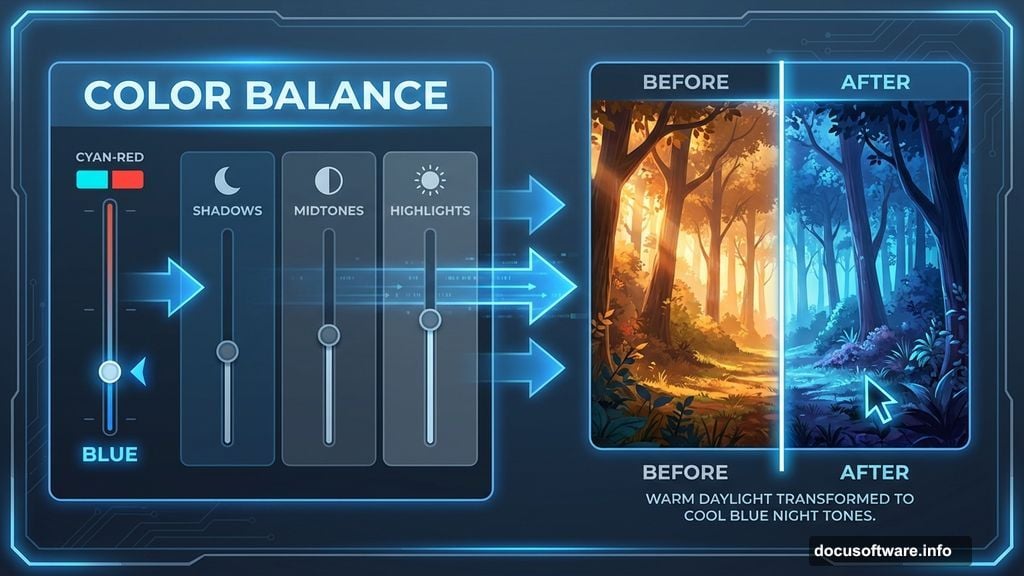
Transform Day to Night with Color Balance
Night scenes need cooler tones and shifted color balance. Add a Color Balance adjustment layer.
In the Shadows, push toward Blue and Cyan. In the Midtones, add more Blue and reduce Red. For Highlights, shift slightly toward Blue and Yellow.
These adjustments transform your daylight forest into twilight. The exact values matter less than the overall color shift. Your eyes should register “nighttime” immediately when you apply the adjustment.
Generate Atmospheric Fog Effects
Create a new layer. Set your foreground color to black and background to white. Go to Filter > Render > Clouds. Photoshop generates random cloud patterns using your selected colors.
Add some dark brush strokes along the bottom of this layer. This helps the fog blend naturally into the ground rather than floating obviously.
Change the layer’s blending mode to Screen. This makes black areas transparent while keeping lighter fog visible. Reduce opacity to around 22% for subtle atmospheric haze.
Screen blending mode is essential for realistic fog and glow effects. Remember it.
Reduce Contrast for Night Realism
Nighttime scenes have less contrast than daylight. Add a Brightness/Contrast adjustment layer and decrease the contrast slider.
How much? Enough that your scene feels moodier but details remain visible. Push it too far and everything becomes muddy gray. Find the balance where your forest feels nocturnal but still readable.
This small adjustment makes a huge difference in believability. Our eyes expect lower contrast at night, so matching that expectation sells the illusion.
Position Your Fairy Model
Import your fairy model stock image. Place her in the foreground, positioned where your sharp focus area exists. Scale and position until the composition feels balanced.
Use the Pen Tool to create a precise selection around your model. This takes patience but clean selections are non-negotiable for professional results. Convert your path to a selection and add a layer mask.
Refine the mask edges, especially around hair and wing details. The Select and Mask workspace helps tremendously here. Spend time getting this right—poor masking destroys believability faster than any other mistake.
Match Your Model to the Scene Lighting
Your model arrives from a different photo with different lighting. You need to match her to your forest scene’s color temperature and exposure.
Add a Color Balance adjustment layer clipped to your model layer. Shift her tones to match the cool, blue-tinted forest. She should feel illuminated by the same moonlight affecting everything else.
Next, add a Curves adjustment layer, also clipped to the model. Darken her overall exposure to match the nighttime environment. Pay special attention to shadow areas—they should be nearly as dark as forest shadows.
Consider adding a subtle blue rim light. Create a new layer set to Screen blending mode. With a soft brush and light blue color, paint along her edges where moonlight would catch. This separates her from the background while maintaining lighting consistency.
Add Fantasy Wings
Import your wing stock images. Position them behind your model layer. Transform and warp the wings until they look naturally attached to her shoulder blades.
Wings need depth too. Add subtle Gaussian Blur to wing edges farther from the camera. This reinforces the shallow depth of field effect you built earlier.
Match the wing colors to your scene using Color Balance adjustments. Fantasy elements need the same color treatment as realistic elements to feel cohesive.
Finally, add a soft glow to wing edges using the technique you’ll refine in later steps. Wings should feel magical but not cartoonish.
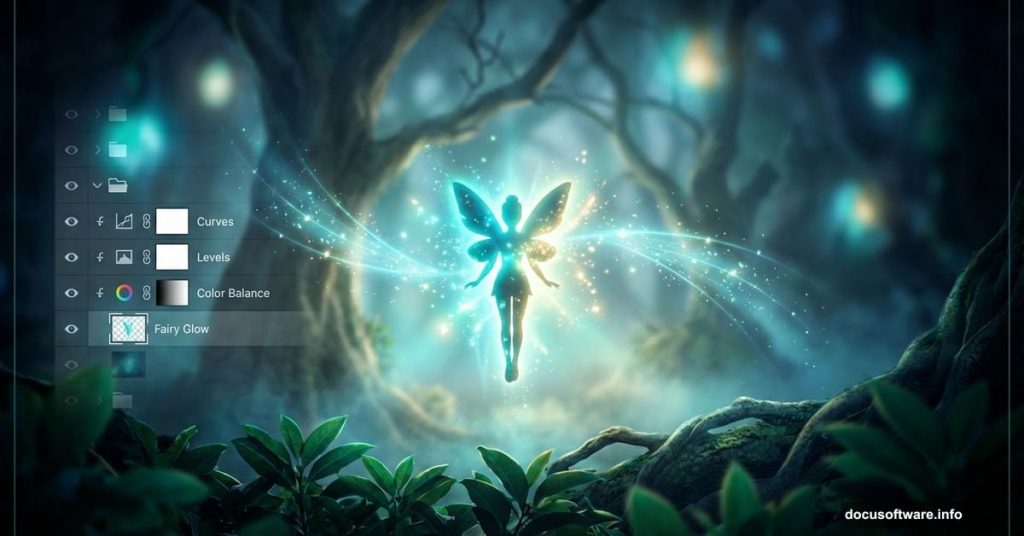
Create Magical Glow Effects
Here’s where your manipulation transforms from realistic to fantastical. Glows sell the magic.
Create a new layer above your model. Set the blending mode to Screen. Using a soft brush with very low opacity, paint bright blue-white around your model’s hands, near her face, and along wing edges.
Build up the glow gradually. Multiple light passes with 10-15% opacity create subtle luminosity. A single brush stroke at 100% opacity looks obviously painted.
Add another layer set to Linear Dodge (Add) for more intense glow spots. This blending mode creates brighter, more saturated glows than Screen mode. Use it sparingly for the brightest light sources.
Consider adding a lens flare or light burst in the background. Go to Filter > Render > Lens Flare. Choose a subtle flare type and position it where your fairy’s magic might emanate from. Reduce opacity until it feels atmospheric rather than overwhelming.
Paint Dragonfly Companions
Install your dragonfly brushes. Create a new layer and select a dragonfly brush. Set your foreground color to a light, cool tone that matches your scene.
Paint several dragonflies around your fairy at varying sizes. Larger dragonflies appear closer to the camera while smaller ones recede into the background.
Apply different blur amounts to different dragonflies based on their distance from the focal plane. Closest ones stay sharp. Mid-distance ones get slight Gaussian Blur. Distant ones get more blur.
Add glow effects to dragonflies using the same Screen and Linear Dodge techniques you used on your model. Their bodies can emit soft bioluminescent light that adds to the magical atmosphere.
Consider adding motion blur to a few dragonflies to suggest movement. This brings life to your static scene.
Build Depth with Foreground Elements
Import dead tree or plant stocks. Position them in the extreme foreground, even partially off-canvas. Make them much larger than background elements to exaggerate depth.
Apply strong Gaussian Blur to these foreground elements. They should be significantly blurrier than your model, mimicking how out-of-focus foreground objects look through a camera lens.
Reduce the opacity of these foreground layers to around 40-60%. They should feel like ghostly frames around your main subject rather than solid, opaque objects.
This technique creates incredible depth perception. Your viewer’s eye travels through blurry foreground, focuses on your sharp model, then recedes into the blurred background.
Add Atmospheric Light Rays
Create a new layer. Using the Lasso Tool, draw diagonal selections where light beams might pierce through the forest canopy. Feather these selections heavily—at least 50 pixels.
Fill the selections with a pale blue-white color. Then apply Gaussian Blur to soften them further. Change the blending mode to Screen and reduce opacity to 15-25%.
Repeat this process with multiple light rays at different angles and sizes. Layer them for complexity. Vary the blur amount and opacity to create realistic light scatter.
Light rays add drama and direct the viewer’s eye toward your subject. Position at least one major ray near or behind your fairy to highlight her as the focal point.

Refine with Final Color Grading
Add a final Color Lookup adjustment layer at the top of your layer stack. Photoshop includes several cinematic LUTs that can instantly enhance your color mood.
Experiment with different LUTs until you find one that enhances your magical atmosphere. “Moonlight” or “Night from Day” presets work well for fantasy scenes. Reduce the LUT opacity if the effect feels too strong.
Consider adding a subtle vignette. Create a new layer filled with black. Apply a strong Gaussian Blur, then use the Eraser Tool with a huge, soft brush to clear the center. Set the blending mode to Soft Light and reduce opacity until you achieve subtle edge darkening.
Add a final Selective Color adjustment if you want to fine-tune specific color ranges. This gives you surgical control over blues, cyans, and greens without affecting your entire image.
Export Your Finished Artwork
Before exporting, create a stamped copy of all visible layers. Press Ctrl+Alt+Shift+E to merge everything into a new top layer while preserving your layer stack below.
Apply final sharpening to this merged layer. Go to Filter > Sharpen > Smart Sharpen. Use a small radius (0.5-1.0 pixels) with an amount around 100-150%. This brings back detail lost during all the blurring and adjustments.
Save your working file as a PSD with all layers intact. You might want to adjust things later.
Export a flattened JPEG at maximum quality for sharing online. Consider your target platform’s optimal dimensions. Instagram prefers 1080×1350 for portrait posts. DeviantArt and ArtStation handle larger files well.
Where Beginners Struggle Most
Masking remains the biggest challenge in photo manipulation. Spend time learning advanced selection techniques. The Select and Mask workspace in newer Photoshop versions helps tremendously, but manual refinement with a small brush still produces the cleanest edges.
Lighting consistency separates amateur work from professional results. Every element must feel lit by the same light sources with the same color temperature. When something looks “pasted in,” lighting mismatch is usually the culprit.
Overdoing effects is tempting with fantasy art. Glows, blurs, and light rays should enhance your scene without overwhelming it. If effects draw more attention than your subject, you’ve gone too far. Subtle always wins over obvious.
Depth of field makes or breaks realism. Study how actual camera lenses render out-of-focus areas. Notice how blur isn’t uniform—it varies based on distance from the focal plane. Recreate this variation in your manipulation.
Building Your Own Magical Scenes
This tutorial’s techniques transfer to any fantasy manipulation. Swap the fairy for a wizard, dragon, or mystical creature. Change the forest to a castle, underwater scene, or alien landscape.
The fundamentals remain constant: strategic depth through layered blurring, atmospheric effects with cloud renders and light rays, color grading that establishes mood, and lighting that unifies all elements.
Practice these techniques separately before attempting complex compositions. Master one blur technique until it becomes intuitive. Then add glow layers. Then work on color matching. Building skills incrementally produces better results than trying to learn everything simultaneously.
Study how light behaves in real environments. Notice how fog scatters light, how shadows fall, how materials reflect or absorb different wavelengths. Photography knowledge directly improves photo manipulation ability.
The gap between “pretty good” and “professional quality” comes down to patience. Spend extra time on masks. Add one more lighting pass. Adjust that Color Balance by two more points. These small refinements accumulate into dramatically better final images.
Your imagination determines your only limit. These Photoshop techniques simply provide the tools to bring your visions to reality.