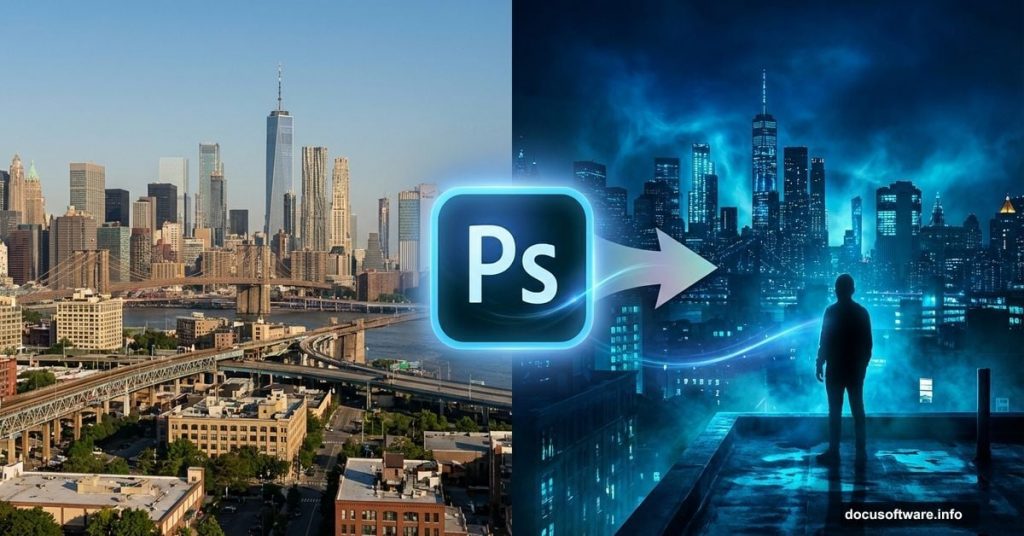
Want to transform ordinary city photos into dramatic rooftop compositions? This tutorial shows you exactly how to blend urban landscapes, atmospheric lighting, and silhouettes into one cohesive scene.
You’ll learn to manipulate light sources, create glowing city effects, and seamlessly integrate human subjects into architectural backgrounds. Plus, we’ll use Camera Raw filters to add that final cinematic polish.
Let’s build something striking.
What You Need Before Starting
Gather these resources first. You’ll need a base city image, a human silhouette, and atmospheric elements like moon textures, birds, and sky overlays.
The tutorial uses specific stock images. But you can substitute similar resources. Just make sure your city photo has decent resolution and your subject has clean edges for easier masking.
Download everything before opening Photoshop. That way you won’t interrupt your workflow hunting for files.
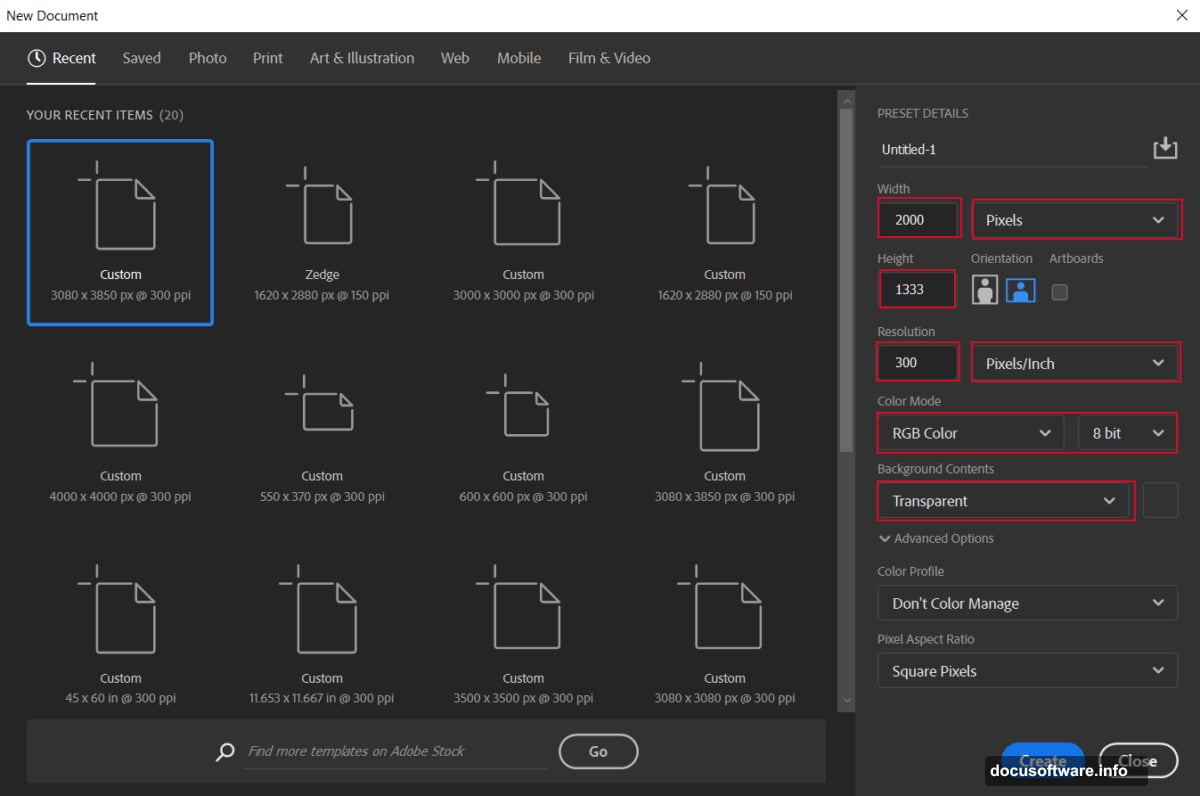
Set Up Your Canvas Properly
Start with a new document. Go to File > New and create a 2000x1333px canvas at 300 DPI. Use RGB color mode with a transparent background.
Why these dimensions? This size works great for web display while maintaining print quality if needed. Plus, the 3:2 aspect ratio matches standard photography formats.
Higher resolution means more detail. But it also means larger file sizes. So 300 DPI hits the sweet spot between quality and performance.
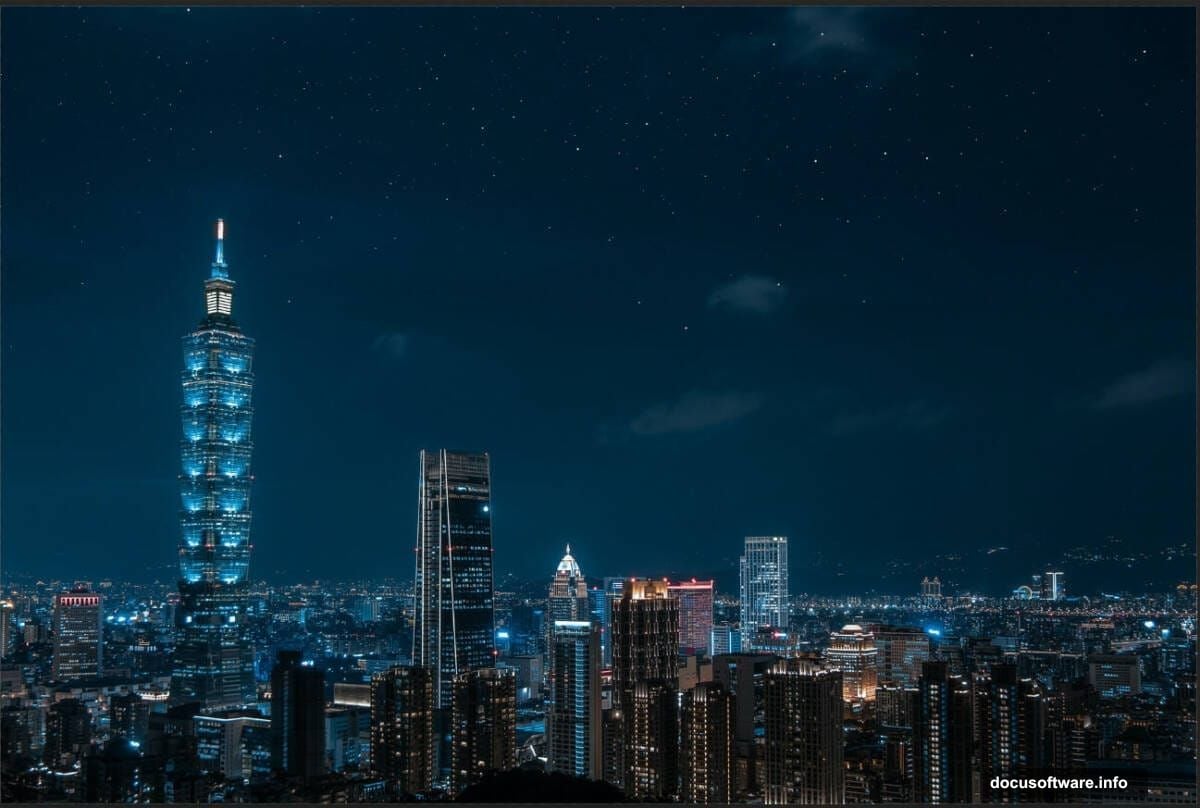
Build Your Base City Layer
Place your city image onto the canvas. Use File > Place to import it, then scale with the transform tool (Ctrl/Cmd + T).
Hold Alt + Shift while dragging corners to maintain proportions. In Photoshop CC, just Alt alone does this. Position your city to fill the frame, leaving some sky space at the top.
Now duplicate this layer with Ctrl/Cmd + J. You’ll use this copy for color adjustments next.
Create That Signature Blue Glow
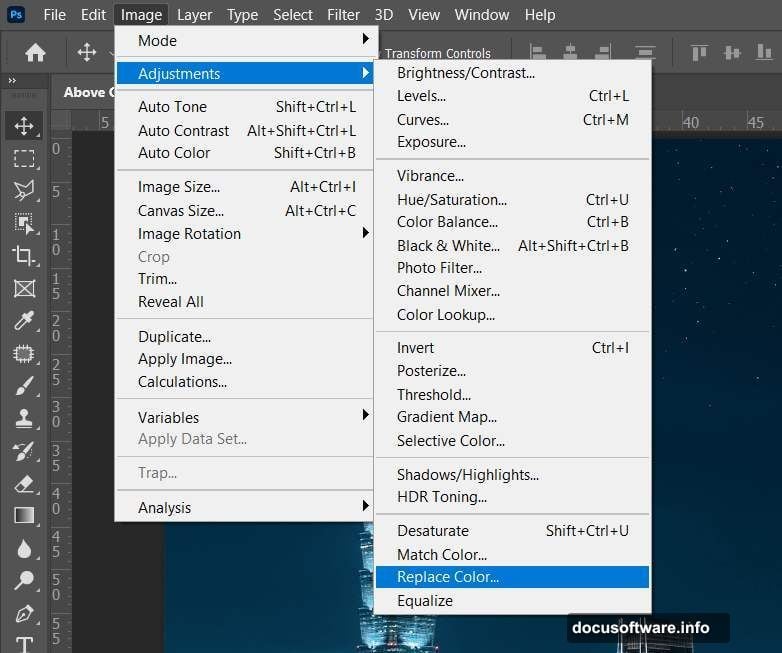
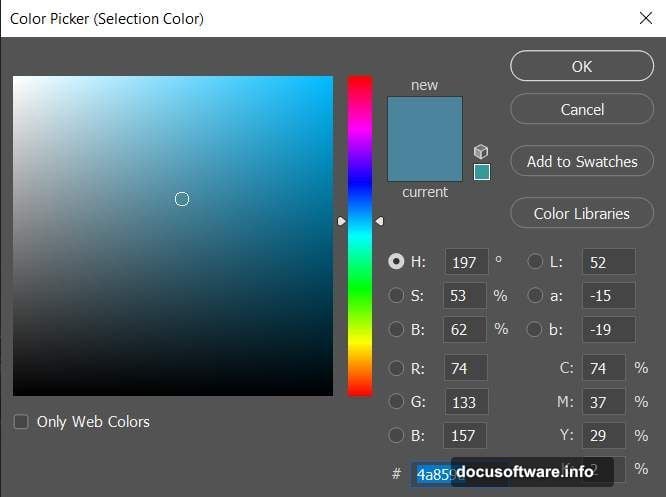
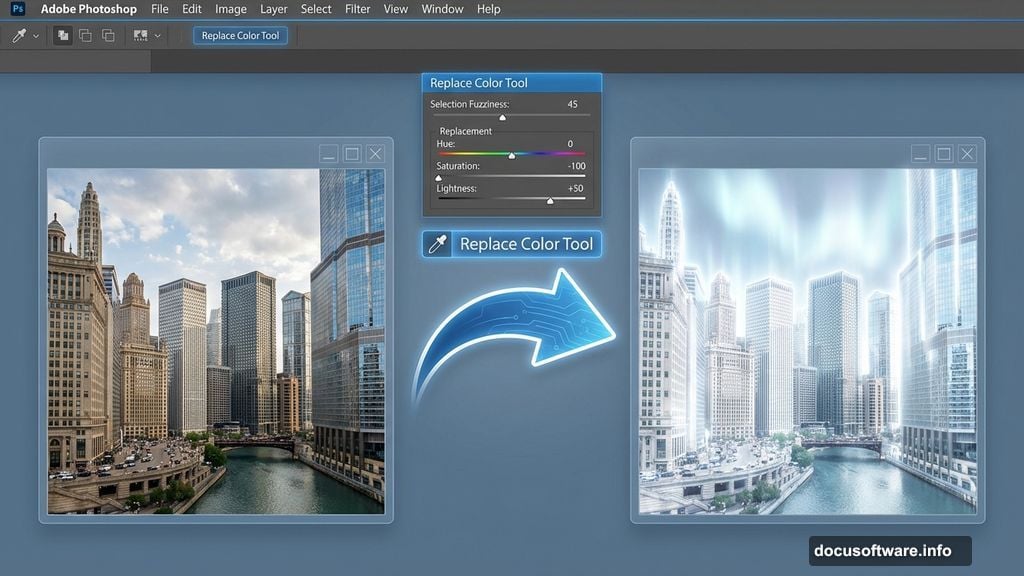
Here’s where the magic starts. Go to Image > Adjustments > Replace Color on your duplicated city layer.
Select blue tones around #4a859d. Check “Localized Color Clusters” and set Fuzziness to 45. Then push Saturation to -100 and Lightness to +100.
This technique converts blue areas into bright white highlights. It mimics the way city lights bloom in nighttime photography. The result? That dreamy, ethereal glow you see in cinematic urban shots.
Balance Overall Tones With Curves
Add a Curves adjustment layer. Lift the midtones slightly to brighten the overall scene without blowing out highlights.
The curve should form a gentle S-shape. This increases contrast while maintaining detail in shadows and highlights.
Don’t go too aggressive here. Subtle adjustments look more natural than dramatic shifts.
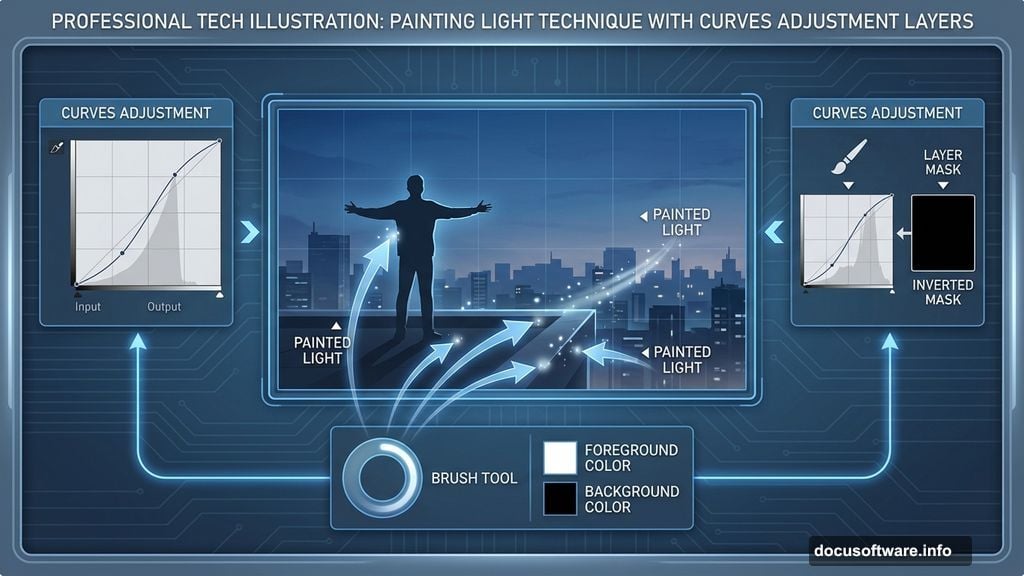
Paint Light Where You Want It
Add another Curves adjustment layer. But this time, invert the mask with Ctrl/Cmd + I so the adjustment doesn’t affect anything initially.
Grab a soft round brush with white as your foreground color. Paint on the mask where you want extra brightness. Focus on light sources, building edges, and areas you want to emphasize.
This selective brightening technique gives you precise control over your lighting. It beats global adjustments because you’re painting light exactly where it matters most.
Enhance Shadows for Depth
Add one more Curves adjustment layer. Pull down the midtones slightly to deepen shadows and increase overall contrast.
This step adds dimension to your scene. Without deeper shadows, images look flat and lifeless. The contrast between bright city lights and dark shadows creates that dramatic nighttime atmosphere.
Again, subtlety wins. You’re enhancing existing shadows, not creating a noir film.
Layer the City Glow Effect
Now place your glow effect image. Import it the same way you brought in the city photo.
Position this glowing overlay over your city. Then change the blend mode to Color Dodge. This blend mode intensifies lights dramatically while leaving dark areas relatively unchanged.
Create a layer mask and use a soft black brush to remove glow from the sky. You want the effect concentrated on the city itself, not bleeding into clouds.
Duplicate this glow layer twice with Ctrl/Cmd + J. Multiple layers intensify the effect and give you more control over final intensity.
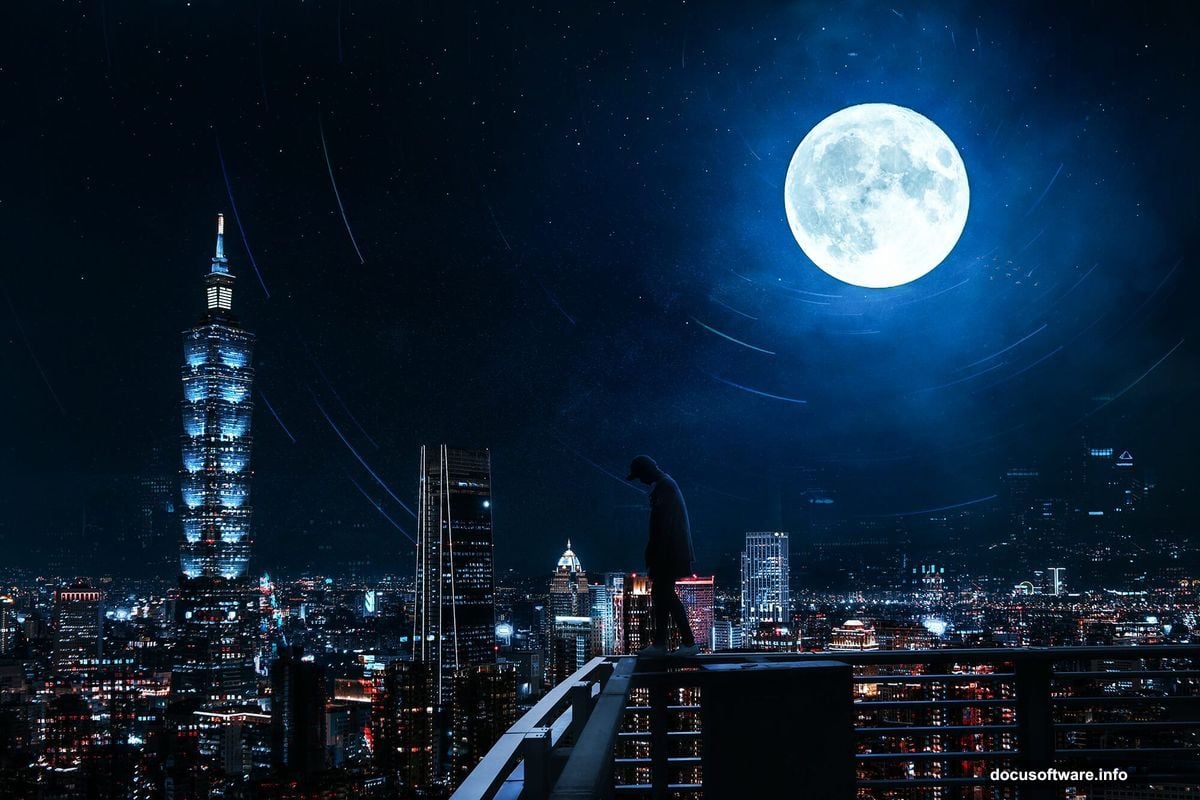
Add Your Human Subject
Open your figure image separately. Use the Pen Tool (P) to trace around the person carefully. Take your time here—clean selections matter.
Right-click and choose “Make Selection” when you’ve closed your path. Then create a layer mask to isolate your subject.
The Pen Tool takes practice. But it produces cleaner selections than quick selection tools, especially around hair and complex edges. For this tutorial, a silhouette works best anyway.
Position and Scale Your Figure
Move your masked subject onto your main composition. Scale and position them on the rooftop or building edge where you want them.
Consider perspective carefully. Your figure should match the angle and scale of the architecture. Too large and they look like giants. Too small and they disappear.
Use the transform tool’s reference points to align with building edges. This helps maintain proper perspective.
Blend the Figure Into the Scene
Add a Curves adjustment layer clipped to your figure layer. Darken the person to match the overall scene lighting.
Since this is a nighttime scene, your subject should read mostly as a silhouette. But keep some edge definition visible so they don’t become a flat black shape.
You can also add a slight blue tint to match the color temperature of the city lights reflecting off their clothing.
Add Rim Lighting for Separation
Create a new layer above your figure. Use a soft white brush with low opacity (around 20-30%) to paint subtle highlights along the edge facing the brightest light source.
This rim lighting separates your subject from the background. It’s how real light behaves—it catches edges and creates definition.
Don’t overdo it. Just a hint of edge light makes the difference between a pasted-on figure and one that belongs in the scene.
Place the Moon Dramatically
Import your moon texture and position it in the upper portion of your composition. Scale it appropriately—moons in wide shots should be relatively small, not filling half the sky.
Use a layer mask and soft brush to blend the moon’s edges into the sky. Hard edges scream “fake” instantly.
Change the blend mode to Screen or Lighten. This lets the moon glow naturally without looking pasted on.
Add Atmospheric Depth With Textures
Layer in your cloud and Milky Way textures. These add depth and atmosphere to your sky.
Use Screen or Lighten blend modes again. Adjust opacity until these elements enhance rather than dominate the scene.
The goal is subtlety. Your sky should feel rich and dimensional without pulling attention from your main subjects.
Populate the Sky With Birds
Place your bird silhouettes scattered across the frame. Vary their sizes to create depth—smaller birds read as more distant.
Group them in realistic flight patterns. Birds rarely fly in perfect lines or uniform spacing.
Reduce opacity slightly on more distant birds. This atmospheric perspective trick enhances the three-dimensional feel.
Add Film Grain for Texture
Create a new layer at the top of your layer stack. Fill it with 50% gray (Edit > Fill > 50% Gray).
Apply Filter > Camera Raw Filter. Navigate to the Effects panel and add grain. Adjust the size and roughness to taste.
Change this layer’s blend mode to Overlay or Soft Light. Then reduce opacity to around 20-30%.
Grain adds an organic, photographic quality. Digital images often look too clean. A hint of texture makes them feel more authentic.
Apply Final Color Grading
Add a final Curves adjustment layer at the very top. Make subtle adjustments to the RGB composite curve and individual color channels.
For a cool nighttime look, lift the blue channel slightly in the shadows. You can also add a subtle S-curve to the RGB channel for contrast.
This final color grade unifies all your elements. It’s like the color correction stage in filmmaking—everything comes together here.
Use Camera Raw for Polish
Flatten a copy of all your layers (Ctrl/Cmd + Alt + Shift + E). Then apply Filter > Camera Raw Filter.
In Camera Raw, adjust clarity, vibrance, and dehaze to enhance detail and color. Use the graduated filter tool to darken the top of the frame slightly, drawing attention downward.
Camera Raw’s controls feel more intuitive than traditional Photoshop adjustments for many users. Plus, it’s non-destructive if you convert to a Smart Object first.
The clarity slider in particular adds micro-contrast that makes architectural details pop.
Save Your Masterpiece Properly
Save your working file as a PSD to preserve all layers. Then export a flattened JPEG or PNG for sharing.
Use File > Export > Export As for maximum control over file size and quality. For web display, 85-90% JPEG quality offers a good balance.
Keep your layered file. You might want to adjust elements later, and having that flexibility beats starting over from scratch.
Common Mistakes to Avoid
The biggest error? Over-processing. When every element screams for attention, nothing looks believable.
Also watch your light sources. If the moon is on the right, your rim lighting should match that direction. Inconsistent lighting destroys the illusion instantly.
Finally, don’t skip the blending steps. Just dropping elements onto a canvas without adjustment layers looks amateurish. The magic happens in how you blend everything together.