Photo manipulation transforms ordinary images into stunning surreal artwork. But most tutorials skip the why behind each step.
This guide breaks down how to create a dramatic lighthouse scene floating among clouds. You’ll learn essential masking techniques, adjustment layer strategies, and Camera Raw secrets that work across projects. Plus, every step includes specific values and brush settings.
Let’s build something spectacular.
Gather Your Source Images First
Before touching Photoshop, collect high-quality source files. You’ll need specific elements for this composition.
Required images:
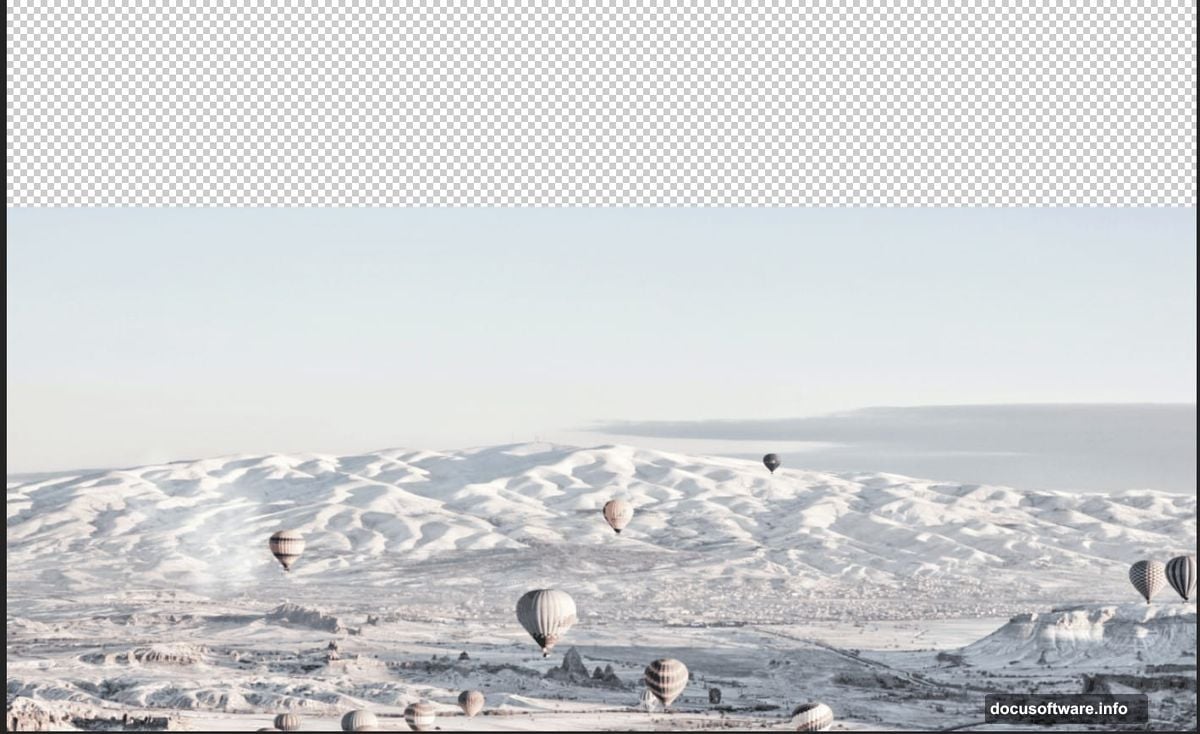
- Sky background with dramatic clouds
- Large cloud formation for the base
- Lighthouse photo (preferably isolated)
- Seagull images (multiple angles work best)
- Boy silhouette or photo
- Cloud brushes pack
Image quality matters. Use photos with similar lighting directions. Mismatched light sources ruin believability fast. Also, higher resolution images give you flexibility during composition.
Download all assets before starting. Nothing kills creative flow like hunting for files mid-project.
Set Up Your Canvas Properly
Canvas setup determines final output quality. Don’t skip this foundation.
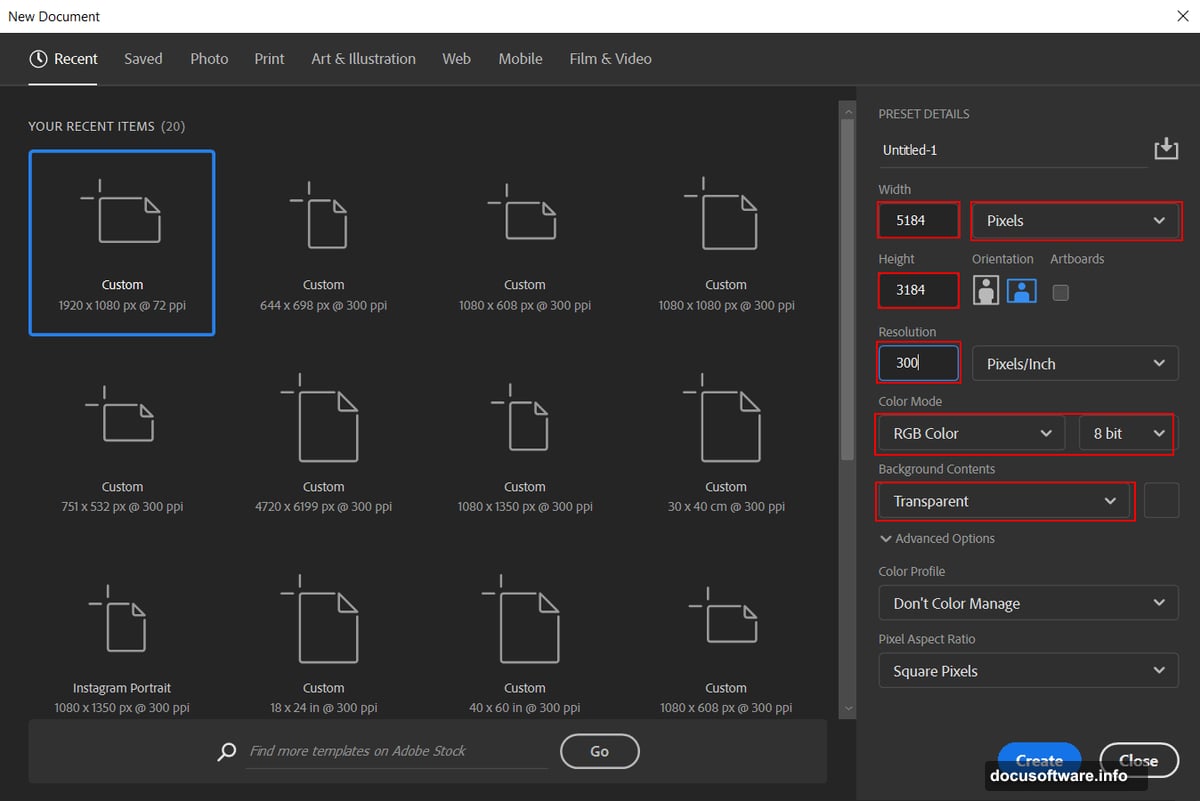
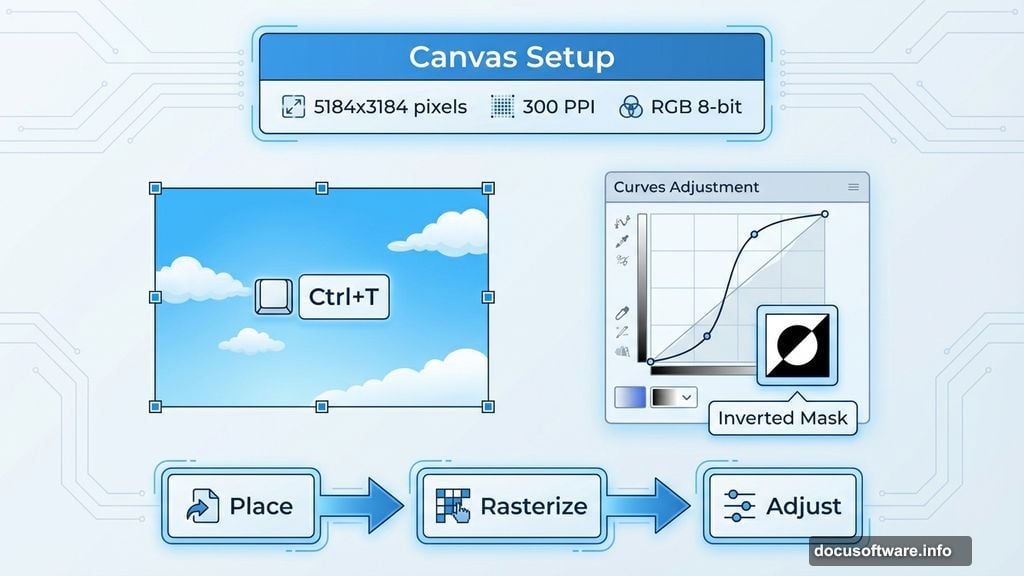
Open Photoshop and create a new document. Navigate to File > New and input these exact specifications:
- Preset: Custom
- Width: 5184 pixels
- Height: 3184 pixels
- Resolution: 300 PPI
- Color Mode: RGB Color 8-bit
- Background: Transparent
Why these dimensions? This size provides print-quality resolution while maintaining manageable file sizes. The 16:10 aspect ratio works for both digital display and physical prints.
Transparent backgrounds prevent white edges during composition. You’ll thank yourself later when blending elements.
Place Your Base Sky Background
Start with atmospheric foundation. Your sky sets the entire mood.
Navigate to File > Place and select your sky image. Position it using the transform tool (Ctrl/Cmd + T). Hold Alt + Shift while dragging corner handles to resize proportionally. In Photoshop CC, holding Alt alone maintains proportions from center.
Pro tip: Place your sky slightly larger than the canvas. This gives cropping flexibility later if composition needs adjusting.
Right-click the layer and select Rasterize to convert from smart object. Now you can apply adjustments directly.
Enhance Sky Depth With Curves
Flat skies kill drama. Layer multiple Curves adjustments to build dimension.
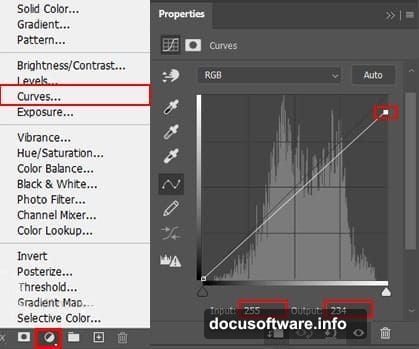
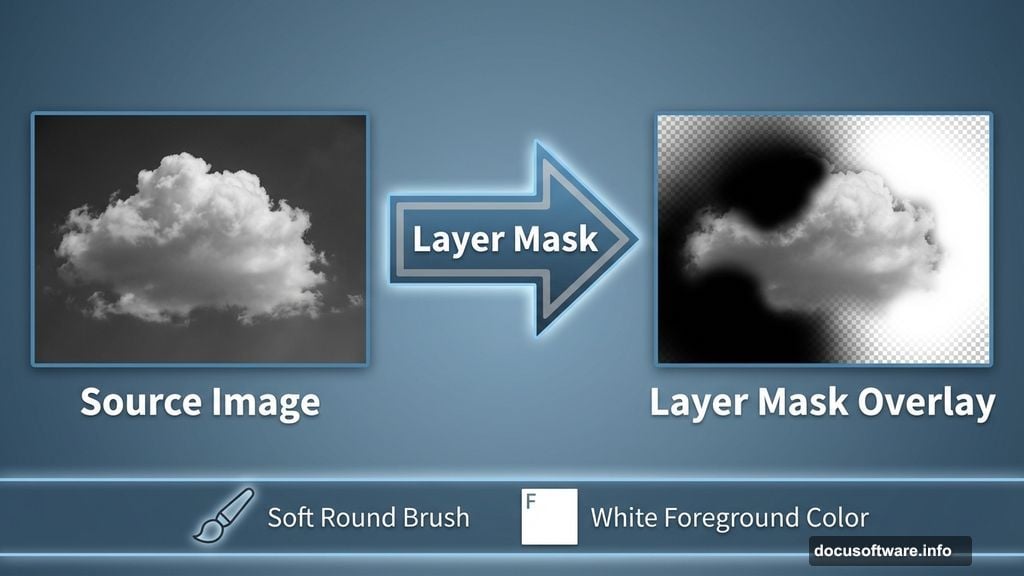
Add a Curves adjustment layer above your sky. Immediately press Ctrl/Cmd + I to invert the layer mask to black. This hides the adjustment initially.
Select the Brush Tool (B) with a soft round brush. Set foreground color to white. Paint over darker sky areas where you want enhanced shadows. The inverted mask technique gives precise control over which areas receive the adjustment.
Why invert first? Painting adjustments exactly where needed beats globally adjusting then masking unwanted areas. You build effects intentionally instead of removing mistakes.
Add a second Curves adjustment layer. Again, press Ctrl/Cmd + I to invert the mask. This time, paint white on highlight areas to boost brightness selectively.
These targeted adjustments create natural-looking depth that uniform curves never achieve.
Blend Secondary Sky Elements
Multiple sky layers add complexity and visual interest. But blending requires finesse.
Open your secondary sky image. Use the Rectangular Marquee Tool (M) to select the best portion. Copy (Ctrl/Cmd + C) and paste (Ctrl/Cmd + V) onto your main canvas.
Position with Transform (Ctrl/Cmd + T), resizing while holding Alt + Shift for proportional scaling.
Now create a layer mask. Select the Gradient Tool (G) with foreground set to black and background to white. Drag from bottom to top across your image. This creates a smooth fade from visible to transparent.
Gradient direction matters. Bottom-to-top blends sky elements naturally. Top-to-bottom looks artificial because lighter areas appear at the bottom naturally.
Color Grade Your Sky Foundation
Professional photo manipulations use multiple adjustment layers for color consistency. Stack these carefully.
Hue/Saturation adjustment: Add this layer above your sky elements. Shift overall color temperature to match your creative vision. Cooler tones create moody atmospheres. Warmer tones feel more inviting.
Levels adjustment: This balances overall tonal range. Drag the black and white input sliders inward to increase contrast. Don’t crush blacks or blow out highlights.
Black and White adjustment: Don’t panic—you’re not removing all color. Reduce opacity to 20-30%. This subtle desaturation creates a slightly muted, ethereal quality perfect for surreal scenes.
Color Balance adjustment: Fine-tune color relationships here. Add cyan to shadows for depth. Push midtones toward the dominant color scheme. Adjust highlights to complement rather than match shadows.
These layered adjustments work together. Each subtle change compounds into cohesive color grading.
Group and Refine With Exposure
Organization prevents chaos in complex compositions. Group related layers immediately.
Select all sky layers by holding Ctrl/Cmd while clicking each layer. Press Ctrl/Cmd + G to create a group. Name it “Sky Base” or similar.
Add an Exposure adjustment layer above the group. This controls overall brightness without affecting individual layer relationships. Increase exposure if your scene feels too dark. Decrease for moodier atmospheres.
Why adjust after grouping? Changes affect all underlying layers uniformly. You maintain relative differences between layers while controlling overall brightness.
Add another Curves adjustment above Exposure. This final curves layer fine-tunes contrast across your entire sky foundation.
Build Your Cloud Platform Base
The lighthouse needs something to stand on. Create that impossible cloud platform now.
Place your large cloud image onto the canvas. Position it where you want the lighthouse to rest. This cloud becomes the physical foundation of your surreal scene.
Mask away hard edges. Use a soft brush on the layer mask to blend cloud edges into the surrounding sky. Natural clouds have soft, diffuse boundaries. Hard edges scream “Photoshop manipulation.”
Cloud positioning tip: Place it lower-third of the composition. This leaves room for sky above while grounding the scene. Too high feels cramped. Too low wastes dramatic sky space.
Adjust cloud brightness and color to match your established sky. Use Curves and Color Balance targeted to just this cloud layer. It should feel part of the atmosphere, not pasted on top.
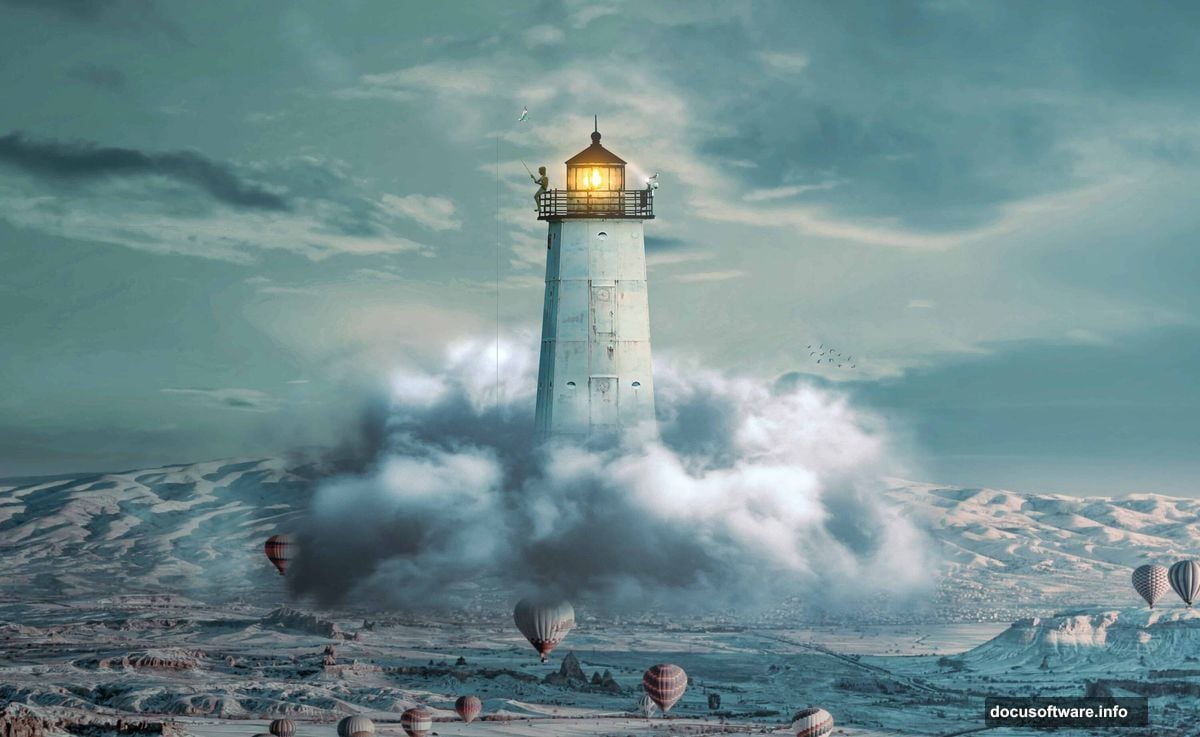
Add the Lighthouse With Precision
Time for your focal point. Lighthouse placement and integration determine composition success.
Place the lighthouse image onto your canvas. Position it on your cloud platform. The base should appear to rest naturally on the cloud surface.
Create a detailed layer mask. Use a hard-edged brush for the lighthouse structure. Switch to a soft brush where the base meets the cloud. This partial softness suggests the lighthouse is nestled into the cloud rather than sitting on top.
Lighting consistency check: Does the lighthouse light direction match your sky? If your sky suggests light from the right, the lighthouse should cast shadows toward the left. Mismatched lighting breaks immersion instantly.
Add shadow beneath the lighthouse. Create a new layer set to Multiply blend mode. Paint soft shadows with a black brush at low opacity (15-20%). Shadows anchor floating objects, making impossible scenes feel plausible.
Populate With Seagulls for Scale
Empty skies feel lifeless. Birds add movement and scale reference.
Place seagull images at varying distances. Larger birds appear closer. Smaller birds suggest depth. Position some above the lighthouse, others below the cloud platform.
Scale variation matters. Three birds at identical sizes look staged. Vary sizes even slightly to suggest different distances from viewer.
Blur distant birds slightly. Select Filter > Blur > Gaussian Blur and apply 0.5-1 pixel radius. This atmospheric perspective makes distant objects less sharp, adding realism.
Adjust seagull brightness to match atmospheric depth. Distant birds should be slightly lighter and lower contrast than foreground birds.
Add the Boy for Emotional Anchor
Human elements create emotional connection. Your viewer needs someone to relate to.
Place the boy silhouette or photo onto your composition. Position him on the cloud platform, perhaps gazing toward the lighthouse. This establishes narrative—the scene tells a story now, not just showcases technical skill.
Mask carefully around the figure. Clean edges on the silhouette maintain focus. Soft edges suggest integration with the environment.
Color matching critical: The boy must share the scene’s color palette. Use Color Balance and Curves targeted to his layer. Match the atmospheric tone exactly.
Add subtle shadows where the boy contacts the cloud surface. Same technique as the lighthouse—new layer set to Multiply, soft black brush at low opacity.
Apply Camera Raw for Final Polish
Camera Raw brings everything together with professional-grade finishing.
Merge all visible layers into a new top layer (Ctrl/Cmd + Alt + Shift + E). Select this merged layer and choose Filter > Camera Raw Filter.
Essential Camera Raw adjustments:
Start with Basic panel. Increase Clarity to 15-25 for enhanced midtone contrast. Push Vibrance up 10-15 to boost muted colors without oversaturating.
Move to Tone Curve. Create a subtle S-curve by lifting shadows slightly and pulling down highlights. This adds polish and depth.
Color Grading panel secrets: This is where magic happens. Push shadows toward blue-cyan for depth. Shift midtones toward your dominant color—orange for warmth, teal for coolness. Keep highlights neutral or slightly warm.
Adjust Split Toning if available in your version. Add complementary color tints to shadows and highlights. This creates cohesive color harmony across the entire image.
Finally, bump sharpening to 40-60 with Masking around 70. This adds crispness to key elements while avoiding noise in smooth areas like sky.
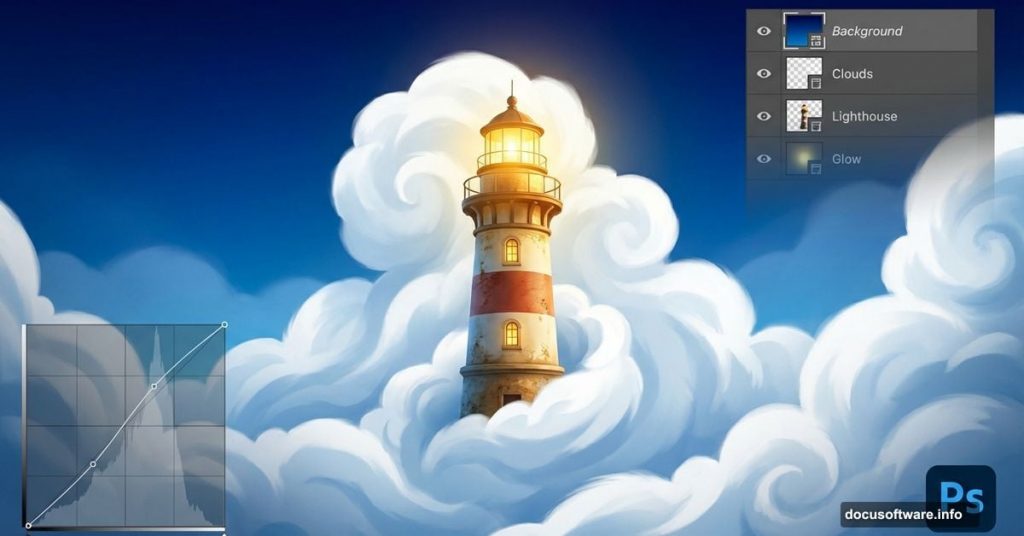
The Psychology Behind This Scene
This composition works because it taps into universal metaphors. Lighthouses represent guidance and searching. Clouds suggest dreams and impossibility. The boy adds human scale and wonder.
Surreal photo manipulation succeeds when it feels emotionally true even while being visually impossible. Technical execution matters. But without emotional resonance, it’s just a technical exercise.
Your choices throughout this process—color grading decisions, element placement, lighting consistency—all serve that emotional truth. Every adjustment should ask: “Does this strengthen the story or just show off technique?”
Choose story over spectacle every time.