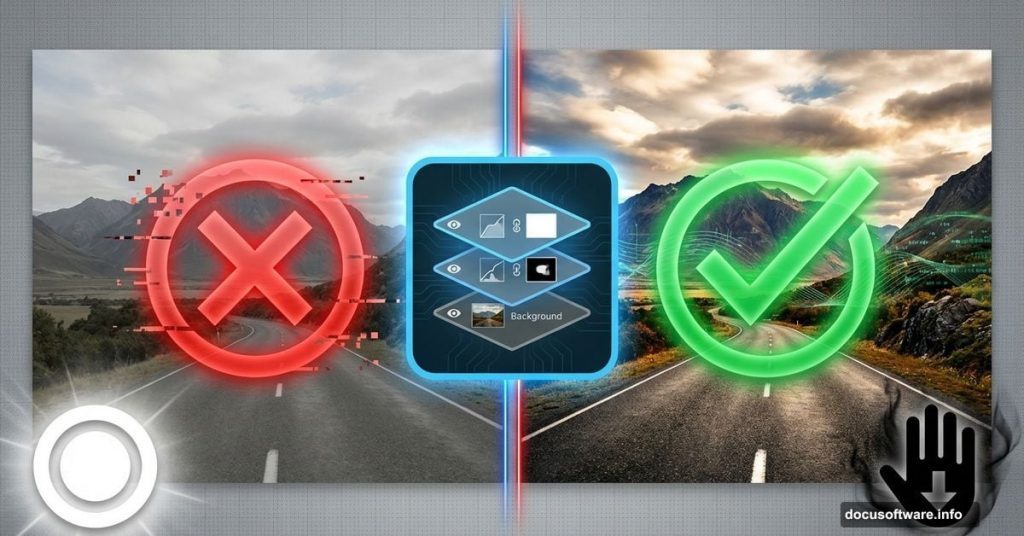
Dodging and burning transforms flat photos into dramatic masterpieces. But most photographers do it wrong and permanently damage their images.
The difference between amateur and professional retouching often comes down to this one technique. Done right, you can reshape lighting, add depth, and guide viewers’ eyes exactly where you want them. Done wrong, you’ll create muddy shadows and blown-out highlights that can’t be fixed.
Let’s break down how to dodge and burn nondestructively so you always have an escape route.
Why Nondestructive Editing Matters
Traditional dodging and burning tools in Photoshop permanently alter your pixels. Once you save and close, those changes become baked in forever.
That’s a disaster if you change your mind later. Or if a client requests adjustments. Or if you simply pushed an area too far and need to dial it back.
Nondestructive techniques solve this. You keep your original image intact while building changes on separate layers. So you can adjust, remove, or fine-tune effects at any time without quality loss.
Plus, you can save your dodging and burning layers as templates. Then apply similar lighting adjustments across multiple photos with just a few clicks.
The Two-Layer Method for Clean Results
Here’s the foundation technique that gives you complete control.
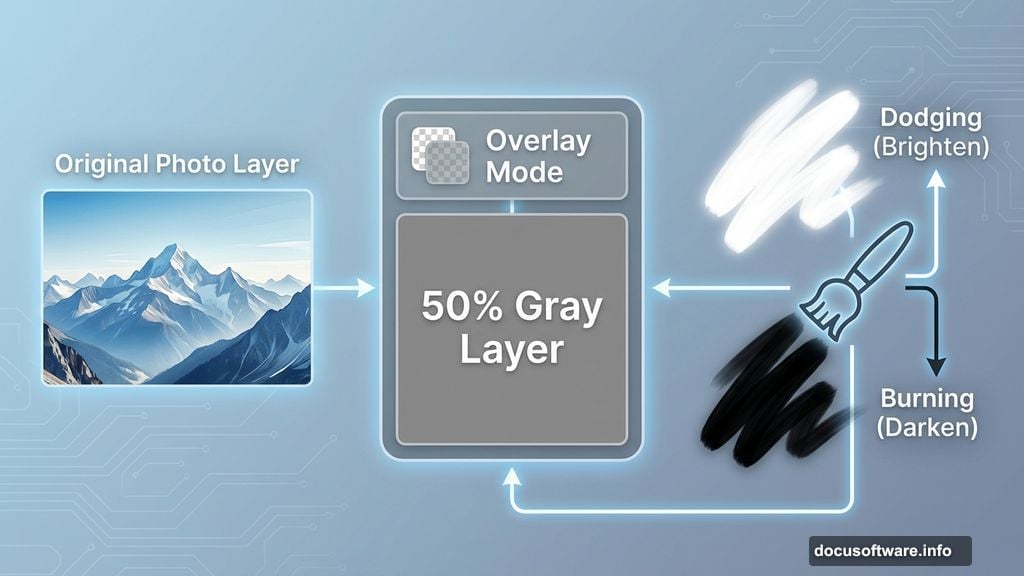
First, create two new layers above your image. Fill one with 50% gray and set its blend mode to Overlay. This becomes your dodging and burning layer.
Now grab the Brush tool. Set it to soft edges with low opacity around 10-15%. Paint with white to brighten areas (dodging). Paint with black to darken them (burning).
The beauty? Gray at 50% is completely invisible in Overlay mode. Only your white and black brush strokes show through. So you can see exactly what you’re changing without the layer itself interfering.
However, there’s a smarter approach that gives even better results.
Luminosity Masking Takes It Further
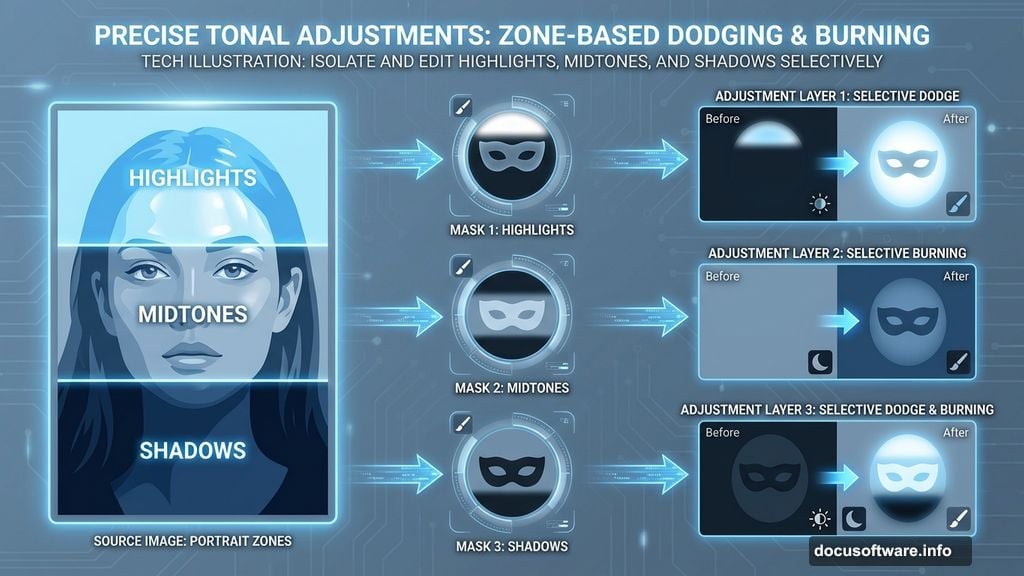
Standard dodging and burning affects all tones equally. But photos have different brightness zones that respond differently to adjustments.
Luminosity masks target specific tonal ranges. You can brighten only the highlights, darken only the shadows, or adjust midtones without touching anything else.
This prevents common problems like blowing out bright areas when you dodge or crushing shadow detail when you burn. Your adjustments stay natural because they respect the existing tonal structure.
Creating luminosity masks used to require complex channel calculations. But modern Photoshop includes built-in luminosity selection tools that make it straightforward.
Instead of painting blindly across your entire image, you first select the tonal range you want to affect. Then your dodging and burning only impacts those specific brightness levels.
Practical Applications That Actually Work

Portrait photographers use this technique for facial contouring. Darken the sides of the nose, burn under cheekbones, and dodge the center of the forehead. Suddenly faces look more sculpted without obvious makeup or editing.
Landscape shooters rely on it for drama. Burn down bright skies that compete for attention. Dodge foreground elements to pull them forward. The result looks like perfect natural lighting even when the original exposure was flat.
Architecture photographers fix perspective issues with selective burning. Dark corners that bow outward can be lightened to straighten apparent lines. Bright spots that draw unwanted attention get burned down to match their surroundings.
Product photography benefits from precise highlight and shadow placement. You can make objects appear more three-dimensional by strategically dodging edges and burning recessed areas.
Common Mistakes to Avoid
Most beginners overdose and burn too aggressively. Remember that subtle adjustments compound across multiple areas. Build effects gradually with low opacity brushes.
Another trap? Forgetting to zoom out. What looks perfect at 200% zoom often appears unnatural at actual viewing size. Check your work at multiple zoom levels.
Plus, burning shadows too much creates dead black zones with zero detail. Always preserve some shadow information even when darkening significantly. Otherwise your image looks posterized and artificial.
Finally, dodging highlights excessively blows them out to pure white. Keep an eye on your histogram while working. If you see spikes hitting the right edge, you’ve gone too far.
Combining Techniques for Maximum Impact
The real power emerges when you layer multiple dodging and burning passes with different luminosity masks.
Start with broad tonal adjustments using masks that target large brightness ranges. This establishes your overall lighting direction and mood.
Then add a second layer with tighter masks focused on specific elements. Facial features, foreground objects, or key architectural details get refined separately.
Finally, create a third layer for micro-adjustments. Small highlights on eyes, rim lighting on hair, or tiny shadow details that add polish.
Each layer uses low opacity. But together they create dramatic effects that still look completely natural. And because everything lives on separate layers, you can adjust the strength of each pass independently.
When to Stop Editing
Here’s the hard truth. You can always do more dodging and burning. But more isn’t always better.
The best retouchers know when to stop. Your goal is enhancing the existing light and form, not creating entirely new lighting that defies physics.
If someone looks at your photo and immediately thinks “Photoshop,” you’ve pushed too far. Great dodging and burning is invisible. Viewers feel the impact without noticing the technique.
Take breaks while editing. Come back with fresh eyes after an hour or the next day. You’ll immediately spot areas that need dialing back.
Better yet, keep your original next to your edited version. Does the edited version look like the same photo but better? Or does it look like a different image entirely? Aim for the former.
Dodging and burning separates decent photos from stunning ones. Master the nondestructive approach and you’ll have complete control over your image lighting forever.