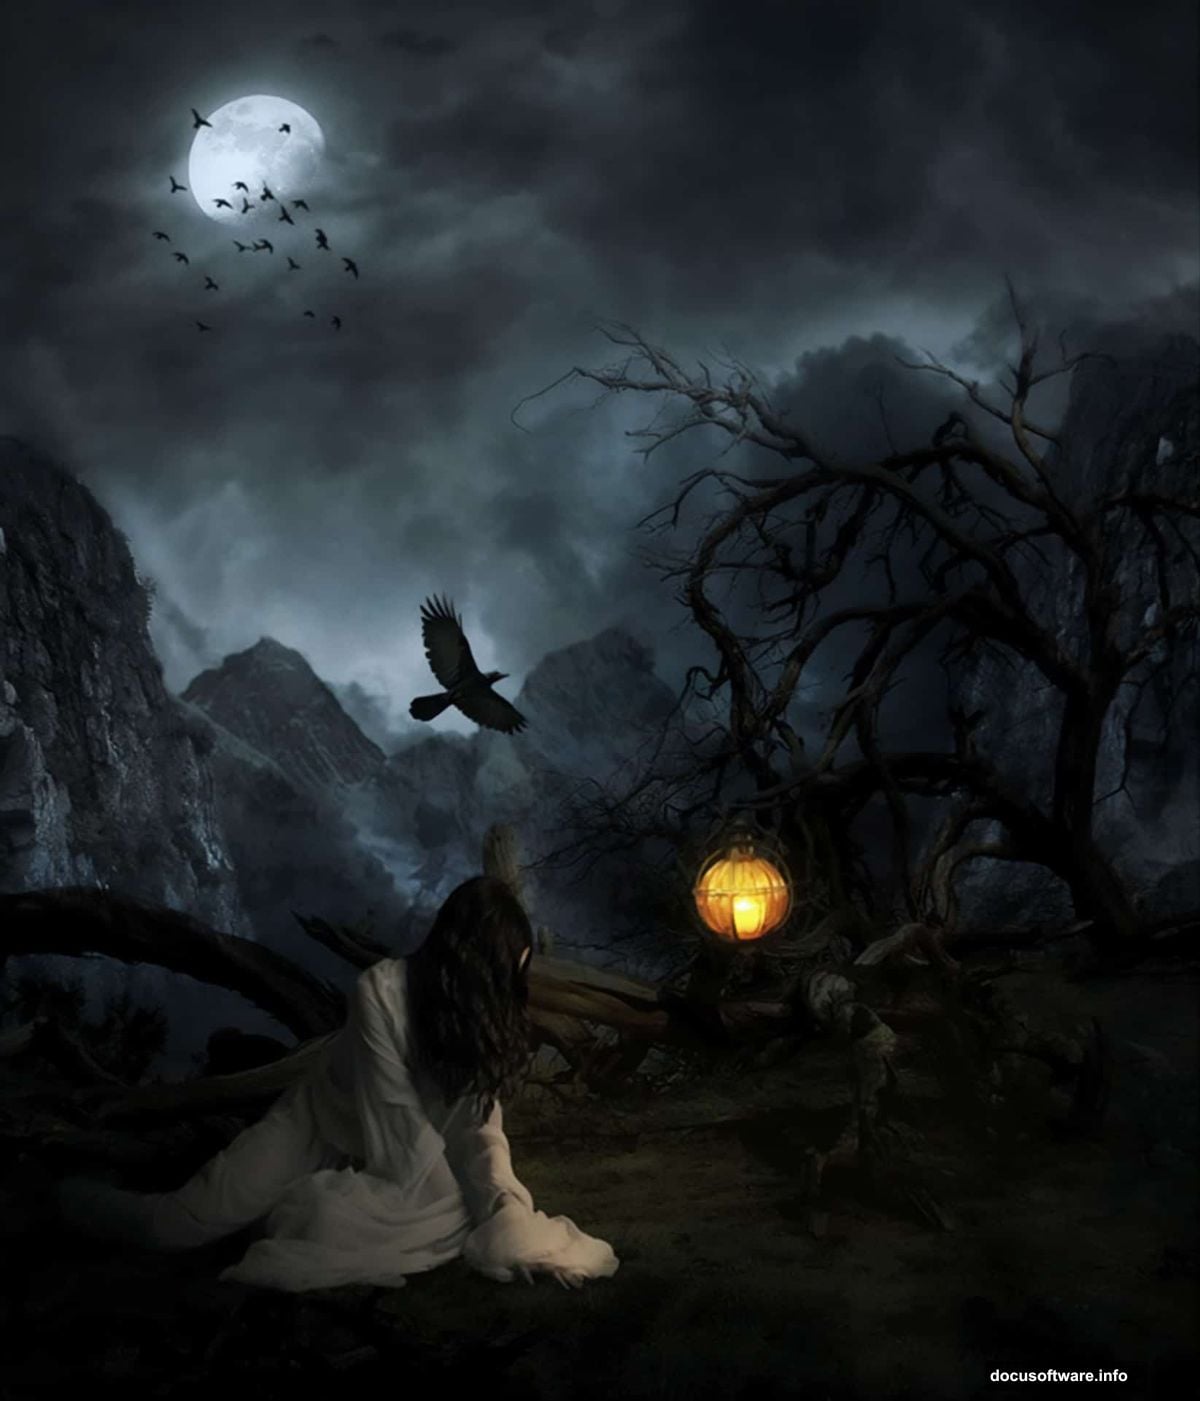
Want to build a dark, surreal landscape that looks straight out of a nightmare? This Photoshop composite tutorial walks you through creating a moody mountain scene with atmospheric elements.
You’ll learn practical techniques for blending multiple images seamlessly. Plus, the methods work for any composite project, not just this specific scene. Let’s dive into the process.
What You’ll Learn
This tutorial covers essential composite techniques most Photoshop guides skip. You’ll master layer masking without tedious selections. You’ll also learn how to create realistic shadows and atmospheric lighting.
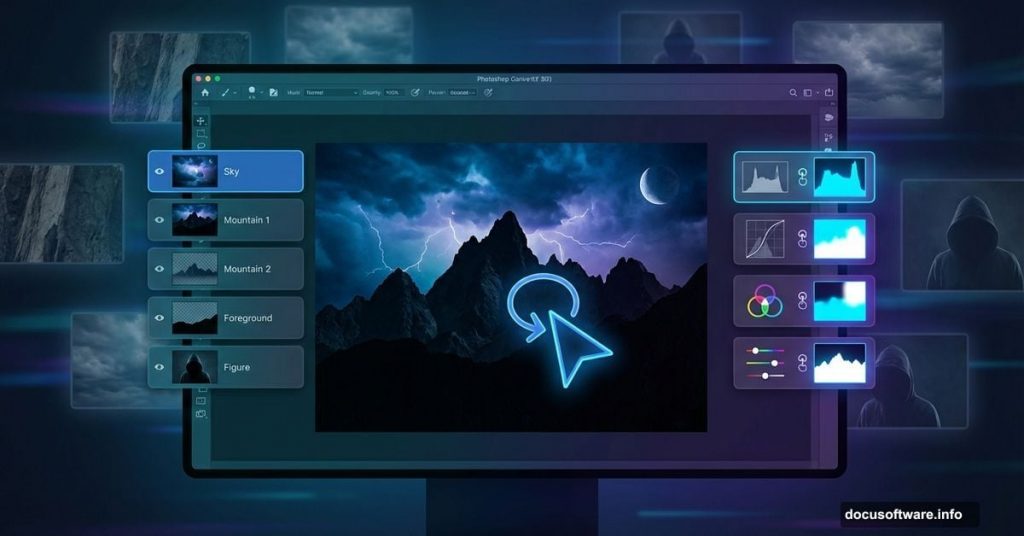
The final image combines landscape photos, sky elements, and character models into one cohesive scene. More importantly, you’ll understand why each step matters so you can apply these skills to your own projects.
Before You Start
You need Photoshop CS5 or newer for this tutorial. Earlier versions lack some adjustment layer features we’ll use.
Gather all your source images first. The tutorial uses specific stock photos from DeviantArt, Pixabay, and other free resources. Download everything before you begin. That way you won’t break your workflow hunting for files mid-project.
Also grab the smoke brushes and bird brushes linked in the original tutorial. These speed up certain effects significantly.
Building the Base Landscape
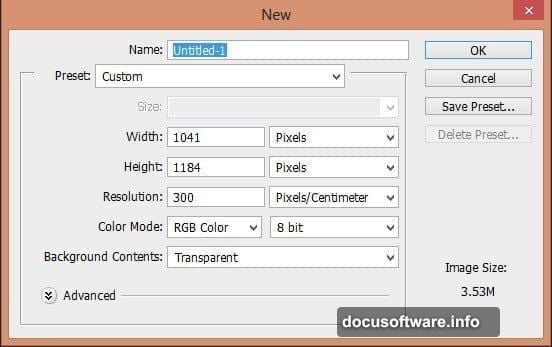
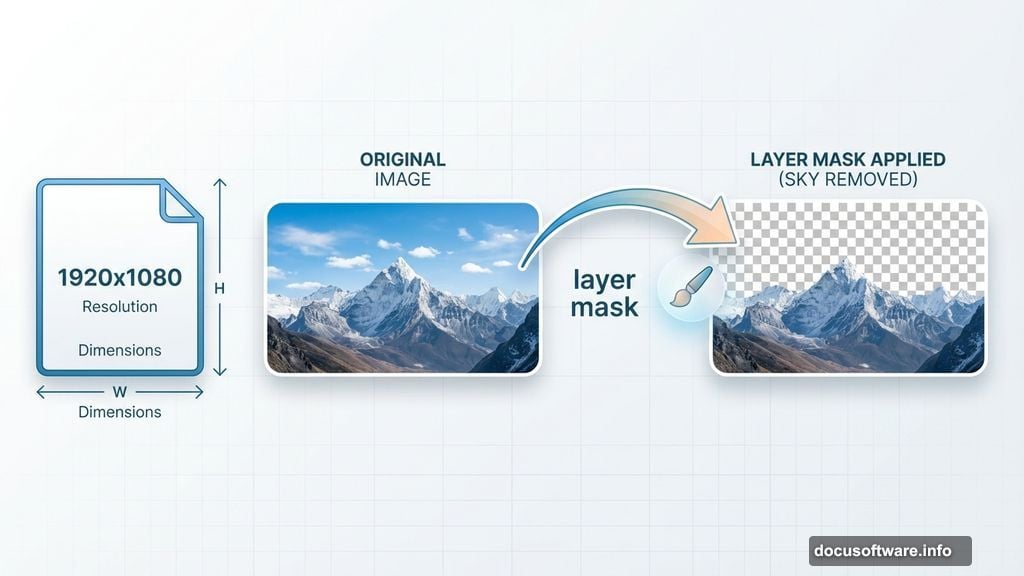
Start with a new document at 1920×1080 pixels or higher. Higher resolution gives you more flexibility for cropping and adjustments later.
Place your main landscape image as a smart object. File > Place automatically converts images to smart objects. This lets you resize or transform without losing quality. Smart objects save you when you realize later that mountain needs to be bigger.
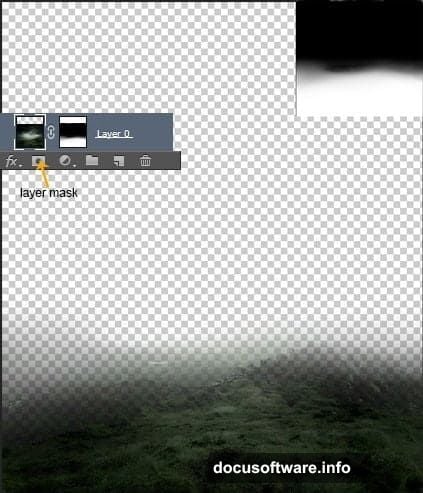
Add a layer mask to the landscape. Select a soft black brush and paint away the sky portion. Don’t worry about perfect edges yet. You’re just removing the original sky so you can replace it with something more dramatic.
Creating the Dark Sky
Place your sky image below the landscape layer. This creates your background atmosphere.
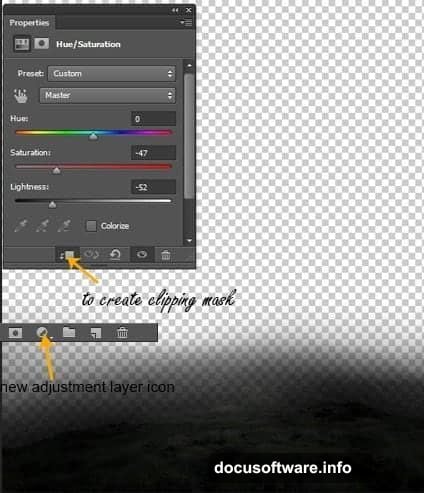
Now here’s where things get interesting. Add a Curves adjustment layer to the sky. Clip it to the sky layer by clicking the button at the bottom of the adjustment panel. This ensures your curves only affect the sky, not other elements.
Drag the curve down to darken the sky significantly. You want an ominous, stormy feel. Don’t be afraid to go really dark. You can always lighten it later if needed.
Adding Mountain Layers
This technique transforms ordinary mountain photos into surreal peaks. Place your first mountain image and position it in the mid-ground.
Instead of carefully selecting around the mountain, just mask out the sky with a soft brush. Work quickly. The overlapping elements and atmospheric effects will hide imperfect edges. That’s the secret most tutorials don’t tell you.
Add multiple mountain layers at different depths. Place larger mountains in the foreground, smaller ones behind. This creates depth through overlapping shapes and atmospheric perspective.
For each mountain layer, add a Hue/Saturation adjustment. Reduce saturation by 40-50% and drop lightness by 30-50%. Distant mountains should be lighter and less saturated than foreground ones. This mimics how atmosphere affects distant objects.

Blending the Trees
Trees create that creepy forest atmosphere. But selecting individual branches takes forever.
Here’s the faster method. Place your tree images and roughly mask out the sky behind them. Don’t waste time on precise selections.
Instead, change the tree layer’s blend mode to Multiply or Darken. Suddenly those rough edges disappear. The dark branches blend naturally while the lighter sky areas become transparent. This works because blend modes compare pixel values between layers.
Add a subtle blur if edges still look too sharp. A 0.5 to 1 pixel Gaussian Blur softens things without making them obviously blurry.
Placing the Character
Your model becomes the focal point. Place her in the lower third of the composition, slightly off-center. This follows the rule of thirds for better visual balance.
Extract the model from her background. Use Select > Select and Mask for cleaner edges around hair and clothing. Refine the edge detection if needed.
Once placed, the model will look pasted in. Fix this with adjustment layers. Add Curves to match the overall scene darkness. Use Color Balance to shift her tones toward the blues and teals in your landscape.
Creating Realistic Shadows
Shadows ground your subject in the scene. Without them, everything floats awkwardly.
Create a new layer below your model. Set it to Multiply blend mode. Use a soft black brush at 30-40% opacity to paint shadow underneath and behind her. Think about where your light source is. Shadows fall opposite the light direction.
Blur the shadow layer slightly with Gaussian Blur. Real shadows have soft edges, especially in diffused outdoor lighting.
Adding Atmospheric Elements
Fog and mist create depth and mood. Place your smoke brush on a new layer. Paint with white at low opacity in the mid-ground and background. This simulates atmospheric haze.
Make distant elements hazier than foreground ones. This atmospheric perspective trick makes your scene feel three-dimensional.
Add your moon or light source. Place it on a separate layer. Give it a subtle Outer Glow in the Layer Styles panel. This creates the natural light bleeding effect around bright objects.
Lighting Effects
Create dramatic lighting with Curves adjustment layers. Add a Curves layer over your entire composition. Lift the curve in areas where moonlight hits. Drop it in shadow areas.
Use the layer mask on your Curves adjustment. Paint black on the mask where you don’t want the adjustment. Paint white where you do. This gives you precise control over which areas brighten or darken.
For rim lighting on your character, add another Curves layer clipped to the model. Brighten it significantly. Then invert the mask (Ctrl/Cmd + I) and paint white along the edges facing your light source. This creates that beautiful backlit glow.
Adding the Birds
Birds add movement and scale. Place your raven or crow images scattered through the sky. Vary their sizes based on distance from camera. Closer birds should be larger and sharper. Distant ones smaller and slightly blurred.
You can also use bird brushes for quick silhouettes. Create a new layer, select a hard round brush, and stamp your bird shapes. Make them solid black for dramatic silhouettes against the sky.
Color Grading the Scene
Now unify everything with color adjustments. Add a Color Lookup adjustment layer at the top of your layer stack. This affects everything below it.
Try different LUTs to find a mood you like. Moonlight, Teal and Orange, or custom cinema LUTs work well for dark atmospheric scenes.
Follow up with a Color Balance adjustment layer. Push the midtones toward blue and cyan. Add a touch of blue to the shadows too. This creates that cold, moonlit atmosphere.
Final Polish
Add a subtle vignette to draw eyes toward your center of interest. Create a new layer and fill it with white. Go to Filter > Lens Correction and use the Vignette slider to darken edges. Change the layer blend mode to Multiply and reduce opacity to taste.
Finally, add a selective sharpening pass. Merge all visible layers to a new layer (Ctrl/Cmd + Alt/Option + Shift + E). Apply a High Pass filter (Filter > Other > High Pass) at 1-2 pixels. Change blend mode to Overlay or Soft Light. Use a layer mask to remove sharpening from areas that should stay soft, like distant mountains or fog.
Why This Approach Works
Most Photoshop composites fail because elements don’t match in lighting, color, or atmosphere. This tutorial prioritizes those relationships over perfect selections.
By using blend modes, adjustment layers, and atmospheric effects strategically, you create unity across disparate source images. The result looks like a cohesive photograph rather than obvious cut-and-paste work.
Plus, these techniques scale. Once you understand how to use Curves for targeted lighting or blend modes for quick masking, you’ll work faster on every composite project.
Practice these methods on your own images. The specific scene doesn’t matter. The principles of matching light, color, and atmosphere apply to any photo manipulation work you do.