
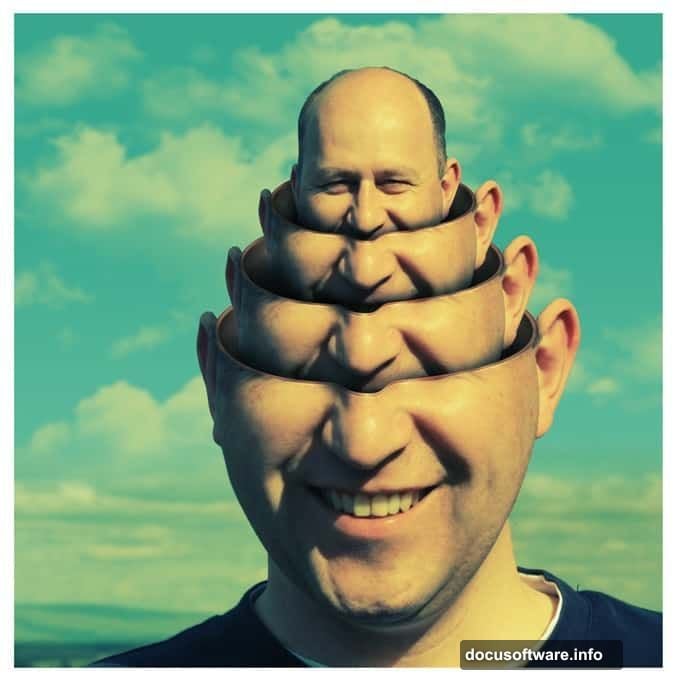
Want to create mind-bending surreal portraits? The stacked head effect turns ordinary selfies into impossible sculptures that grab attention.
This technique sounds complex. But it only needs two stock photos and solid selection skills. No fancy plugins required. Just Photoshop‘s built-in tools and some patience.
Let’s break down how to stack human heads like an architectural marvel.
What You’ll Need Before Starting
First, gather your materials. You need two things: a portrait photo with clear shoulders and head, plus a cloud background image if you want dramatic sky effects.
The portrait should show someone facing forward. Side angles make selection harder. Good lighting helps too. Shadows complicate the masking process later.
Also, this tutorial uses Pen tool heavily. If you’re rusty with path creation, practice drawing smooth curves first. That skill matters more than knowing every Photoshop shortcut.
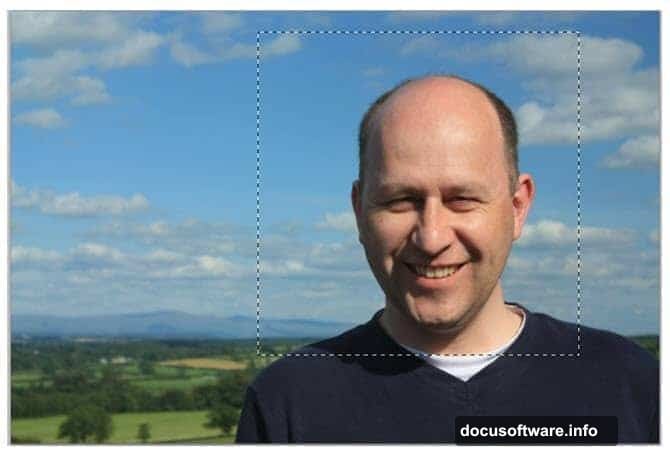
Crop Your Portrait to Focus Area
Open your portrait in Photoshop. Then grab the Rectangular Marquee tool from the toolbar.
Draw a selection around the head and shoulders. Keep it tight. Extra background just creates more work during masking.
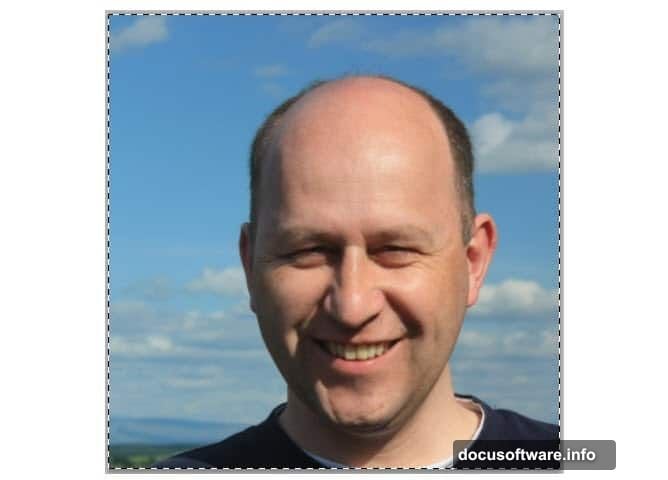
Now go to Image > Crop. This trims everything outside your selection. Press Ctrl+D to deselect. You now have a clean close-up to work with.
Why crop first? Smaller canvas means faster rendering. Plus, you’ll work with relevant pixels only. That keeps file sizes manageable.
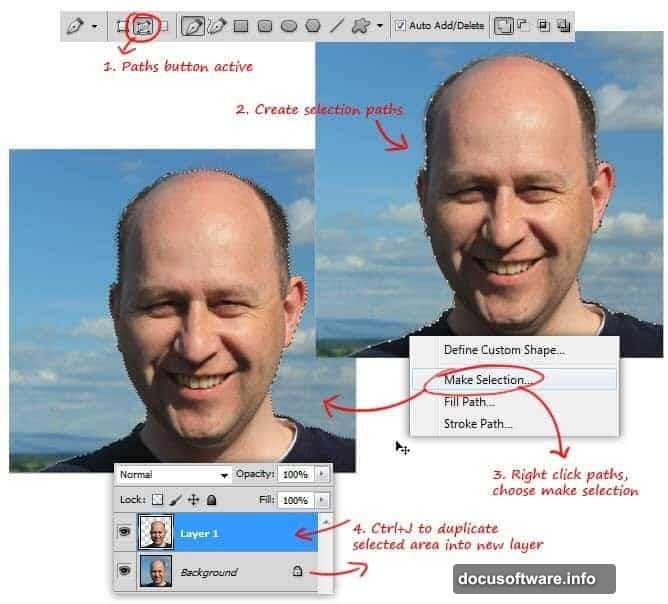
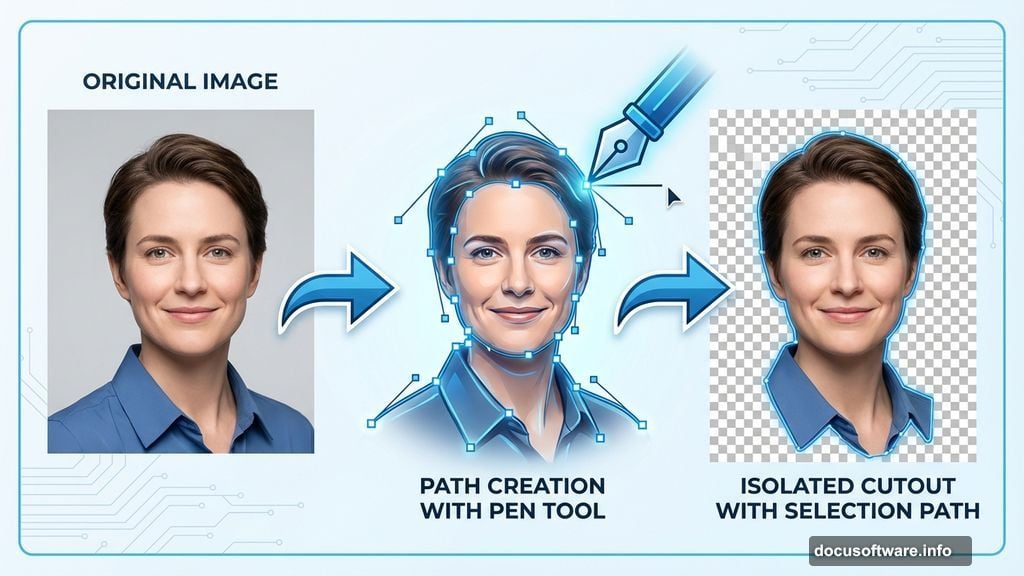
Create Perfect Head Selection Using Pen Tool
Here’s where precision matters. Switch to the Pen tool and start tracing around the head and shoulders.
Click to create anchor points along the edges. For curves like the shoulder line, click and drag to create smooth bezier handles. Take your time. Sloppy paths show up in the final image.
Once you complete the path outline, right-click anywhere on the path. Choose Make Selection from the menu. Click OK when the dialog appears.
Press Ctrl+J to copy your selection onto a new layer. Now you have the subject isolated from the background. This becomes your base layer for stacking.
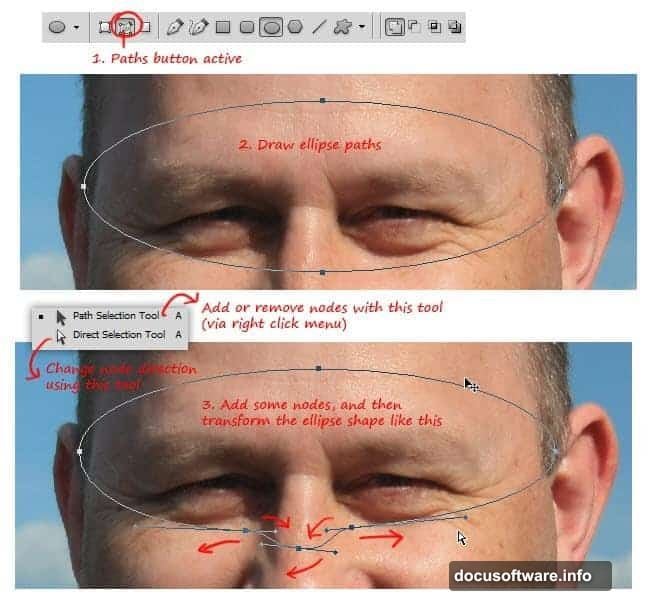
Mark the Head Cut Line with Ellipse Path
The stacking effect needs clean horizontal cuts through the head. An ellipse path creates that cut line perfectly.
Select the Ellipse tool from the toolbar. Draw an oval shape across the head where you want the first cut. Position it carefully. This determines where your stack sections begin.
But the bottom edge needs adjustment. Heads aren’t perfectly round. So grab the Direct Selection tool and reshape the path’s lower curve to follow the nose and face contour.
This custom ellipse becomes your cutting template. Every stacked section uses variations of this same curve.
Add Thickness to the Cut Edge
Flat cuts look unrealistic. Real objects have thickness. So we’ll create that rim effect now.
Hold Alt and drag your ellipse path. This duplicates it instantly. With the new path selected, click the “Subtract from shape area” button in the options bar.
Now press Ctrl+T to activate Free Transform. Scale the second path down slightly and center it inside the first path. This creates a ring shape between the two ellipses.
That ring becomes the visible thickness of each head slice. Adjust the gap width until it looks believable. Too thin seems fragile. Too thick looks cartoonish.
Convert Paths to Working Selections
Time to turn those paths into actual selections. Open the Paths panel by going to Window > Paths.
Click the “Load path as selection” button at the bottom of the panel. Your ellipse paths transform into marching ants selections.
Switch back to the Layers panel. Press Ctrl+J to copy the selected area onto a new layer. This creates your first head slice with proper edge thickness.
Duplicate this slice layer several times. You’ll need multiple copies for the stacking effect. Also duplicate your full head layer at least once as backup.
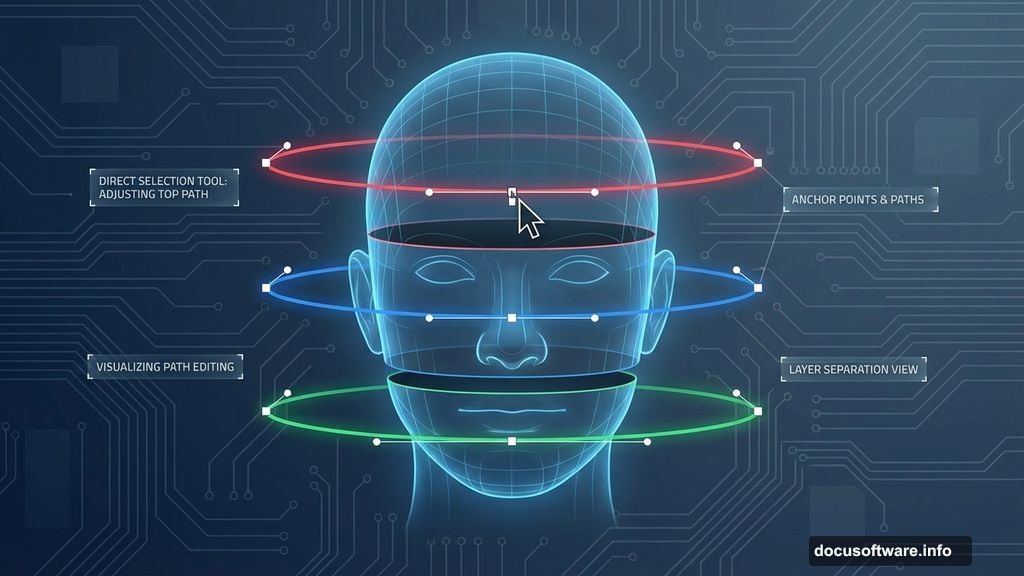
Stack Multiple Head Layers Vertically
Here’s where the surreal effect takes shape. Hide your background and rim cut layers temporarily.
Drag the full head layer to the top of the layer stack. Within the Paths panel, select your rim cut path again and load it as a selection.
Now position each duplicated head slice below the previous one. Use the Move tool to nudge layers into perfect alignment. Each slice should sit slightly lower than the one above.
The rim thickness between slices creates depth. This makes the impossible stack look architecturally solid instead of flat cutouts.
Add Shadows for Dimensional Realism
Stacked heads need shadows between layers. Otherwise they float unconvincingly.
Create a new layer between each head slice. Use a soft black brush at low opacity. Paint subtle shadows along the bottom edge of each slice where it overlaps the one below.
Vary shadow intensity based on distance. Slices farther apart need darker shadows. Closer slices need lighter ones. This reinforces the 3D illusion.
Also add contact shadows where the bottom slice meets the shoulders. Real objects cast shadows on supporting surfaces. Your surreal stack should too.
Color Correction Unifies the Composition
Multiple duplicated layers often show slight color variations. Adjustment layers fix this fast.
Add a Curves adjustment layer above all head layers. Adjust RGB channels to balance overall tonality. This ensures every slice matches color-wise.
Then add a Hue/Saturation adjustment if needed. Subtle desaturation often helps surreal effects feel more dreamlike. Too much saturation screams “fake” instead of “artistic.”
Group all head layers together. Name this group “Head Stack” for organization. Apply layer masks to the group if you want to blend edges or add atmospheric effects later.
Background Integration Completes the Effect
Your stacked heads need context. A dramatic sky or abstract background sells the surreal mood.
Import your cloud photo as a new layer behind the head stack group. Scale and position it to create visual interest. Stormy clouds work great for ominous vibes. Soft sunset clouds feel more dreamlike.
Adjust background opacity if it competes with your main subject. The heads should dominate. Background just provides atmosphere.
Finally, add a subtle vignette using a Levels adjustment layer with layer mask. Darken edges to draw eyes toward the center stack. This polishes the final composition.
Common Problems and Quick Fixes
Selection edges look jaggy? Refine Edge tool cleans them up. Select your layer mask, then use Select > Refine Edge. Adjust Smooth and Feather sliders until edges look natural.
Stack alignment seems off? Use rulers and guides. Press Ctrl+R to show rulers. Drag guides from rulers to mark center points. Align each slice to these guides perfectly.
Colors look muddy after adjustments? You stacked too many adjustment layers. Flatten unnecessary adjustments or reduce their opacity. Sometimes less correction looks better.
Shadows too harsh? Lower layer opacity or use Gaussian Blur. Shadows in real life have soft edges. Your painted shadows should too.
Why This Technique Works for Surreal Art
The head stacking effect succeeds because it breaks reality in believable ways. We know stacked heads are impossible. But the careful shadows, thickness, and alignment make our brains almost accept it.
That tension between impossible and convincing creates surreal impact. Plus, the technique teaches crucial Photoshop skills. Path creation, layer management, masking, and color correction all get heavy practice.
Master this effect and you’ll handle more complex composites easily. The principles transfer to product mockups, fantasy scenes, and conceptual artwork.
Practice with different portraits. Try stacking other body parts or objects. The technique adapts to endless creative variations. Your imagination sets the only limits.
Post Title: Photoshop Head Stacking: Master This Surreal Effect
Meta Description: Want to create mind-bending surreal portraits? The stacked head effect turns ordinary selfies into impossible sculptures that grab attention.