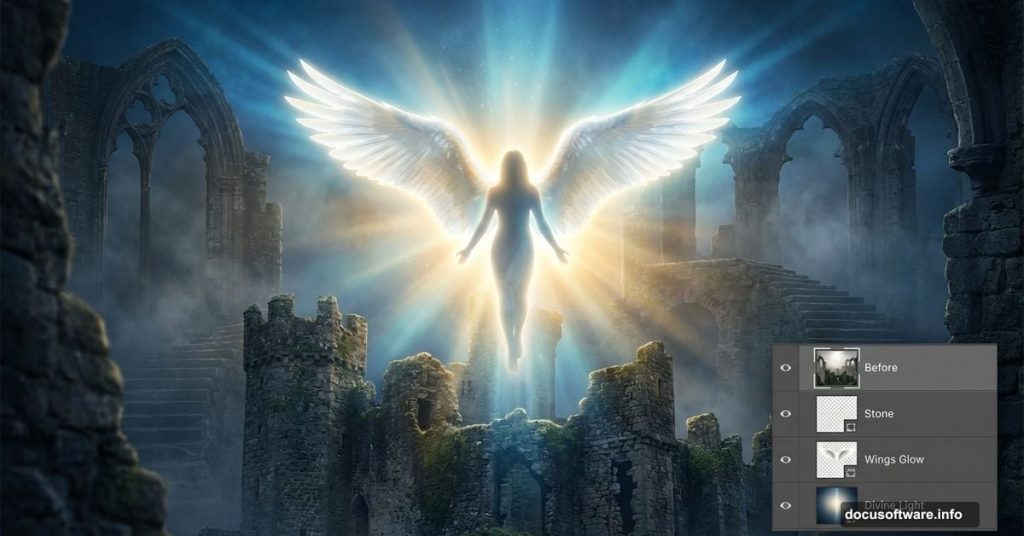
Want to create a mystical angel rising through castle ruins? This Photoshop tutorial shows you how to manipulate photos into ethereal heavenly scenes.
You’ll learn three core techniques. First, blend multiple stock images into a cohesive environment. Second, create realistic glowing light effects that mimic divine radiance. Third, apply soft-focus finishing touches that give your composite that dreamy, otherworldly quality.
Most photo manipulation tutorials skip the lighting. That’s a mistake. Proper light blending makes the difference between “obviously fake” and “wait, is this real?” We’ll fix that.
What You’ll Need Before Starting
Gather these resources first. You can’t pause mid-tutorial to hunt for files.
Stock Images Required:
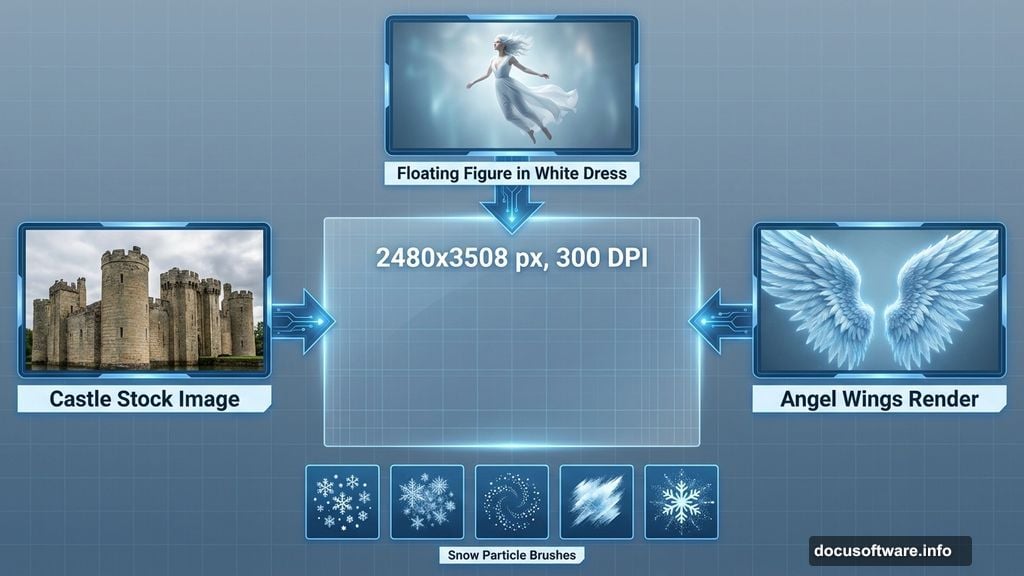
- Castle interior with stairs (Nightstock provides great options)
- Floating figure in white dress
- High-resolution angel wings render
- Snow or particle brushes for atmospheric effects
Photoshop Skills Needed:
- Basic layer manipulation
- Transform and distort tools
- Curves adjustments for color correction
- Brush tool fundamentals
Don’t worry if you’re rusty on some techniques. I’ll walk through each step with specific settings. Plus, most adjustments have visual alternatives if exact numbers don’t work for your images.
Set Up Your Canvas Properly
Bad canvas settings ruin photo manipulations before you start. Let’s avoid that.
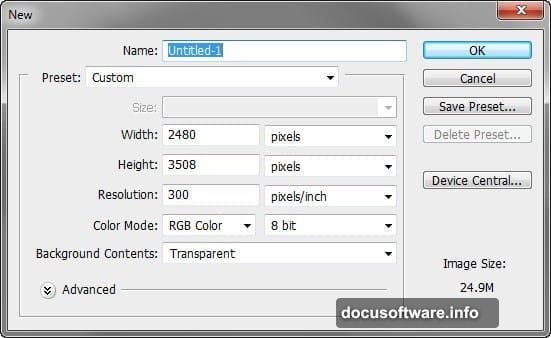
Create a new file with these exact specifications:
- Width: 2480 pixels
- Height: 3508 pixels
- Resolution: 300 DPI
- Color Mode: RGB
- Background: Transparent
Why these numbers? They give you print-quality resolution while maintaining manageable file sizes. The transparent background lets you control every element without fighting default colors.
Save this file immediately. Name it something you’ll remember. Photo manipulation projects involve dozens of layers. Losing progress because you forgot to save is preventable and infuriating.
Build Your Castle Environment Foundation
Now we’ll construct the base scene. This establishes perspective and lighting that everything else must match.
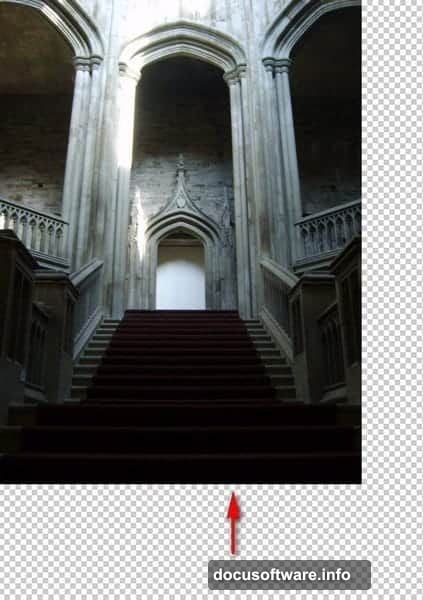
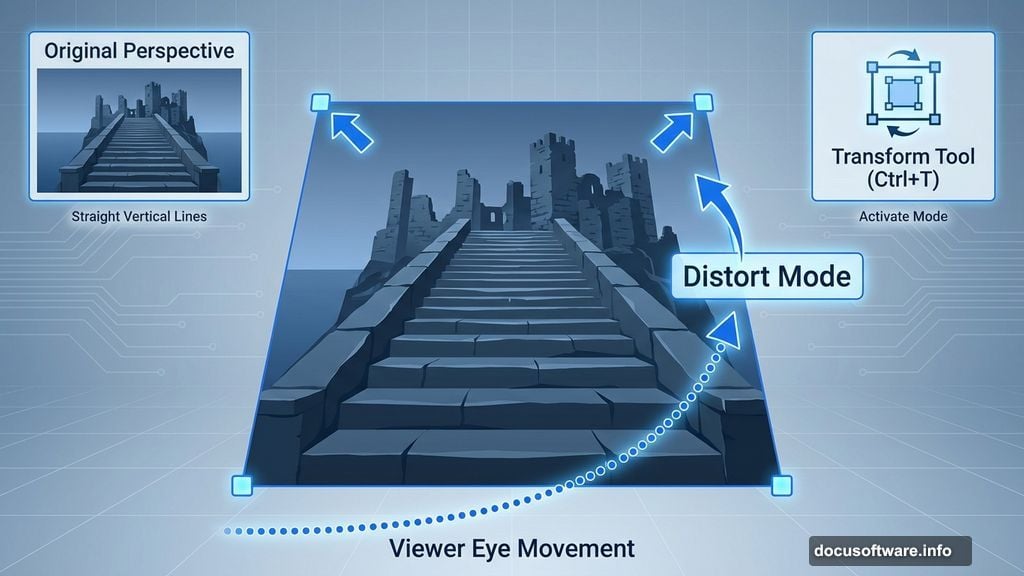
Open your castle stairway stock image. Activate the Move Tool (press V) and drag the image onto your canvas. Don’t worry about perfect placement yet.
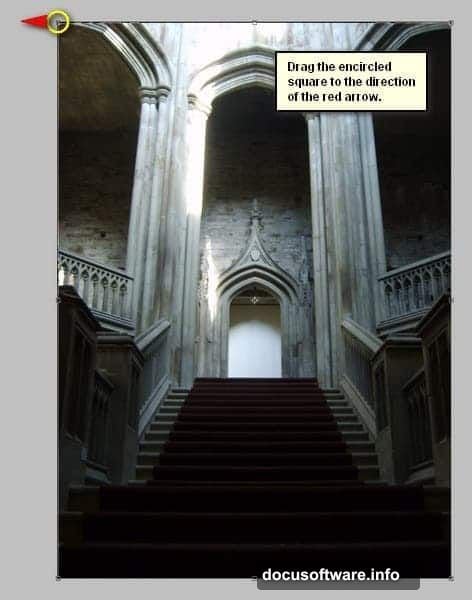
Transform the perspective: Press Ctrl/Cmd + T to activate Transform mode. Grab the corner handles and resize the image to fill your canvas. The stairway should occupy most of the vertical space.
Here’s where it gets tricky. Right-click inside the transform box and select Distort. This lets you adjust individual corners independently. Drag the top corners outward slightly to create an upward perspective. The viewer’s eye should naturally move toward the top of the stairs.
Hit Enter to confirm the transformation.
Fix the Lighting on Your Base Image
Stock photos never match perfectly. The castle interior probably has different lighting than you need for a heavenly glow effect.
Select your castle layer. Press Ctrl/Cmd + M to open Curves. We’re darkening the overall scene to make bright elements pop later.
Adjust the curve with these settings:
- Channel: RGB
- Output: 125
- Input: 103
This creates subtle shadows without crushing blacks completely. You want mood, not muddy darkness. If your specific stock image looks too dark, drag the curve point slightly higher. Trust your eyes over exact numbers.
Pro tip: Group layers as you go. Select all layers for this section and press Ctrl/Cmd + G. Name the group “Background.” Future you will thank present you for this organization.
Add Your Angel Figure and Blend Seamlessly
Time to introduce the main subject. This step separates amateur composites from professional work.
Open your floating figure stock image. Use the Pen Tool (P) to create a precise selection around the figure. Yes, this takes time. No, you can’t rush it. Clean selections make believable composites.
Once selected, drag the figure onto your canvas. Position her about two-thirds up the stairway. She should appear to be rising, not floating randomly.
Match the lighting: The figure’s lighting must match your castle environment. Open Curves again (Ctrl/Cmd + M) and darken her slightly. Pay special attention to the shadow side of her body. It should be darker than the light side, matching the direction of light in your castle scene.
Add a subtle shadow beneath her feet. Create a new layer, use a soft black brush at 30% opacity, and paint where her shadow would fall on the stairs. Blur it with Filter > Blur > Gaussian Blur (radius: 5-8 pixels).
Create Heavenly Glowing Wing Effects
Wings need special treatment. Static wing renders look flat and obviously fake. Let’s fix that.
Import your angel wing render. Position the wings behind your figure layer. They should appear to grow naturally from her shoulder blades.
Make them glow: Duplicate the wing layer (Ctrl/Cmd + J). Set the duplicate to Screen blend mode at 40% opacity. This creates an inner glow effect.
Add outer glow. Select the original wing layer and go to Layer > Layer Style > Outer Glow. Use these settings:
- Blend Mode: Screen
- Opacity: 75%
- Color: Soft yellow-white (#FFF9E6)
- Size: 50-80 pixels
The wings should now appear to emit light rather than just reflect it.
Build the Rising Light Shaft
This step sells the entire effect. Without proper light, your angel just looks like she’s standing on stairs with wings glued on.
Create a new layer above your background but below your figure. Name it “Light Shaft.”
Activate the Gradient Tool (G). Set it to white-to-transparent, radial gradient. Draw from the top center of your canvas downward, stopping where your figure stands. Set this layer to Screen blend mode at 60% opacity.
Add light particles: This part makes it magical. Install your snowflake or particle brush pack. Create a new layer above everything. Use white particles at varying sizes, concentrating them in the light shaft area. Set this layer to Screen blend mode at 70%.
Paint some particles larger and brighter near the top (heavenly source). Make them smaller and more dispersed at the bottom. This creates depth and atmospheric perspective.
Apply Finishing Soft Focus Effects
Raw composites look harsh. Professional work has subtle softness that ties everything together.
Flatten a copy of your image. Go to Layer > Flatten Image, then immediately press Ctrl/Cmd + J to duplicate. This preserves your original layers underneath.
Apply a subtle Gaussian Blur. Go to Filter > Blur > Gaussian Blur with radius 3-5 pixels. Set this blurred layer to 30% opacity. This creates that dreamy soft-focus look without losing detail completely.
Final color correction: Add a Curves adjustment layer on top of everything. Create a very subtle S-curve to increase contrast slightly. Lift the highlights a bit (top right of curve) and deepen shadows just slightly (bottom left).
The entire scene should now have cohesive lighting and a mystical, ethereal quality.
Common Mistakes That Ruin Angel Composites
I’ve seen hundreds of these tutorials. Most fail in predictable ways.
Mismatched lighting kills believability. Your figure, wings, and background must share consistent light direction and color temperature. If the castle has warm orange light but your angel has cool blue tones, the composite fails instantly.
Over-glowing everything looks fake. Yes, we want heavenly light. But too much glow makes everything look like a bad video game cutscene. Subtlety wins. Start with 30-40% opacity on glow effects and increase only if needed.
Ignoring shadows destroys depth. Floating objects need shadows, even faint ones. Without them, your angel looks pasted on rather than present in the scene.
Harsh edges give away the trick. Every selection needs slight feathering (1-2 pixels minimum). Sharp cutout edges scream “amateur photo manipulation.”
Why This Technique Works for Other Projects
Master these core skills and you’ve unlocked dozens of other composite possibilities.
The light shaft technique works for any mystical or dramatic scene. Fantasy book covers, album artwork, gaming concept art – they all use variations of this method.
Blending multiple figures with consistent lighting transfers directly to group portraits, surreal concepts, or historical recreation. The principles stay the same even when subjects change.
Atmospheric particles add mood to practically any scene. Rain, dust, embers, magical sparkles – they all follow similar particle distribution rules. Dense near the source, dispersed at distance, affected by perceived air currents.
Soft-focus finishing elevates any composite from “digital” to “photographic.” Real cameras have optical imperfections. Perfect digital sharpness everywhere looks artificial. Selective softness adds realism.
These aren’t tricks. They’re fundamental photo manipulation principles. Once you understand why they work, you’ll spot them everywhere in professional digital art.
Your next project just got easier. These same techniques adapt to whatever mystical, dramatic, or impossible scene you want to create.