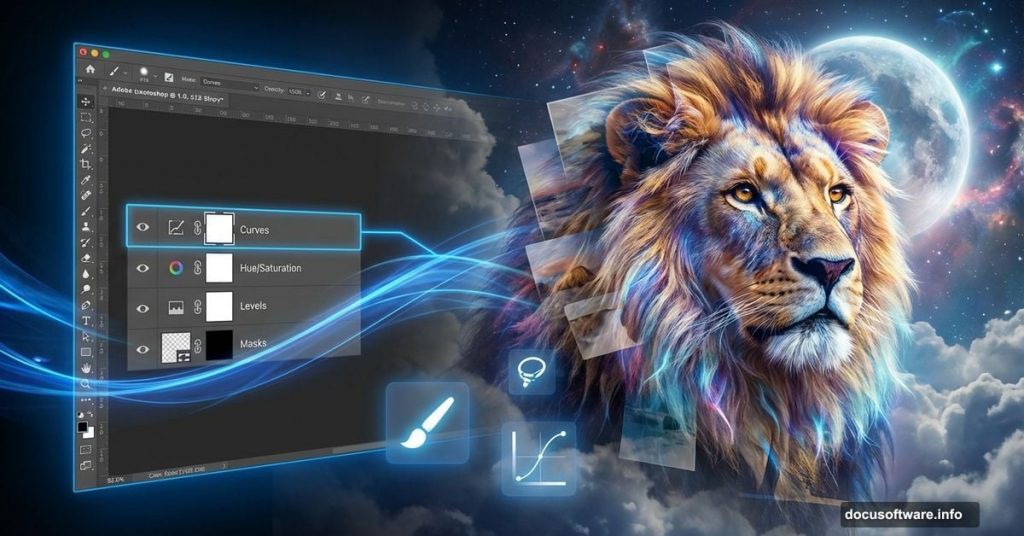
Want to create dramatic wildlife composites in Photoshop? This King Lion manipulation teaches fundamental techniques that work across all photo editing projects.
You’ll learn how to blend multiple images seamlessly, control lighting naturally, and use adjustment layers effectively. Plus, these skills transfer directly to client work, personal projects, and creative experiments. The process takes about 45 minutes once you understand the steps.
Let’s build something impressive.
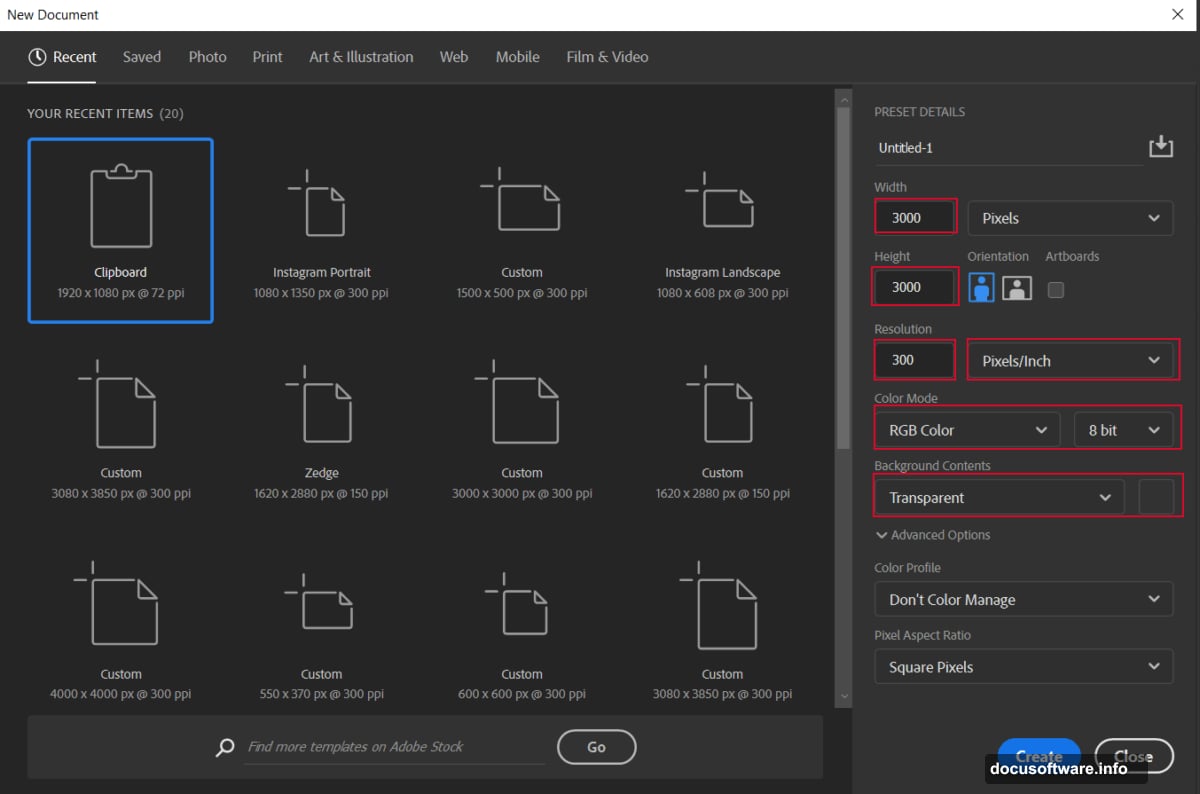
Setting Up Your Canvas
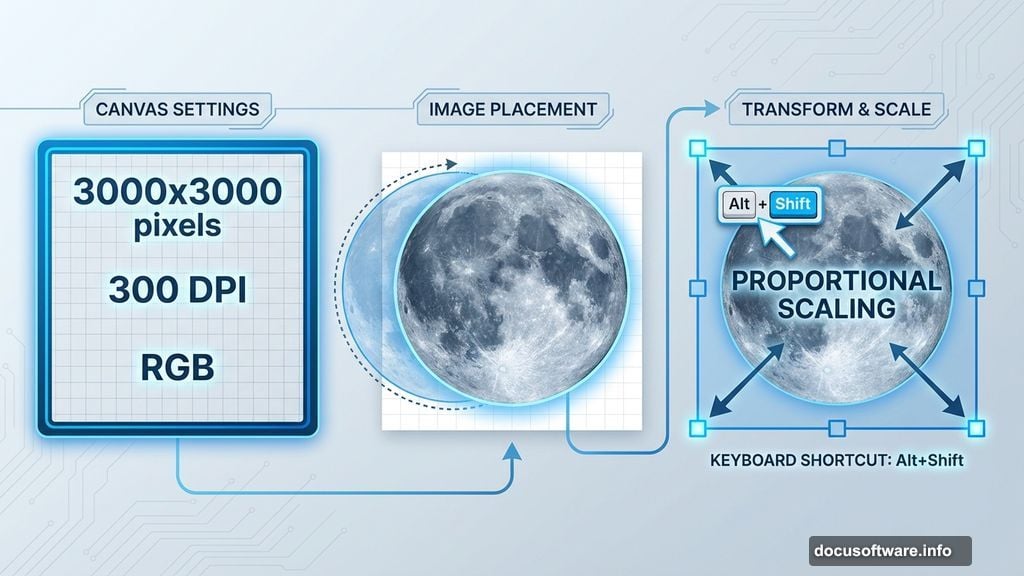
First, create your workspace properly. Go to File > New and set these specifications:
Width: 3000 pixels
Height: 3000 pixels
Resolution: 300 DPI
Color Mode: RGB 8-bit
Background: Transparent
Why these settings? High resolution ensures print quality if needed. Meanwhile, the square format works perfectly for social media. Plus, starting with transparency gives you flexibility later.
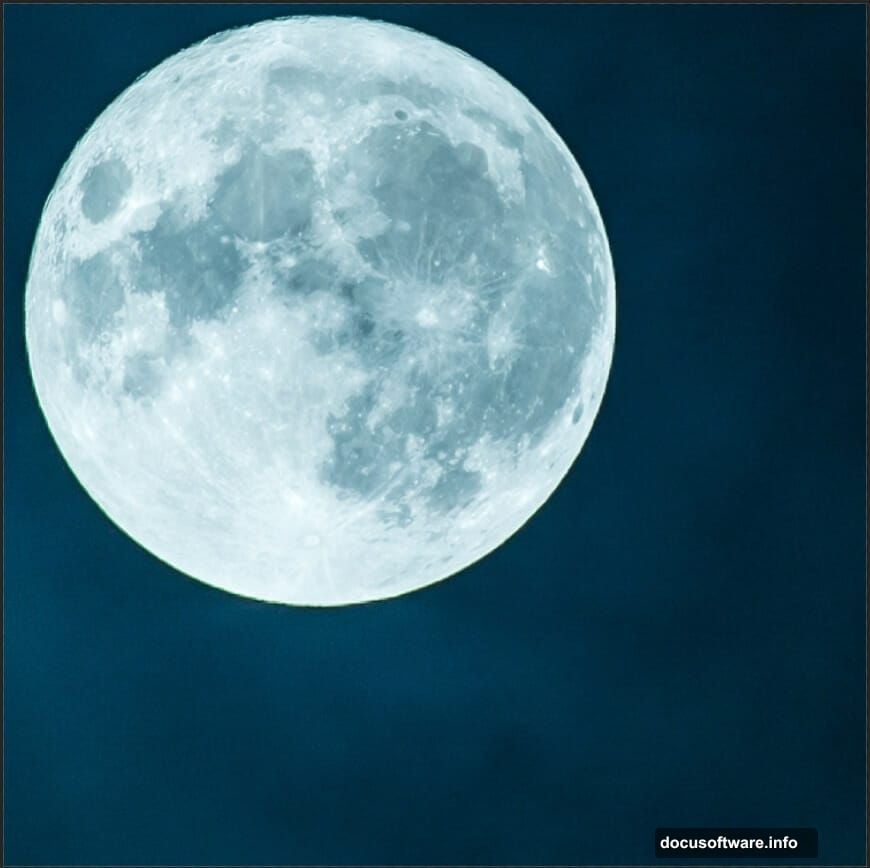
Building the Celestial Background
Now, place your moon image. Navigate to File > Place and select your moon photo. Then use the Transform tool (Ctrl/Cmd + T) to position it.
Here’s a pro tip: Hold Alt + Shift while resizing to maintain proportions from the center. In newer Photoshop CC versions, just Alt alone works. This keeps your moon circular instead of egg-shaped.
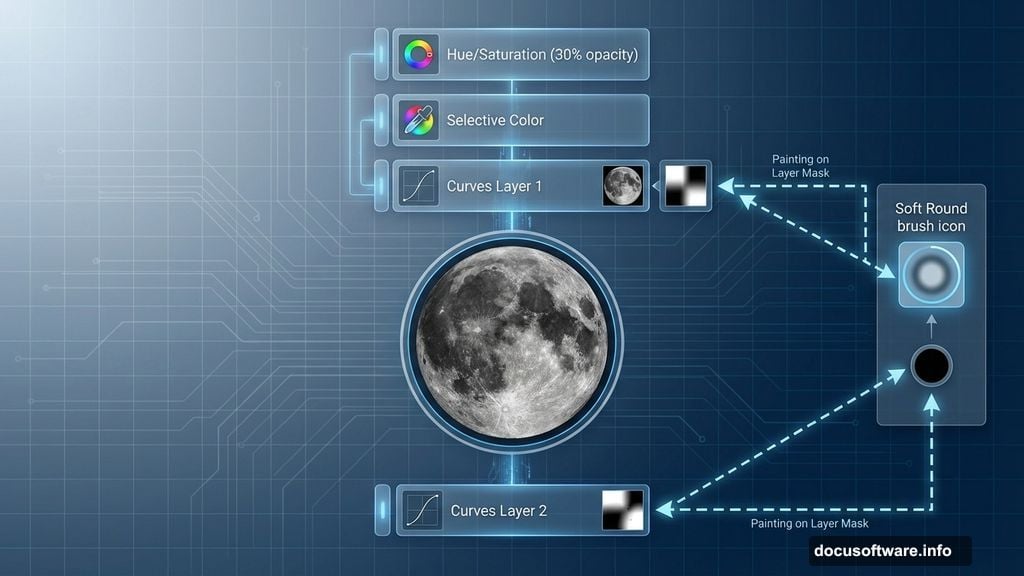
Next, add a Hue/Saturation adjustment layer. Change the blend mode to Hue and drop opacity to 30%. This subtle shift creates atmospheric color without overpowering your scene.
Refining Moon Colors and Tones
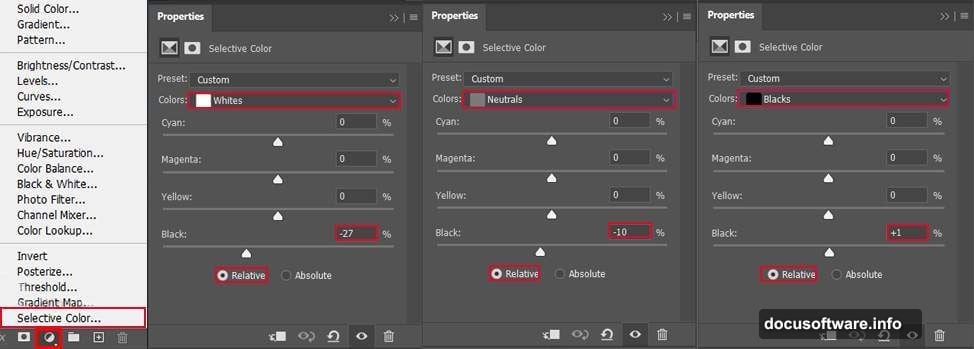
Add a Selective Color adjustment layer next. This tool targets specific color ranges without affecting everything else. Focus on yellows and neutrals to warm the moon naturally.
Then stack two Curves adjustment layers. For each one, use a Soft Round brush with black foreground color. Paint directly on the layer mask over the moon areas you want darker.
Why two separate Curves layers? It gives you independent control over different tonal ranges. So you can deepen shadows while preserving highlights. This creates dimension that single adjustments miss.
Adding Atmospheric Clouds
Time to import cloud brushes. Select the Brush Tool (B) and right-click anywhere. Click the gear icon and choose Import Brushes. Select your downloaded cloud brush pack.
Create a new layer above everything. Set your foreground color to white. Now paint clouds across your sky using various brush sizes.
Vary your brush opacity as you work. Lower opacity creates wispy, distant clouds. Higher opacity forms dense, nearby formations. This depth variation makes your sky believable.
Creating Environmental Shadows
Create another new layer. Switch to a large Soft Round brush with black foreground color. Paint shadows along the right side of your composition.
Then reduce layer opacity to 90%. This subtle darkening suggests a light source from the left. It also creates visual weight that balances your composition nicely.
Incorporating Flying Birds
Open your birds image file separately. Hold Ctrl/Cmd and click the layer thumbnail to select it. Copy (Ctrl/Cmd + C) and paste (Ctrl/Cmd + V) into your main composition.
Position the birds using Transform (Ctrl/Cmd + T). Place them strategically to create movement and scale. Birds flying across the moon instantly communicate distance and atmosphere.
Here’s what many tutorials skip: Keep birds slightly out of focus. Add a tiny bit of Motion Blur (Filter > Blur > Motion Blur) to suggest movement. Real birds in photos rarely appear tack sharp.
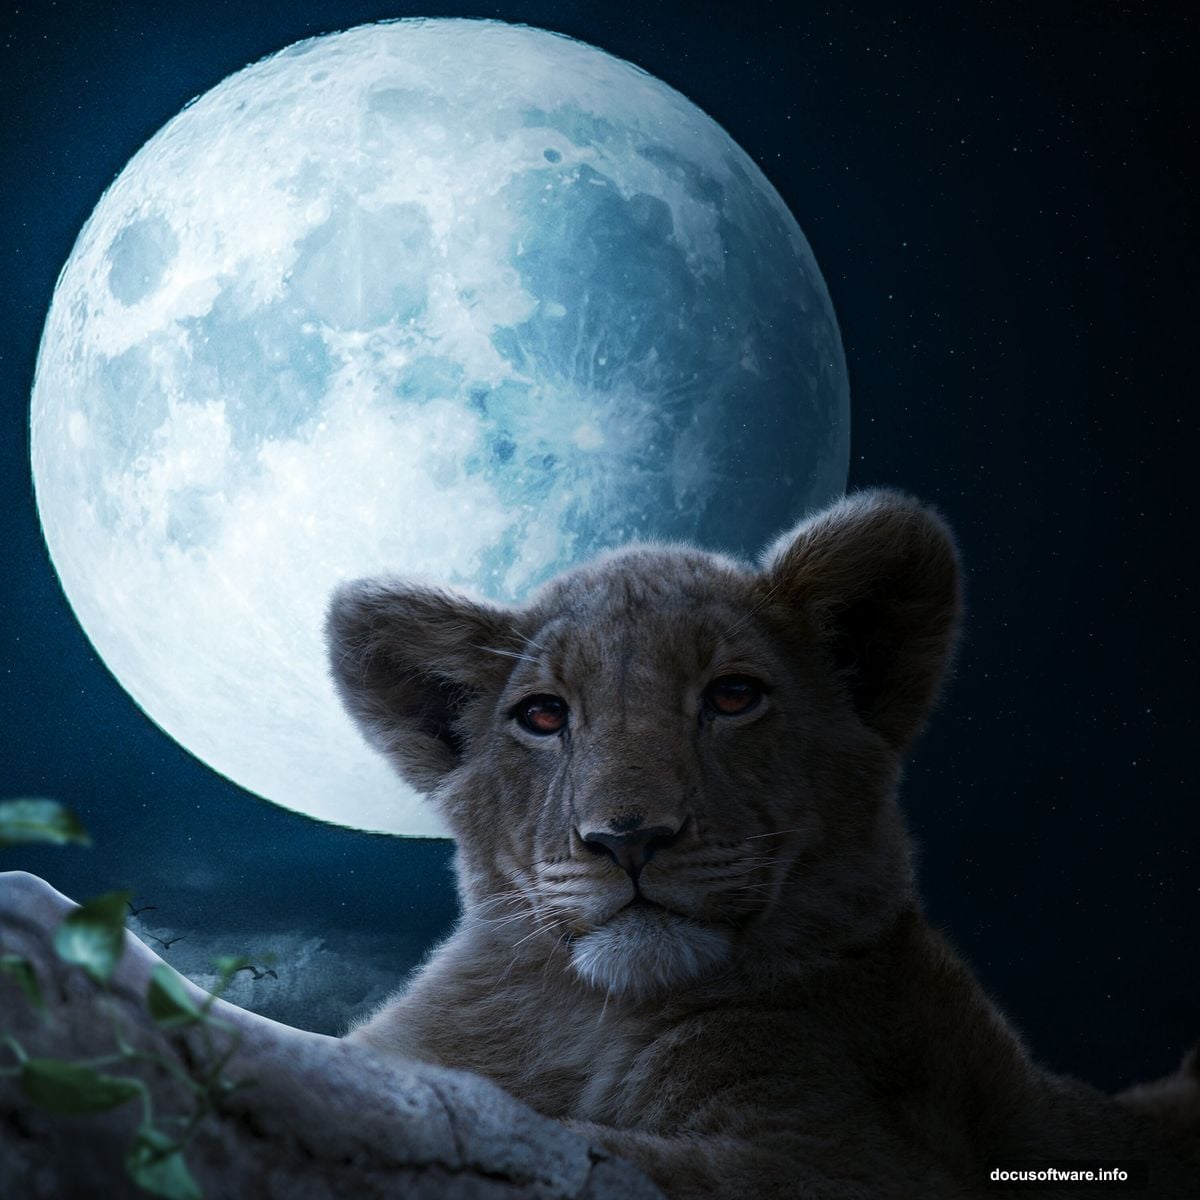
Placing and Blending the Lion
Now for the star subject. Place your lion image the same way you did the moon. Position it prominently in the lower portion of your frame.
Use layer masks instead of erasing edges. Create a mask (click the mask icon at the bottom of the Layers panel). Then paint with black on the mask to hide unwanted areas. Paint with white to reveal them again.
This non-destructive approach lets you refine edges repeatedly. So you can adjust blending without permanently altering your original lion image.
Matching Light and Shadow
Study where light hits your moon. Your lion needs matching highlights and shadows. Create a new layer set to Overlay blend mode.
Use a soft white brush on areas facing the light source. Paint softly on the lion’s face, mane, and body. Build up gradually rather than painting one heavy stroke.
Then create another Overlay layer for shadows. Use a soft dark brown or black brush. Paint shadows on the opposite side from your light. This dimensional lighting sells the entire composite.
Adding Ground Elements
Place plant or grass elements along the bottom. This grounds your lion literally and figuratively. Without ground reference, subjects float awkwardly in space.
Use the same masking techniques as before. Blend edges carefully where plants meet the lion’s paws. Some overlap creates natural interaction between elements.
Final Color Grading
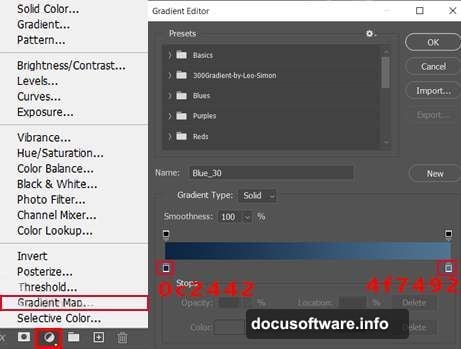
Add a Gradient Map adjustment layer near the top of your layer stack. Choose a subtle color gradient that unifies your palette. Blue to orange works beautifully for moonlit scenes.
Set the Gradient Map to Soft Light or Overlay blend mode. Reduce opacity to taste, usually 20-40%. This creates color harmony across all your separate elements.
Applying Camera Raw Filter
Finally, go to Filter > Camera Raw Filter. This powerful tool offers final polish in one place. Increase clarity slightly to enhance details. Boost vibrance for richer colors without oversaturation.
Add a subtle vignette by reducing exposure in the corners. This draws eyes toward your lion naturally. Also adjust temperature slightly warmer if your composite feels too cold.
Common Mistakes to Avoid
Don’t rasterize smart objects unnecessarily. Keep layers as smart objects whenever possible. This preserves editing flexibility for later adjustments.
Avoid using Place Linked instead of Place Embedded. Linked files break if you move or delete source images. Embedded files stay with your PSD forever.
Skip the temptation to oversaturate colors. Real moonlight creates subtle, muted tones. Overdoing color saturation screams “fake” instantly.
Why This Technique Matters
Photo manipulation isn’t just about making fantasy images. These same skills apply to product photography, portrait compositing, and advertising work.
Learning to blend images convincingly separates amateur work from professional results. Meanwhile, mastering adjustment layers gives you precision that basic filters never achieve.
So practice each step separately before combining everything. The individual techniques matter more than rushing to a finished piece.
This tutorial teaches foundational skills that improve every composite project you tackle. Start simple, master the basics, then push creative boundaries.