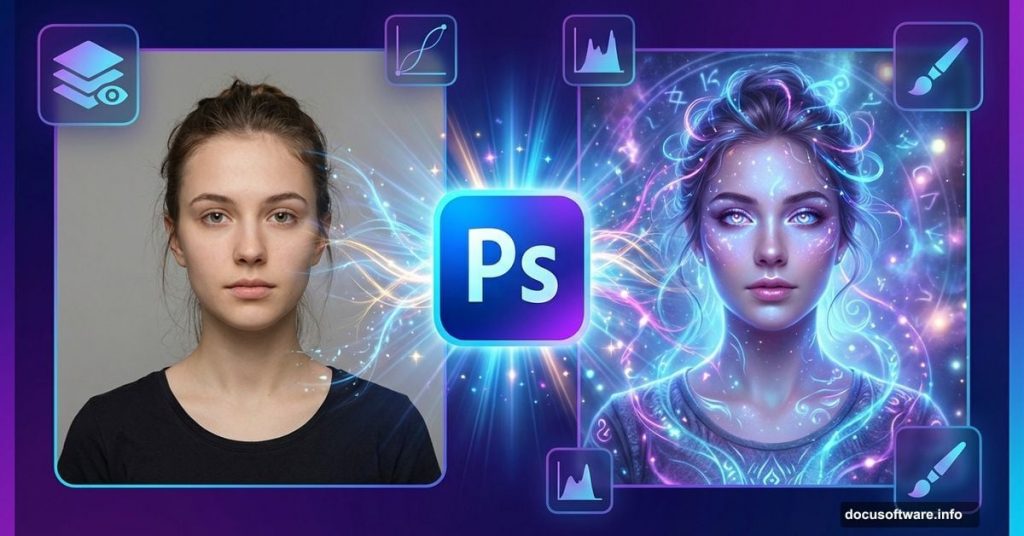
Ever stared at a basic portrait and imagined something otherworldly? That transformation from ordinary to enchanting isn’t reserved for pros with decades of experience.
This guide walks through creating a mystic lady photo manipulation in Photoshop. You’ll learn skin retouching that actually looks natural, makeup effects that pop, warping techniques for dramatic clothing, and mystical finishing touches. Plus, everything here works with free stock images.
Let’s start with the foundation and build something genuinely captivating.
Set Up Your Canvas for Success
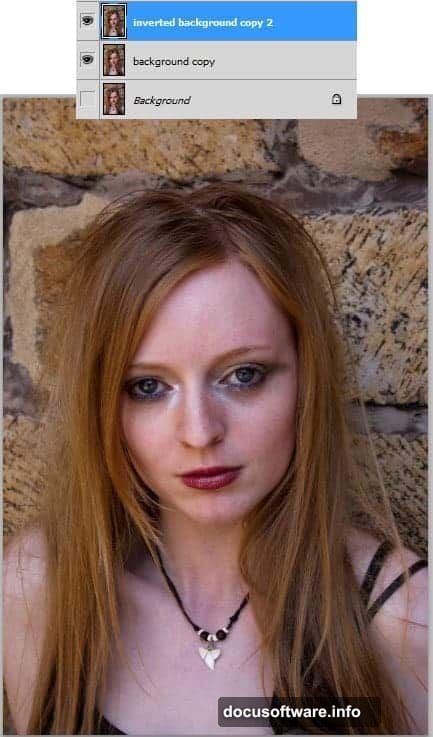
Open your portrait in Photoshop. Before touching anything else, duplicate the base layer twice using Ctrl+J.
Name these duplicates logically. Something like “background copy” and “inverted background copy 2” keeps things clear when you’re ten layers deep later.
Pro tip about image size: Working with massive files slows everything down. If your original runs 2304 x 3456 pixels at 300 DPI, scale it down to 768 x 1152 at 100 DPI. This makes editing smoother without sacrificing quality for web display. Remember this reduction though—filter settings need adjustment proportionally.
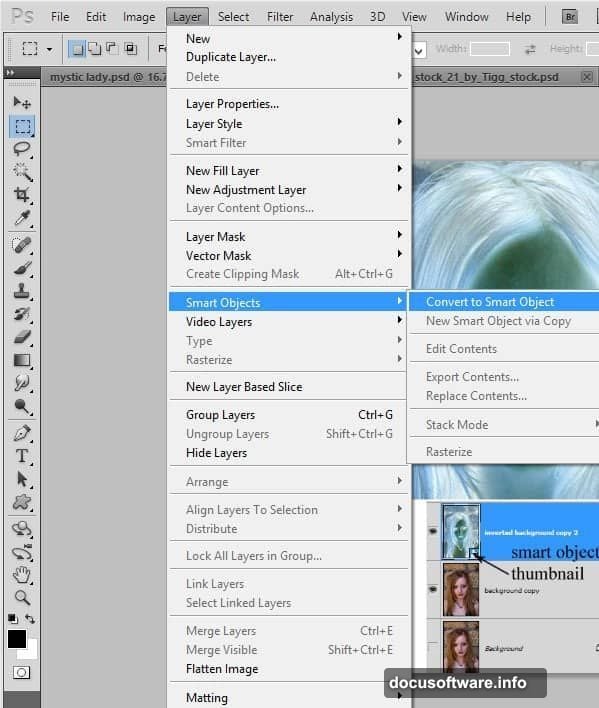
Create Depth With Smart Inversion
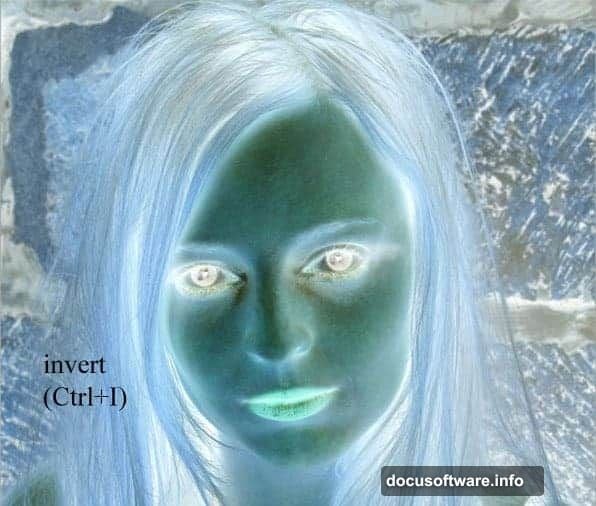
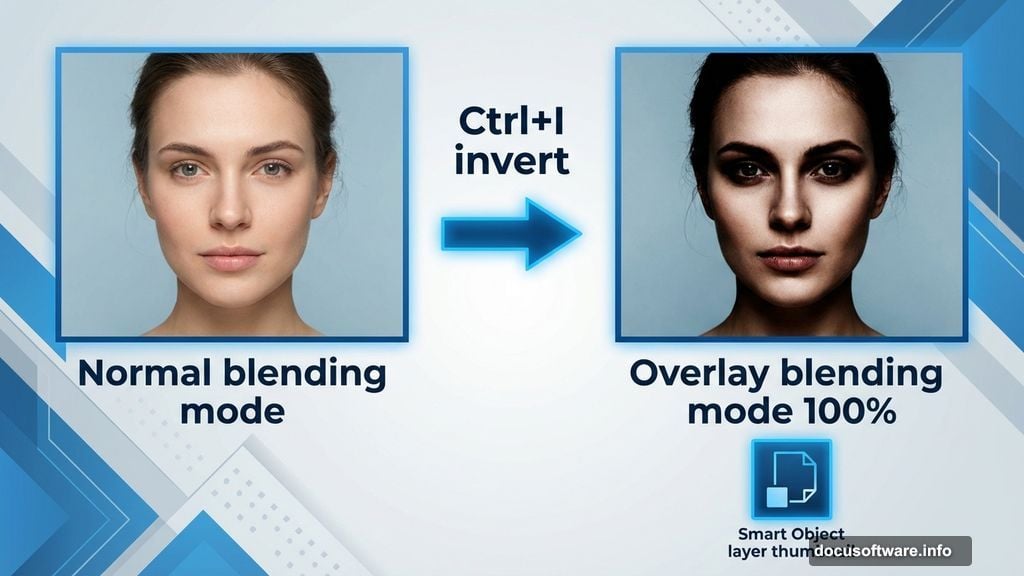
Select your second duplicate layer (the one named “inverted background copy 2”). Hit Ctrl+I to invert it.
Now convert this inverted layer to a Smart Object by going to Layer > Smart Objects > Convert to Smart Object. You’ll see a small icon appear on the layer thumbnail—that confirms it worked.
Change the blending mode from Normal to Overlay at 100% opacity. Suddenly, your portrait gains dimension and contrast. The eyes pop. Shadows deepen. It’s subtle but significant.
Apply High Pass for Texture Control
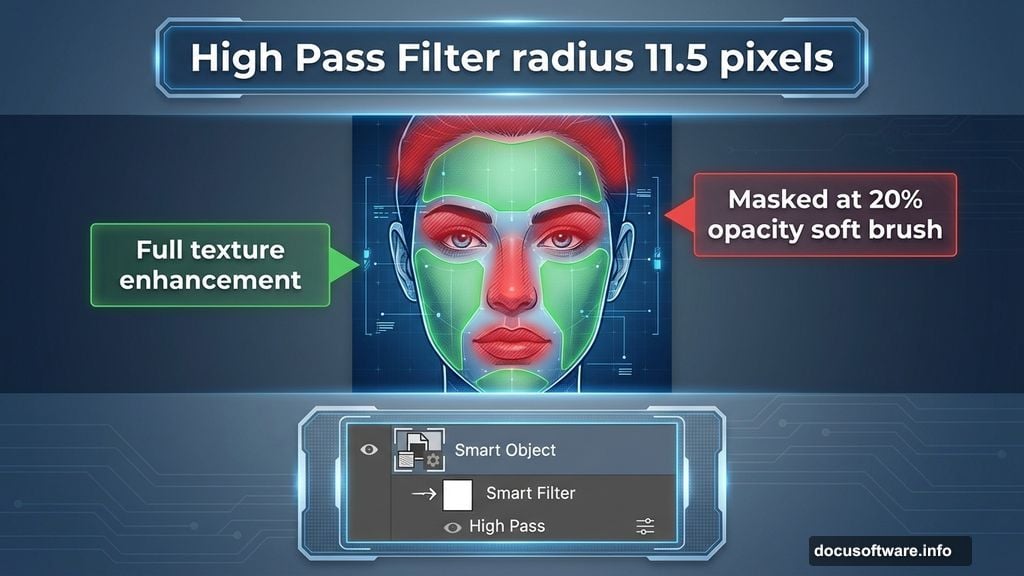
With your Smart Object layer still selected, navigate to Filter > Others > High Pass.
Here’s where file size matters. For full-resolution images (300 DPI), set the radius to 34.5 pixels. For reduced resolution at 100 DPI, use 11.5 pixels instead. The rule: divide by three when you’ve reduced resolution by thirds.
This filter becomes a Smart Filter beneath your layer. That’s powerful—you can adjust it anytime without starting over.
Mask strategically now. Add a layer mask by clicking the mask icon at the bottom of the Layers panel. Using a soft round brush at 20% opacity, mask around the eyes, nose, lips, and upper hair area. These zones need gentler treatment than the rest of the face.
Why mask here? Those areas already have texture. The High Pass filter can make them look overprocessed or harsh. Masking preserves natural softness where it matters most.
Retouch Skin Without Losing Character
Perfect skin looks fake. Instead, aim for refined skin that still shows personality.
Create a new layer above your working layers. Select the Healing Brush tool and check “Sample All Layers” in the top toolbar. This lets you work non-destructively.
Focus on genuine imperfections—temporary blemishes, stray hairs, minor discoloration. Avoid smoothing away freckles, natural texture, or distinctive features. Those elements make the portrait unique.
For broader softening, duplicate your base layer again. Apply Filter > Blur > Gaussian Blur at a low radius (2-4 pixels). Add a layer mask filled with black, then paint white where you want subtle smoothing. This technique beats the airbrushed look every time.
Add Eye Makeup That Actually Enhances
Eye makeup in Photoshop either elevates the image or screams “badly edited.” The difference lies in subtlety and blending.
Create a new layer set to Multiply blending mode. Choose colors from real makeup—deep browns, charcoal grays, or subtle purples. Paint around the eyelid crease and outer corners with a soft brush at 30-40% opacity.
Build color gradually with multiple light passes rather than one heavy application. This mimics how actual makeup layers.
For eyelashes, download quality eyelash brushes (resources like Obsidian Dawn provide excellent free options). Create another new layer. Sample the darkest color from the existing lashes, then carefully stamp new lashes. Vary the brush size and angle for natural variation.
Don’t forget the lower lashline. Just keep it lighter than the upper lashes.
Transform Lips With Realistic Color
Lips tell the whole story about whether your manipulation looks believable.
Create a Hue/Saturation adjustment layer. Click the layer mask, invert it to black (Ctrl+I), then paint white over just the lips. Adjust the Hue slider slightly to shift the natural lip color. Increase Saturation moderately—too much looks cartoonish.
For added dimension, create another layer set to Overlay. Using a soft brush at low opacity, paint darker tones in the center of the lips and lighter tones on the Cupid’s bow. This creates the illusion of depth and glossiness.
Warp Clothing for Dramatic Effect
Here’s where things get mystical. You’ll need a separate image of flowing fabric or a robe.
Open your robe image and use the Quick Selection tool to isolate it from its background. Copy it to your main document.
Position the robe roughly where you want it. Now comes the magic: Edit > Transform > Warp. This gives you a grid overlay with control points. Drag these points to wrap the fabric around your subject’s body contours.
Pay attention to where fabric would naturally fold, drape, or cling. Look at the shoulders, bustline, and arms. The fabric should follow the body’s form while still flowing dramatically.
Blend the edges. Add a layer mask and soften any harsh transitions where the robe meets skin. Use a soft brush at varying opacities to create seamless integration.
Match the lighting by adding subtle shadows under where the fabric would cast them. Create a new layer set to Multiply, paint with a soft black brush at 10-15% opacity, then blur slightly.
Layer Mystical Effects That Don’t Overwhelm
Mystical doesn’t mean “throw every effect at it and hope something works.” Strategic layering creates atmosphere without chaos.
Add cosmic texture: Find a nebula or cosmic background image. Place it above your subject, set the blending mode to Screen or Lighten, and reduce opacity to 30-40%. Mask away areas where it obscures important details.
Create atmospheric glow: Duplicate your main subject layer. Apply Filter > Blur > Gaussian Blur at a high radius (15-25 pixels). Set this blurred layer to Screen mode at 40% opacity. It creates an ethereal glow around the entire figure.
Add light particles: Create a new layer filled with black. Go to Filter > Render > Lens Flare. Add several lens flares in different positions. Set the layer to Screen mode and position the flares where they enhance the composition. Reduce opacity until they feel magical rather than distracting.
Fine-Tune Color Grading for Mood
Color determines emotional impact more than any other single element.
Add a Curves adjustment layer at the top of your layer stack. Create a subtle S-curve for contrast—lift the highlights slightly, deepen the shadows a bit. This adds punch without destroying detail.
Next, add a Color Balance adjustment layer. For a mystical, otherworldly feel, push the midtones slightly toward cyan and blue. Adjust shadows toward blue or purple. Warm the highlights just a touch with yellow or red.
The key word throughout: slightly. Dramatic shifts look amateurish. Subtle adjustments feel professional.
Finally, add a Selective Color adjustment layer. Target individual color ranges to refine specific elements. You might desaturate yellows in the skin slightly while boosting cyans in the background.
Polish Details That Complete the Vision
Small details separate good manipulations from stunning ones.
Refine hair edges: Zoom in on the hair. Use the Refine Edge tool (Select and Mask in newer Photoshop versions) to clean up any rough selections around fine hair strands. Paint new hair strands with a small hard brush if needed to fill gaps or add wisps.
Add catchlights in eyes: Create a new layer. Use a small white brush at 100% opacity to add tiny white dots in the pupils. Position them in the same location in both eyes for realism. This brings dead-looking eyes back to life instantly.
Sharpen strategically: Create a merged copy of all visible layers (Ctrl+Alt+Shift+E). Apply Filter > Sharpen > Unsharp Mask. Use a low Amount (50-80), high Radius (1.0-1.5), and zero Threshold. Then mask away the sharpening from soft areas like background blur and skin.
Mistakes That Kill the Magic
Some choices wreck the illusion completely. Avoid these common traps.
Over-smoothing skin: If skin looks like plastic, you’ve gone too far. Texture equals realism. Keep pores visible in close-up views.
Inconsistent lighting: If your robe has light coming from the left but your face is lit from the right, viewers notice subconsciously. Match light direction across all elements.
Muddy colors: Adding too many adjustment layers creates flat, lifeless color. Sometimes less processing looks better. If your colors look muddy, delete adjustment layers until they clarify.
Obvious selection edges: Hard edges around pasted elements scream “fake.” Always feather selections and use soft brushes on layer masks for seamless blending.
Ignoring resolution: Mixing a low-res cosmic background with a high-res portrait creates visible quality differences. Match resolution across all source images.
Save Your Work the Smart Way
Before calling it finished, save multiple versions.
Save a master PSD file with all layers intact. This lets you make changes later without starting over. Name it clearly: “mysticportraitmaster.psd”
Then flatten a copy and save it as a high-quality JPG for sharing online. Use “Save for Web” with quality set to 80-90 for optimal file size without visible compression artifacts.
Consider saving a web-optimized version at 1200 pixels on the longest side. This loads faster while still looking sharp on screens.
This Technique Scales to Your Style
The specific mystical theme here is just one possibility. These same fundamentals work for any dramatic portrait manipulation.
Want to create a warrior queen instead? Use armor instead of flowing robes. Prefer a cyberpunk aesthetic? Replace cosmic backgrounds with neon cityscapes. The principles remain constant—careful retouching, strategic blending, thoughtful color grading, and attention to lighting consistency.
Start with these techniques. Then push them in directions that match your creative vision. That’s where personal style develops.
The portrait you started with held potential. Now it holds magic. That’s not an accident—it’s skill you can replicate and refine with every project.