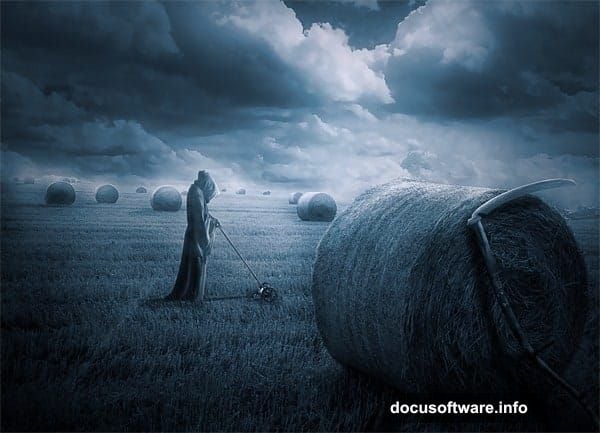
Ever wondered what the Grim Reaper does between soul collections? Apparently, lawn care.
This eerie photo manipulation tutorial shows you how to create a chilling scene of death’s messenger doing yard work. Plus, it’s perfect for beginners who want to learn essential manipulation techniques without drowning in complexity.
You’ll master photo compositing, layer masking, and color grading that eliminates tedious color matching. The whole project takes about an hour once you get the hang of it.
What You’ll Need First
Before diving in, grab these free resources. All images come from Pixabay and DeviantArt, so licensing won’t bite you later.
Required images:
- Straw field photograph for the base scene
- Dramatic cloud formation for atmosphere
- Grim Reaper character stock image
- Scythe prop image for the “lawn mower”
Make sure you have Photoshop CS6 or newer. Older versions might work, but some blur filters behave differently. Save yourself the headache and update if possible.
Setting Up Your Canvas
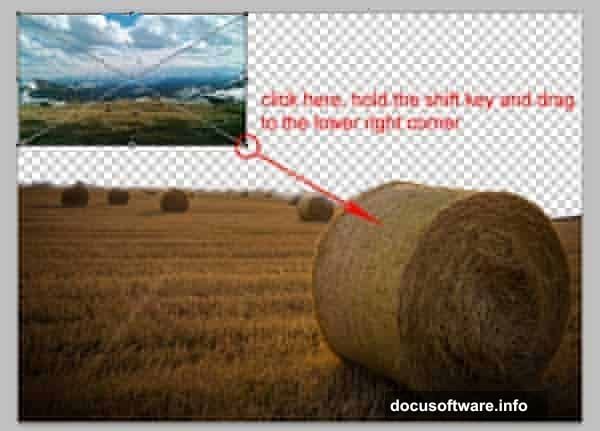
Start by opening the straw field image. This becomes your foundation layer.
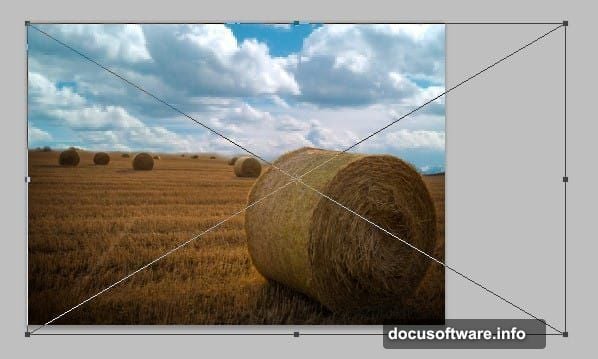
Hit C to activate the crop tool. Then click and drag from the upper left corner down to the lower right. This removes distracting edges and focuses attention on your main scene.
Press Enter to apply the crop. Your canvas should now feel more intentional and less snapshot-like.
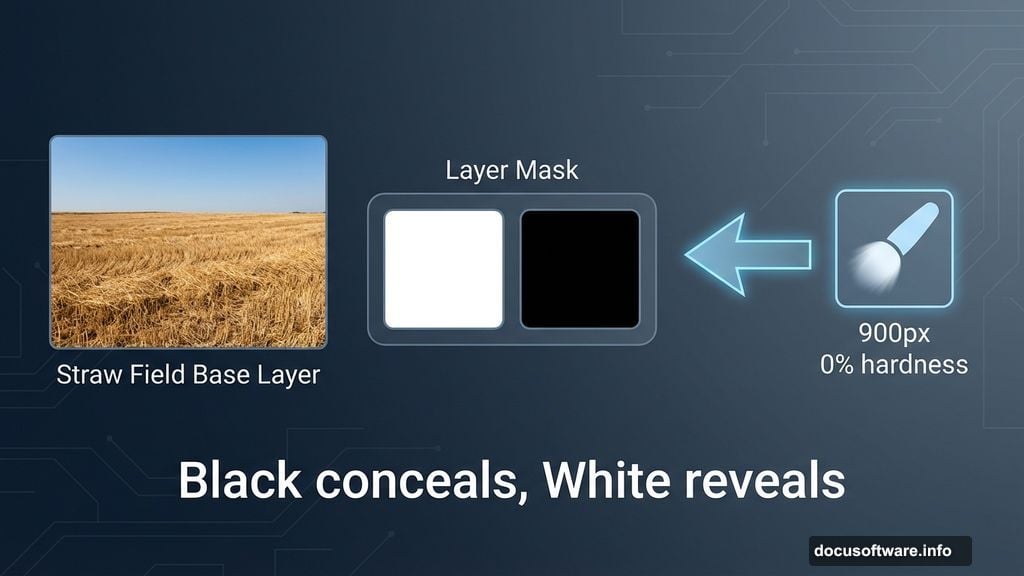
Masking Out Unwanted Sky
Here’s where layer masks save the day. They let you hide parts of an image without permanently deleting pixels.
Click the layer mask icon at the bottom of your layers panel. A white thumbnail appears next to your layer thumbnail. That’s your mask.
Now grab the brush tool by pressing B. Set it to soft round, 0% hardness, around 900 pixels wide. Make sure black is your foreground color.
Start painting over the sky area you want to hide. Black conceals, white reveals. So painting with black on the mask hides those cloudy parts without destroying them.
The result? Clean separation between your field and where dramatic new clouds will go.
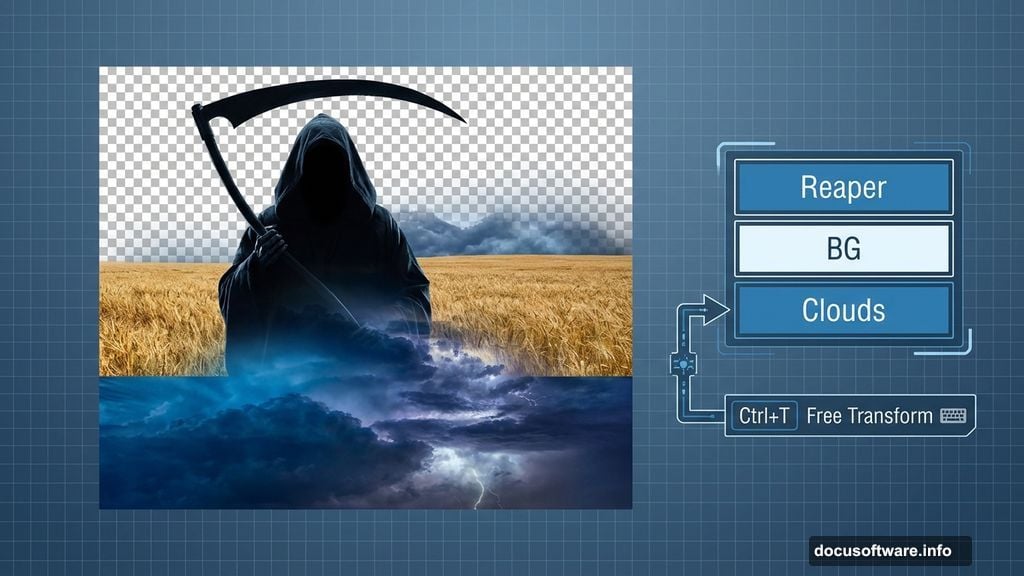
Converting Background Layer
Double-click the background layer to unlock it. Photoshop shows a dialog box asking you to name the new layer.
Call it “BG” or something equally simple. This step seems minor but matters later when you start stacking elements and need to move layers around freely.
Background layers lock themselves by default. Converting removes those restrictions.

Adding Dramatic Cloud Layer
Open your cloud image in the same document. Photoshop automatically creates a new layer above your BG layer.
Drag this cloud layer below the BG layer instead. Why? Because you want clouds behind the field, not in front of it.
Hit Ctrl+T to activate Free Transform. Then click and drag the corner handles until clouds fill the entire blank space where you masked out the original sky.
The composition should feel ominous now. Stormy clouds set the mood for what’s coming next.
Blurring Clouds for Depth
Realistic scenes need depth variation. Sharp clouds in the distance look flat and fake.
With your cloud layer selected, go to Filter > Blur > Surface Blur. This filter smooths clouds while preserving essential edge detail.
Try these settings as a starting point:
- Radius: 25-30 pixels
- Threshold: 20-25 levels
Surface Blur works better here than Gaussian Blur because it maintains cloud structure. Gaussian turns everything into mush. Surface Blur keeps clouds looking like clouds, just softer and further away.
Understanding Clipping Masks
Several steps ahead use clipping masks. So what are they?
Clipping masks let you apply adjustments or effects only to specific layers below them. Instead of affecting your entire image, adjustments stay contained.
Think of it like painting inside the lines. The base layer defines the shape, and clipping masks ensure your effects don’t spill outside those boundaries.
You’ll use this technique when color grading and adding atmospheric effects. It prevents adjustments from bleeding into areas where they don’t belong.
Adding the Grim Reaper
Now for the star of the show. Open your Grim Reaper image and drag it into your composition.
This part gets tricky because you need to isolate the character from its original background. Use whatever selection method you prefer – magic wand, quick selection, or pen tool for precision.
Once selected, add a layer mask to hide the background. Then position the Reaper where he looks natural in the field.
Scale him appropriately using Free Transform. He should feel imposing but not comically oversized. Think menacing lawn care professional, not kaiju destroying Tokyo.
Warping the Scythe Into Position
The scythe becomes his “lawn mower” in this twisted scene. Open the scythe image and cut it out from its background using your preferred selection method.
Place the scythe layer near the Reaper’s hands. Then use Edit > Transform > Warp to bend and shape it into a believable grip position.
Warp tool lets you push and pull different parts of the image independently. So you can angle the handle one way while the blade points another. This creates the illusion that he’s actually holding and using the tool.
Take your time here. Sloppy warping ruins the entire effect. The connection between character and prop needs to feel natural.
Creating Cold Blue Atmosphere
This technique eliminates hours of color matching. Instead of adjusting each element individually, you’ll apply one color grade that unifies everything.
Add a new adjustment layer by clicking the half-moon icon at the bottom of your layers panel. Choose Hue/Saturation.
Shift the entire image toward cool blue tones. Try these starting values:
- Hue: +180 to +200
- Saturation: +15 to +25
- Lightness: -5 to -10
The blue cast creates an eerie, supernatural atmosphere. Plus, it automatically makes all your composited elements feel like they belong in the same scene.
No more fussing with individual color temperatures. The global adjustment handles it.

Fine-Tuning with Curves
Curves adjustment gives you precise control over shadows, midtones, and highlights separately.
Add a Curves adjustment layer above your color grade. Then create a subtle S-curve by pulling up highlights slightly and pushing down shadows.
This increases contrast and adds drama. The Reaper should feel more three-dimensional now, with deeper shadows and brighter highlights defining his form.
Don’t go overboard. Subtle curves adjustments look professional. Heavy-handed curves scream amateur hour.
Adding Atmospheric Haze
Real outdoor scenes have atmospheric perspective. Distant objects appear hazier and less saturated than close ones.
Create a new layer set to Screen or Lighten blend mode. Use a large soft brush with very low opacity (around 10-15%) to paint white haze in the background.
Focus on areas behind the Reaper, between him and the horizon. This pushes those elements back and makes your main subject pop forward.
The effect should be barely noticeable. If viewers consciously see the haze, you’ve added too much.
Adjusting Layer Opacity for Realism
Sometimes composited elements look too strong or too transparent. Layer opacity gives you a quick fix.
Select any layer that feels off and adjust its opacity slider at the top of the layers panel. Subtle reductions often help elements blend more naturally into their surroundings.
The Reaper himself should probably stay at 100% opacity. But atmospheric effects, shadows, and supplementary elements often benefit from slight transparency adjustments.
Trust your eye. If something feels wrong, it probably is.
Final Color Grading Pass
Take one last look at your overall color balance. Does everything feel cohesive? Do any elements stick out as obviously composited?
Add a final Hue/Saturation or Color Balance adjustment layer if needed. Make subtle tweaks until the entire scene feels unified.
The goal isn’t perfectly realistic lighting. It’s a consistent, believable world where a supernatural entity doing lawn care makes visual sense.
Why This Tutorial Works
Most photo manipulation tutorials throw advanced techniques at beginners without context. This one builds skills progressively.
You start with basic cropping and masking. Then layer stacking. Then warping and transformation. Finally, color grading that ties everything together.
Each step teaches a technique you’ll use in future projects. The cold blue color grade trick alone saves hours on future manipulations.
Plus, the subject matter is inherently engaging. Death doing yard work is absurdist enough to hold attention while you learn.
Common Mistakes to Avoid
First mistake? Rushing the selection and masking process. Sloppy edges ruin photo manipulations faster than anything else.
Take time to refine selections. Zoom in. Check for halos and rough edges. Use a small, hard brush to clean up mask edges manually if needed.
Second mistake? Ignoring atmospheric perspective. Everything can’t be equally sharp and saturated. Blur and desaturate background elements slightly.
Third mistake? Over-editing. More adjustment layers don’t automatically mean better results. Sometimes restraint creates more impact.
What You’ve Actually Learned
This tutorial covered essential photo manipulation fundamentals. Layer masking lets you non-destructively hide portions of images. Warping tools reshape elements to fit new contexts naturally.
Clipping masks contain adjustments to specific areas. Color grading unifies disparate elements into cohesive scenes. Blend modes and opacity adjustments add atmospheric effects.
These techniques apply to every photo manipulation project you’ll ever tackle. The specific subject changes, but the core skills remain constant.
So practice them until they feel second nature. Then experiment with your own twisted compositions.
The Grim Reaper needs hobbies. Why not help him explore other side gigs?