Abstract photo manipulation sounds complicated. But you only need three stock images and some clever Photoshop techniques to pull it off.
This tutorial walks you through building an immersive 3D composite with glowing radiation effects. Plus, you’ll learn how to create custom lightning brushes and apply atmospheric color grading. No advanced skills required—just attention to detail and willingness to experiment.
What You’ll Build
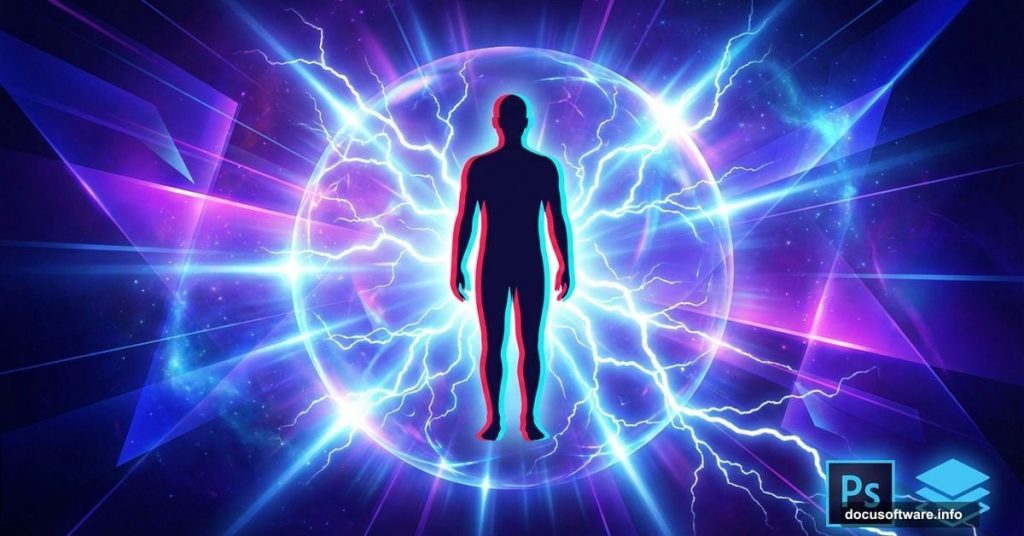
We’re creating a dramatic composite centered around a human subject. Think sci-fi movie poster vibes.
The effect combines spherical elements, custom lightning effects, and radiation-style glows. Then we’ll finish with two different color treatments—dark and moody versus vibrant and surreal.
Here’s the workflow. First, place your base portrait. Next, add 3D sphere elements for depth. Then build custom lightning effects using brushes. Finally, apply texture overlays and color grading to complete the look.
Required Resources
You need three stock images to complete this project:
Base Image: “Altitude Chamber” portrait by d3wd
3D Elements: Sphere pack by in-the-skies
Lightning Effects: Photoshop brushes by redheadstock
Download these before starting. Also, this tutorial works in any Photoshop version from CS6 onwards.
Setting Up Your Canvas
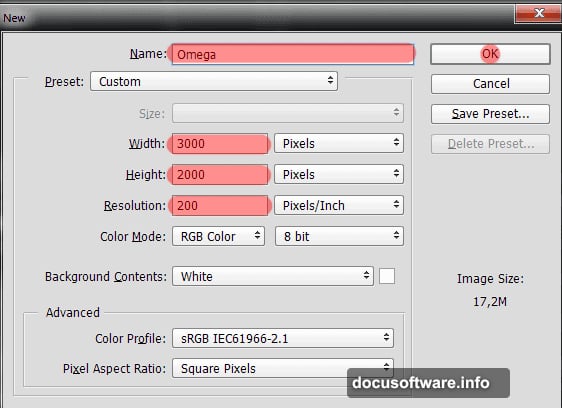
Start by creating a new document. Go to File > New or hit Cmd/Ctrl+N.
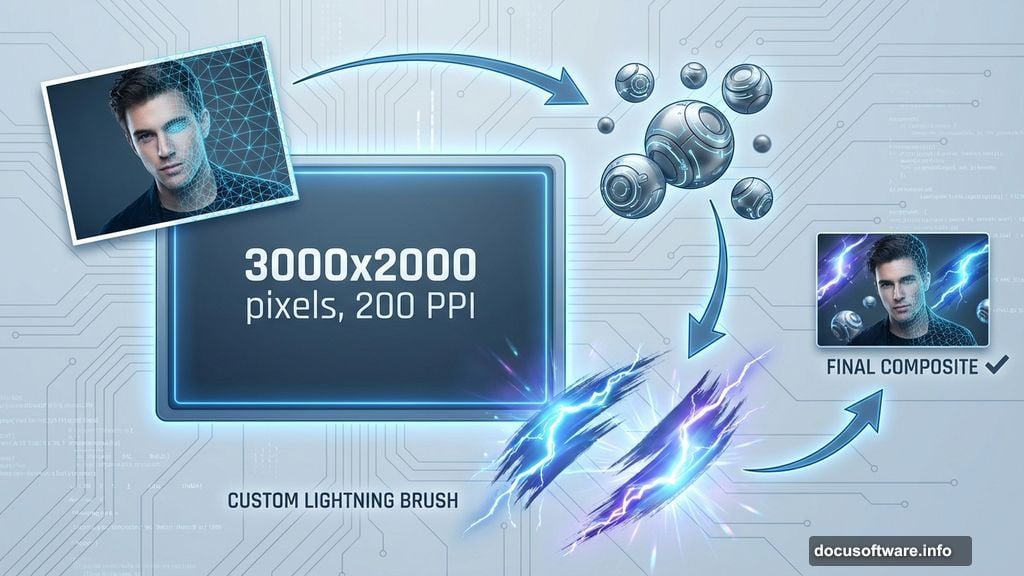
Set your canvas to 3000 pixels wide by 2000 pixels high. Use 200 pixels per inch for resolution. This gives you plenty of room to work without pixelation.
Name your document something memorable. I used “Omega” but pick whatever fits your vision.
Adding the Base Portrait
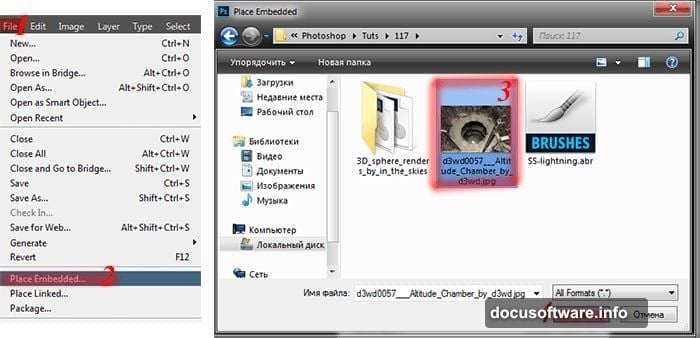
Now bring in your main subject. Go to File > Place and select the Altitude Chamber image.
Photoshop drops it in as a Smart Object automatically. That’s perfect—it means you can resize without losing quality.
Creating the 3D Effect
Here’s where things get interesting. Use Free Transform (Ctrl/Cmd+T) to resize your portrait layer.
Scale it up so parts of the image extend beyond your canvas edges. Leave the mesh foreground visible—you’ll need it later for the composite effect.
Next, duplicate this layer using Cmd/Ctrl+J. This copy becomes your 3D layer.
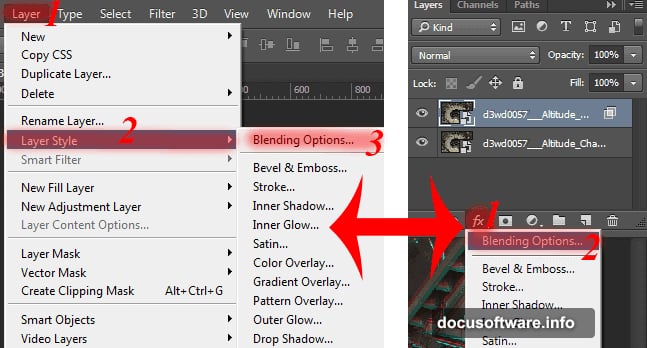
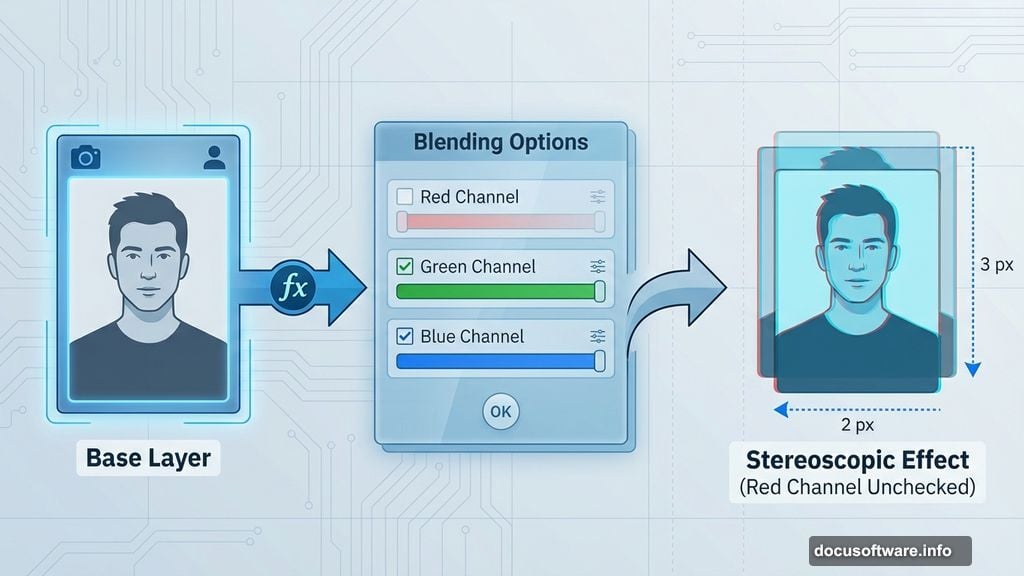
Open the Layer Style panel by clicking the fx icon. Navigate to Blending Options.
In the Blend If section, uncheck the Red channel. This separates the color information and creates a stereoscopic 3D effect when layers are slightly offset.
Positioning the 3D Layer
The effect isn’t visible yet. You need to offset the duplicated layer.
Select the Move Tool (V). Use your arrow keys to nudge the layer. Try moving down three times and left twice.
Suddenly the 3D effect appears. The slight offset between layers creates depth perception.
Experiment with different offset amounts. But don’t go overboard—subtle shifts work better than extreme ones.
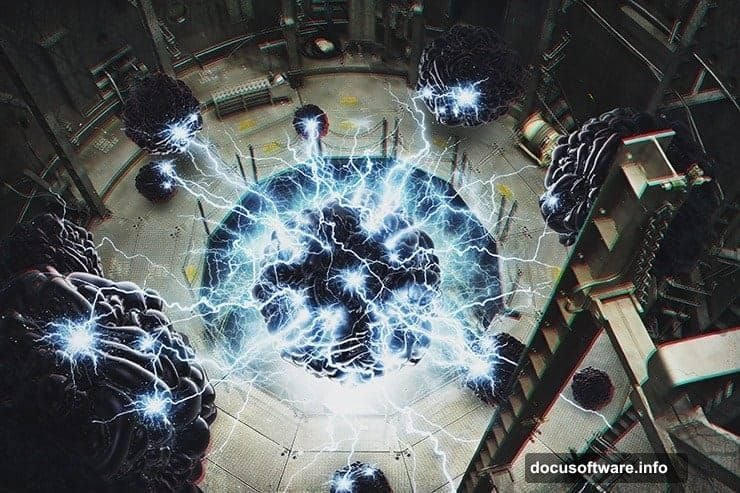
Adding Spherical Elements
Import your 3D sphere images next. These add geometric interest and reinforce the sci-fi aesthetic.
Place each sphere as a separate layer. Position them around your subject to create visual flow.
Use Free Transform to resize spheres as needed. Vary the sizes—some large, some small—for better composition.
Building Custom Lightning Brushes
Standard Photoshop brushes won’t cut it for this effect. You need custom lightning brushes.
Load the lightning brush pack you downloaded. Open the Brushes panel (F5) and import the ABR file.
Select a lightning brush. Create a new layer specifically for lightning effects.
Paint lightning strikes connecting your subject to the spheres. Vary brush size and opacity for natural randomness.

For extra control, paint each major lightning element on its own layer. This lets you adjust individual strikes later.
Creating Radiation Glow Effects
The radiation effect requires texture overlays and blend modes.
Create a new layer above your lightning. Fill it with black using Edit > Fill.
Apply the Clouds filter (Filter > Render > Clouds). Then apply Difference Clouds several times for varied texture.
Change the blend mode to Screen or Linear Dodge. Adjust opacity until you get a subtle glow.
Use a layer mask to paint away glow from areas that shouldn’t emit light. Focus radiation effects near the spheres and along lightning paths.
Smart Filter Techniques
Convert your main layers to Smart Objects before applying filters. This keeps edits non-destructive.
Right-click your layer and choose “Convert to Smart Object.”
Now when you apply filters like Gaussian Blur or Motion Blur, they appear as Smart Filters. You can adjust settings anytime without starting over.
For the radiation glow, try applying Gaussian Blur at 15-20 pixels. Then experiment with Outer Glow layer styles for extra luminosity.
Dark Tone Color Grading
Two color treatments work well for this composite. Let’s start with the dark version.
Add a Curves adjustment layer. Pull down the midtones for a moodier look.
Create a Color Balance adjustment layer. Push shadows toward blue and cyan. Move highlights toward warm yellows for contrast.
Finally, add a Vibrance adjustment. Reduce saturation slightly to maintain the dark, gritty atmosphere.
Vibrant Color Treatment
The alternate approach uses saturated, surreal colors.
Start with a Hue/Saturation adjustment layer. Boost saturation by 20-30 points.
Add a Gradient Map adjustment set to Soft Light blend mode. Use a gradient that transitions from deep purple through orange to bright cyan.
Then apply a Color Lookup table (3DLUT) if you want instant color grading. Try the “Futuristic Bleak” or “Teal Orange Plus Contrast” presets.
Reduce opacity on any adjustment that feels too strong. Subtlety matters more than extremes.
Fine-Tuning the Composite
Step back and evaluate your composition. Look for these common issues:
Harsh Edges: Use soft brushes on layer masks to blend elements naturally
Flat Lighting: Add highlights and shadows with Dodge and Burn tools
Color Mismatch: Adjust individual layers with Hue/Saturation until they harmonize
Weak Focal Point: Increase contrast and sharpness around your main subject
Make small adjustments rather than dramatic changes. The goal is cohesion across all elements.
Exporting Your Final Image
Once you’re satisfied, save your working PSD file first. Always keep an editable master.
Then flatten your image (Layer > Flatten Image) and export as JPEG or PNG.
For web use, export at 72 DPI and 1920 pixels wide. For print, keep your full 200 DPI resolution.
Save multiple versions if you created both color treatments. Compare them side by side to choose your favorite.
Beyond the Basics
This tutorial covers fundamental composite techniques. But the real learning happens through experimentation.
Try swapping different base images. Change sphere positions. Create new lightning patterns. Each variation teaches you something about light, composition, and color.
Abstract composites thrive on creative risks. Don’t be afraid to break the “rules” and discover techniques that work for your unique vision.
The three-resource limitation forces creative problem-solving. Sometimes constraints produce better results than unlimited options.