Photo manipulation sounds complicated. But breaking it down into small steps makes it manageable.
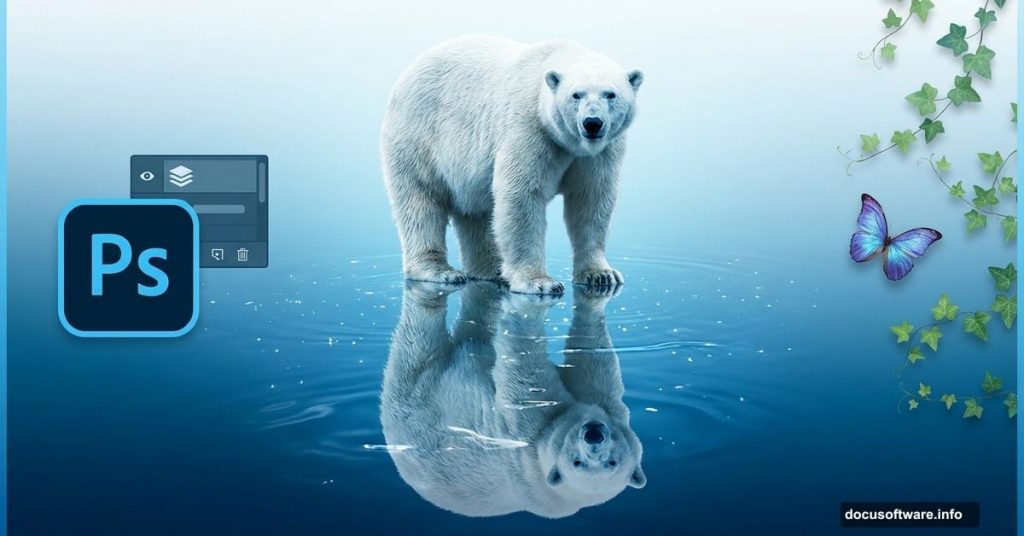
This tutorial walks through creating a striking polar bear image with water reflections, ivy accents, and professional color grading. Plus, you’ll learn techniques that work for dozens of other projects.
Ready? Let’s dive into the details.
What You’ll Need Before Starting
First, gather your resources. You’ll need Photoshop (any recent version works) and a few stock images.
Required images:
- Polar bear photo
- Butterfly image
- Ivy vine textures
- Ivy leaf photos
You can find these on stock photo sites. Just make sure licensing allows manipulation and commercial use if needed.
Also, set aside about 90 minutes for your first attempt. Once you understand the workflow, similar projects take 30-40 minutes.
Build Your Custom Water Texture
Start by creating the foundation texture. This gives your water reflection that authentic rippled look.
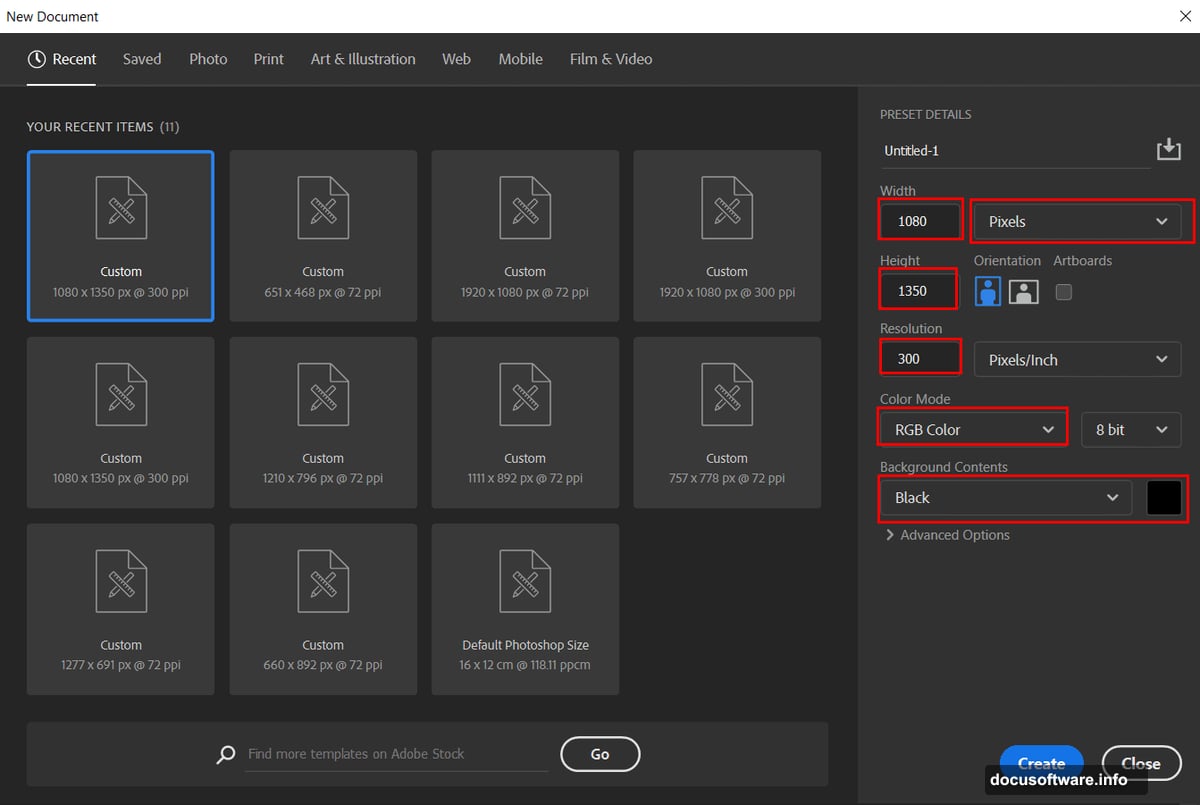
Open Photoshop and create a new document. Set width to 1080px, height to 1350px, and resolution to 300 DPI. Choose RGB color mode with a black background.
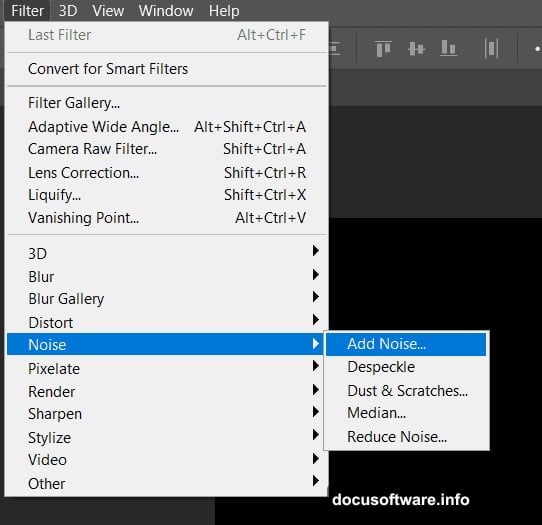
Now add texture noise. Go to Filter > Noise > Add Noise and crank Amount to 400%. Select Uniform distribution and click OK.
Next, soften those harsh pixels. Apply Filter > Blur > Gaussian Blur with Radius set to 1.3px. This creates a smooth base texture.
Here’s where it gets interesting. Open your Channels panel and select the Red channel only.
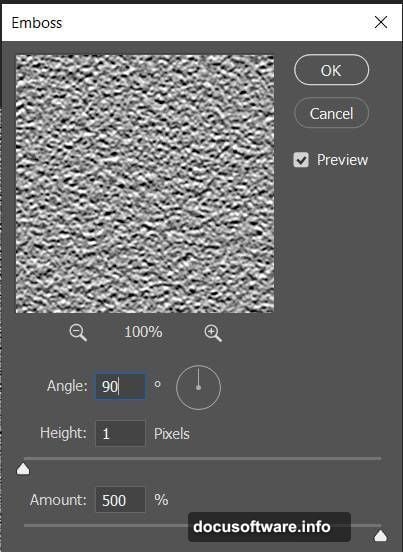
Apply Filter > Stylize > Emboss with these settings:
- Angle: 180 degrees
- Height: 1px
- Amount: 500%
Then switch to the Green channel. Apply the same Emboss filter but change Angle to 90 degrees. This creates directional texture that mimics water movement.
Switch back to RGB view and return to your Layers panel. You’ve just built a custom displacement map.
Create the Displacement Effect
Duplicate your texture layer by pressing Ctrl/Cmd + J. Now transform it to add perspective.
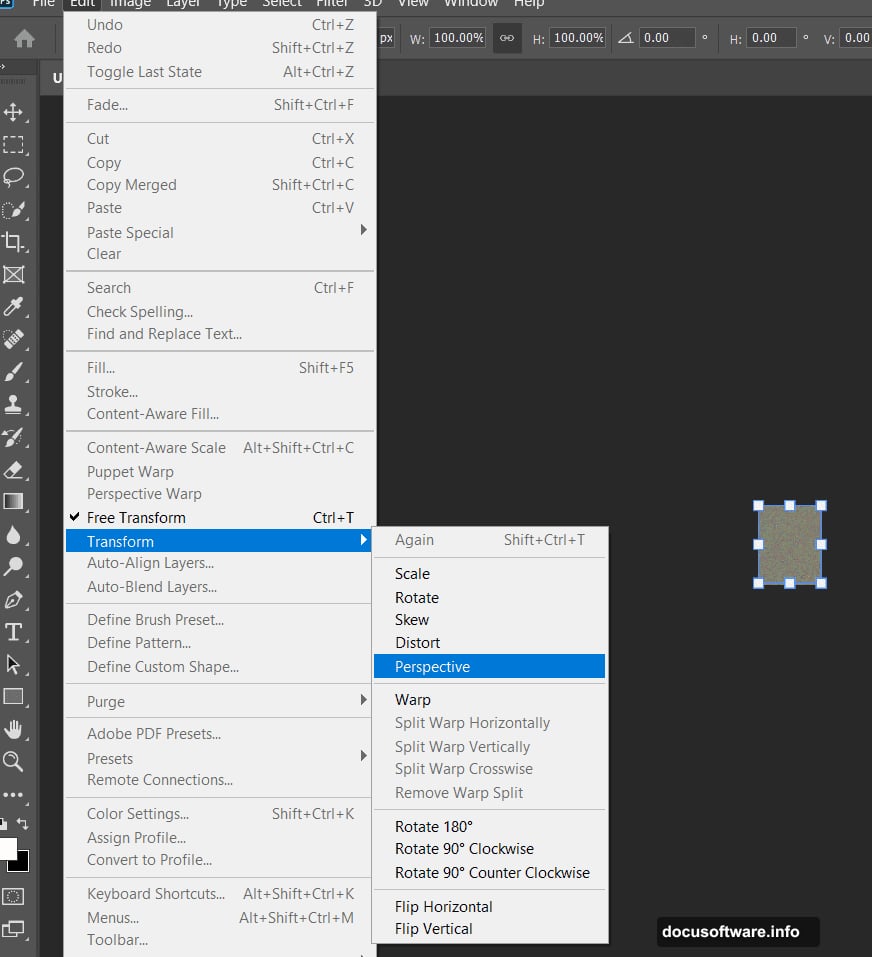
Press Ctrl/Cmd + T to activate Transform mode. Then go to Edit > Transform > Perspective in the menu bar.
Grab the bottom corners and stretch them outward. This creates that receding perspective effect water has when viewed from above. Press Enter when it looks right.
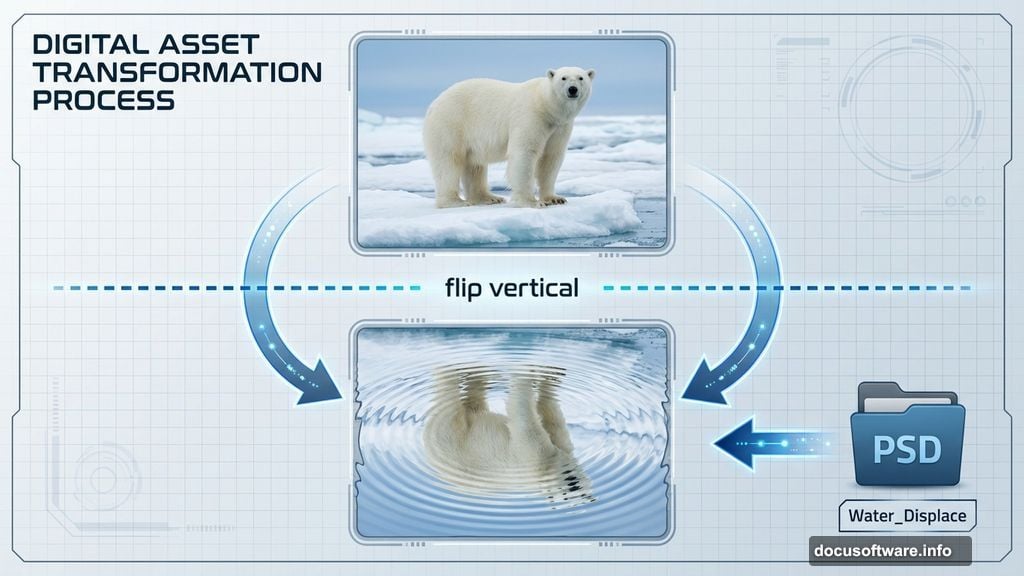
Save this file as a PSD. Name it something obvious like “Water_Displace” so you can find it later.
Now open your polar bear stock image. Duplicate the layer immediately (Ctrl/Cmd + J). This protects your original in case something goes wrong.
Apply your displacement map. Go to Filter > Distort > Displace and select the PSD file you just saved.
Watch your bear image warp and ripple. That’s the displacement map working its magic. The effect adds realistic water distortion automatically.
Build the Water Reflection
Next, create that mirror effect. Go to Edit > Transform > Flip Vertical to flip your bear upside down.
Position this flipped layer below your original bear. Now it looks like a reflection, but it’s too perfect. Real water reflections fade and blur.
Add a layer mask to your flipped bear. Use the Gradient Tool (G) with black and white as your foreground and background colors.
Drag the gradient from bottom to top on your mask. This gradually fades the reflection, making it look like it’s disappearing into murky water.
The transition should be subtle. If it’s too harsh, lower the gradient tool’s opacity and apply multiple passes until it looks natural.
Add Shadow Depth
Water reflections need shadow where they meet the surface. Create a new layer between your bear and reflection.
Select the Brush Tool (B) and choose a soft round brush. Set your foreground color to black.
Here’s the trick. Drop both Flow and Opacity to 15%. This lets you build up shadow gradually without making it look painted on.
Paint along the line where your bear touches the water. Build up the shadow slowly with multiple strokes. It should look like the bear’s sitting in shallow water, casting a soft shadow below.
Stop when it looks natural. Too much shadow makes the bear look like it’s floating. Too little makes it look pasted on.
Add Butterfly Accents
Open your butterfly stock image. Use the Lasso Tool (L) to select the butterfly. Don’t worry about being perfectly precise with edges.
Copy your selection (Ctrl/Cmd + C) and paste it into your main document (Ctrl/Cmd + V). The butterfly appears on a new layer automatically.
Transform it with Ctrl/Cmd + T. Hold Alt + Shift while dragging corners to resize proportionally. In Photoshop CC, just holding Alt keeps proportions locked.
Position your butterfly near the bear’s head or paw. Scale it to look natural in the scene.
Want multiple butterflies? Duplicate the layer (Ctrl/Cmd + J) and reposition. Vary sizes and angles to make them look organic, not copy-pasted.
Layer in Ivy Details
Now add some environmental depth with ivy. Open your ivy vine image and select sections with the Lasso Tool.
Copy and paste selected vines into your composition. Use the Transform tool to wrap vines around your scene edges or frame the bear.
Layer multiple ivy pieces for depth. Put some behind the bear and some in front. This creates a three-dimensional feel.
Use the Eraser Tool (E) with a soft brush to blend ivy edges into your background. Lower the eraser opacity to 30-40% for gradual blending.
Add ivy leaves the same way. Scatter them around your composition. Some floating on water, some at different depths. Vary their sizes and rotations.
Balance Colors with Adjustment Layers
Your composition is built. Now make everything cohesive with color adjustments.
Add a Curves adjustment layer. Click the adjustment layer icon at the bottom of your Layers panel and select Curves.
Adjust the RGB curve to add contrast. Lift highlights slightly and drop shadows a bit. This adds punch without destroying detail.
Next, add a Color Balance adjustment layer. Push colors toward blue and cyan in the shadows. This mimics underwater light.
For midtones, add slight warmth with a touch of yellow and red. This keeps your bear’s fur looking natural.
Want a specific mood? Try a Photo Filter adjustment layer. Warming Filter (85) adds golden hour warmth. Cooling Filter (80) creates an icy feel.
Stack multiple adjustment layers and tweak their opacity. This gives you precise control over your final look.
Final Polish with Camera Raw
Almost done. Now add that professional finish with Camera Raw.
Flatten your image first. Go to Layer > Flatten Image. Then go to Filter > Camera Raw Filter.

Start with the Basic tab. Increase Clarity by 15-20 points. This adds midtone contrast and makes details pop.
Boost Vibrance by 10-15 points instead of Saturation. Vibrance affects muted colors more than already-saturated ones, giving a more natural boost.
Add a touch of Dehaze if your image looks flat. About 5-10 points usually does it. Too much makes everything look artificial.
In the Detail tab, add sharpening. Set Amount to 40-50, Radius to 1.0, and Detail to 25. This brings out fine details without creating halos.
Check the Effects tab. Add a subtle vignette by dropping Highlights to -10 and Amount to -5. This draws eyes toward your center subject.
Click OK and admire your work.
Common Problems and Quick Fixes
Running into issues? Here are solutions to frequent problems.
Reflection looks flat? Add more blur. Duplicate your reflection layer and apply a slight Gaussian Blur. This mimics how water distorts reflections.
Colors don’t match? Use a Hue/Saturation adjustment layer on specific elements. Adjust individual color channels until everything harmonizes.
Edges look cut out? Grab the Smudge Tool and gently push pixels at hard edges. This blends elements more naturally into your scene.
Too dark or too light? Add a Levels adjustment layer. Move the midpoint slider left to brighten or right to darken without crushing blacks or whites.
Butterfly or ivy looks pasted on? Add a subtle drop shadow. Right-click the layer, choose Blending Options, and enable Drop Shadow. Keep Distance and Size small for realism.
Take Your Skills Further
This tutorial taught you core techniques that apply to countless projects. Displacement maps work for fabric, flags, and any surface that needs realistic distortion.
Layer masking with gradients creates smooth transitions for sky replacements, composite portraits, and architectural visualizations.
Adjustment layers give you non-destructive color grading. Experiment freely without permanently altering your work.
Try recreating this project with different animals and environments. A tiger in a jungle. A dolphin breaching waves. An eagle soaring over mountains.
Each variation teaches you how these techniques adapt to different scenarios. That’s how you build real expertise, not just following steps.
The best photo manipulations feel believable. They respect light physics, maintain consistent color temperatures, and use subtle details that reward close inspection.
Keep practicing. Your first attempts won’t be perfect. But each project trains your eye to spot what works and what needs fixing.