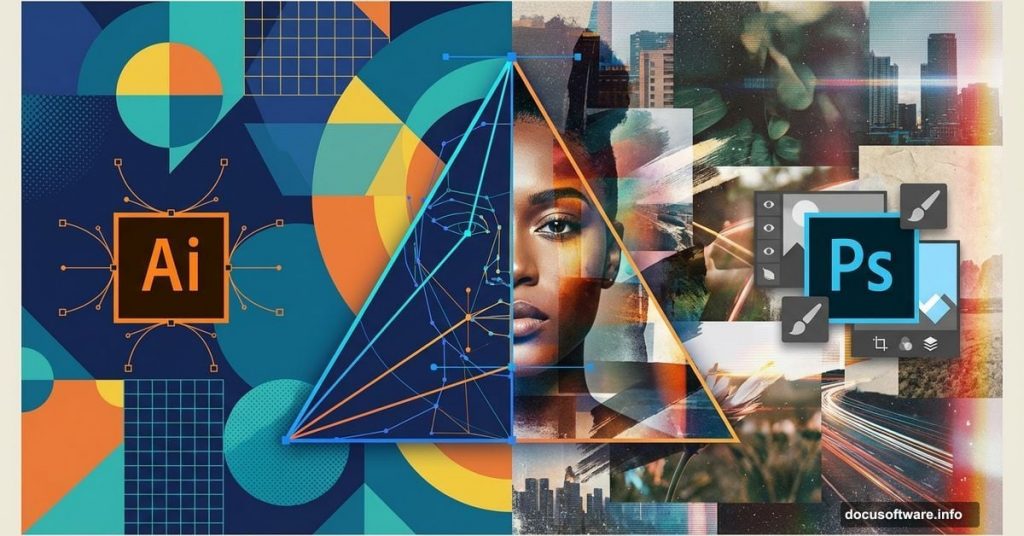
Want to blend clean geometric shapes with realistic photos? This mixed-media technique combines Illustrator’s vector tools with Photoshop’s layering power.
The result looks complex but breaks down into simple steps. You’ll master shape layers, smart objects, and masking along the way. Plus, these skills work for posters, album covers, and social media graphics.
Fair warning: You’ll need both Photoshop and Illustrator for this one.
What You’ll Actually Build
A layered composition featuring geometric shapes behind portrait photography. Think modern poster art with a retro twist.
The design uses triangles, spheres, and custom patterns. Then adds human subjects, texture overlays, and decorative elements. Everything sits in organized layers you can edit later.

Start With the Foundation Shapes
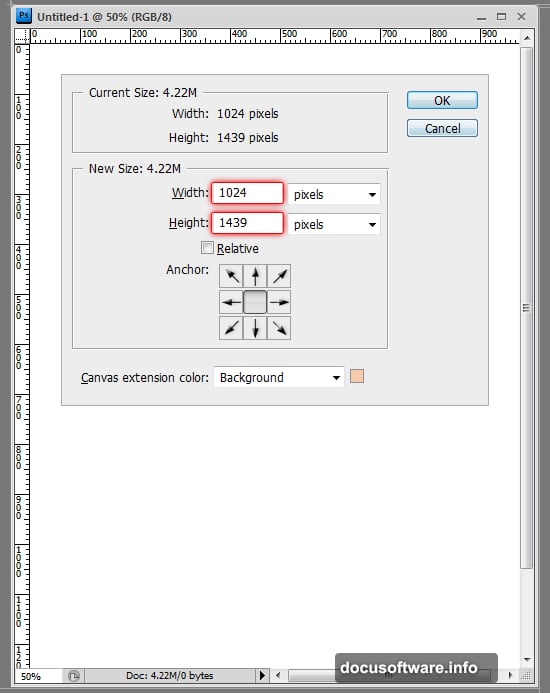
First, set up your canvas. Create a new document around 2000×2500 pixels. You can adjust size later, so don’t stress the exact dimensions.
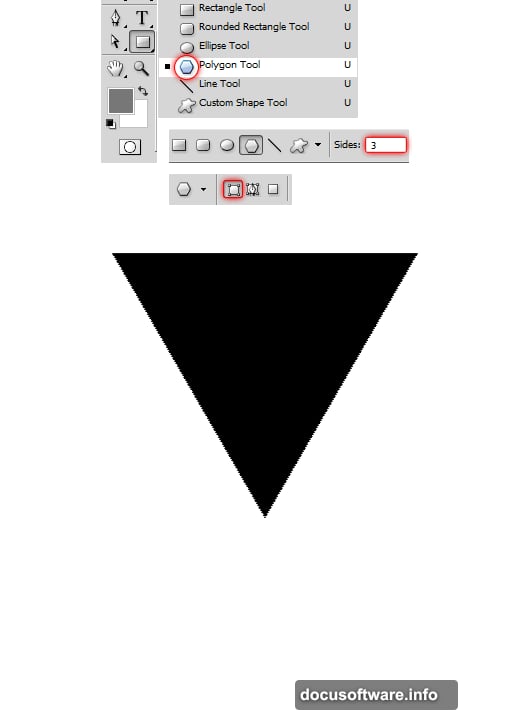
Now grab the Polygon Tool from the toolbar. Change the sides count to 3 for a triangle. Make sure “Shape Layers” is selected, not “Paths” or “Pixels.” This creates an editable vector layer.
Draw your triangle. Then comes the clever part.
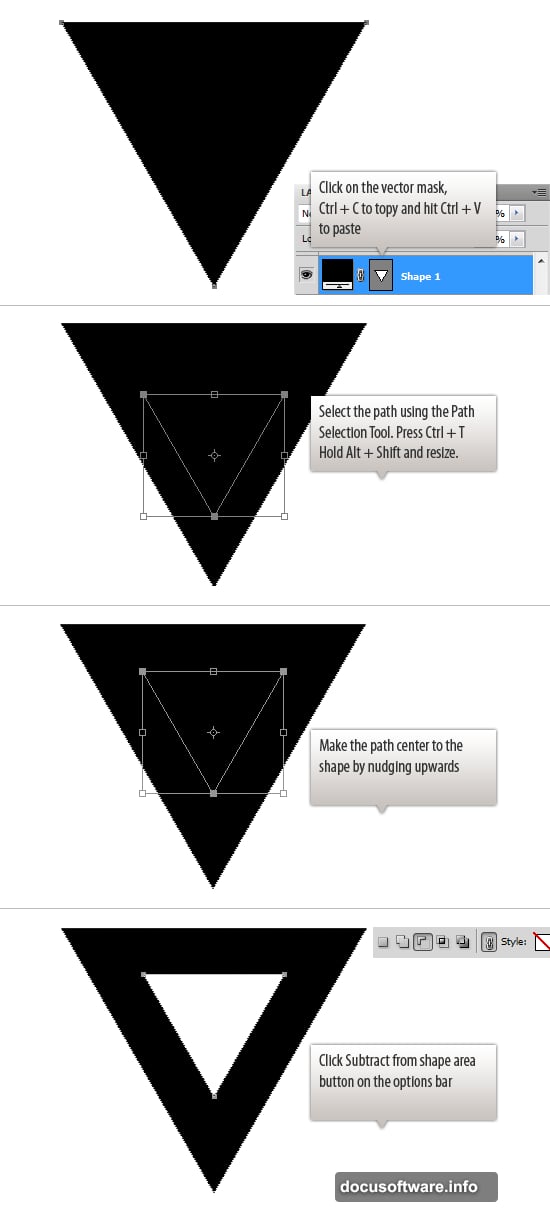
Cut a Hole Through Your Shape
Copy the triangle’s path and paste it in place. Scale it down about 50% and center it inside the original.
With both paths on the same layer, select “Subtract From Shape Area” from the top options bar. Boom—instant cutout effect.
This path operation trick works for any shape combination. You’re basically using one shape to punch through another.
Build the Geometric Frame
Next, create rectangular shapes using the Rectangle Tool. Draw a vertical rectangle along one side of your triangle.
Press Ctrl+T for transform mode. Right-click and choose “Skew.” Drag the corners to slant your rectangle at an angle.
Duplicate this shape with Ctrl+J. Flip it horizontal from the transform menu. Now you’ve got matching angled shapes for both sides.
Position Everything Precisely
Rotate the first slanted shape -60 degrees. Use the Info palette (F8) to check exact rotation angles.
Position the second shape to mirror it. Both shapes should sit beneath the triangle layer in your layer stack.
This creates a diamond-like frame. The geometric structure gives your design clear visual zones.
Add Decorative Elements From Illustrator
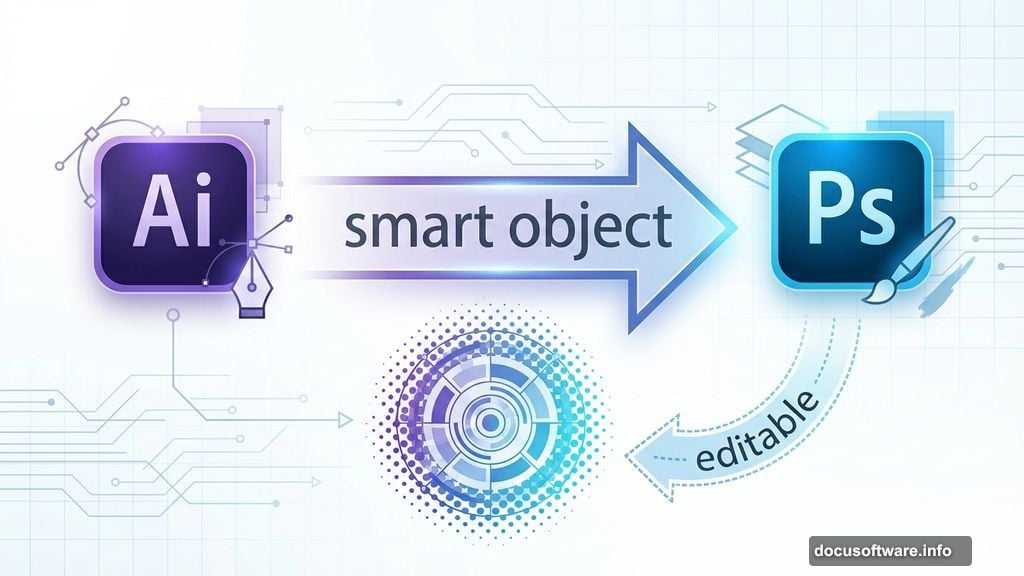
Open Illustrator and create circular patterns, halftone effects, or custom shapes. Vector graphics from Illustrator paste into Photoshop as smart objects.
Smart objects stay editable. Double-click to reopen them in Illustrator anytime. This workflow keeps your design flexible.
Import several decorative spheres, patterned circles, and abstract shapes. Scatter them around your geometric frame. Vary the sizes for visual interest.
Layer in Your Portrait Photos
Drop your main subject into the composition. Position them so they overlap the geometric shapes slightly.
Add layer masks to blend the photo edges. Use soft brushes to fade the mask gradually. This creates that mixed-media look where photos merge into graphics.
Try multiple subjects at different scales. Smaller secondary figures add depth. Overlap them with geometric elements for cohesion.
Apply Texture and Grunge
Import paper textures, watercolor washes, and grunge brushes. Set these layers to Multiply or Overlay blend modes.

Adjust opacity until the texture feels subtle, not overwhelming. Around 30-50% usually works well.
The texture layers unify different elements. They make vector shapes and photos feel like they belong together.
Create Custom Pattern Overlays
Duplicate your geometric shapes and rasterize them. Apply pattern fills or gradient overlays.
Then use layer masks to reveal only portions of these patterns. This technique adds complexity without cluttering your design.
For example, reveal pattern only where shapes intersect. Or fade pattern toward the edges using gradient masks.
Add Final Details and Polish
Import decorative elements like wings, planets, or hot air balloons. These quirky additions give personality to technical designs.
Adjust the overall color balance. Try a warming filter or subtle color grade. This pulls everything together tonally.
Finally, add subtle shadows where elements overlap. Just enough to suggest depth without heavy drop shadows.
Why This Technique Works
Mixed media combines the precision of vector graphics with photography’s organic feel. Neither element dominates. They complement each other.

The geometric structure provides order. The photos and textures add humanity. Decorative elements bring playfulness. Together they create visual tension that holds attention.
Smart objects and shape layers keep your file editable. You can tweak shapes, swap photos, or adjust patterns weeks later. Nothing’s permanent until you flatten for final output.
Make It Your Own
This framework adapts to any style. Swap triangles for hexagons. Use different photos. Change the color scheme.
Try abstract patterns instead of decorative elements. Or skip textures for a cleaner look. The core technique—layering vectors with photos—works for countless variations.
The key is maintaining clear visual hierarchy. Your eye should move through the design smoothly, not get stuck in one spot.
Start with these steps. Then experiment. Mixed-media design rewards creative exploration once you understand the foundational workflow.