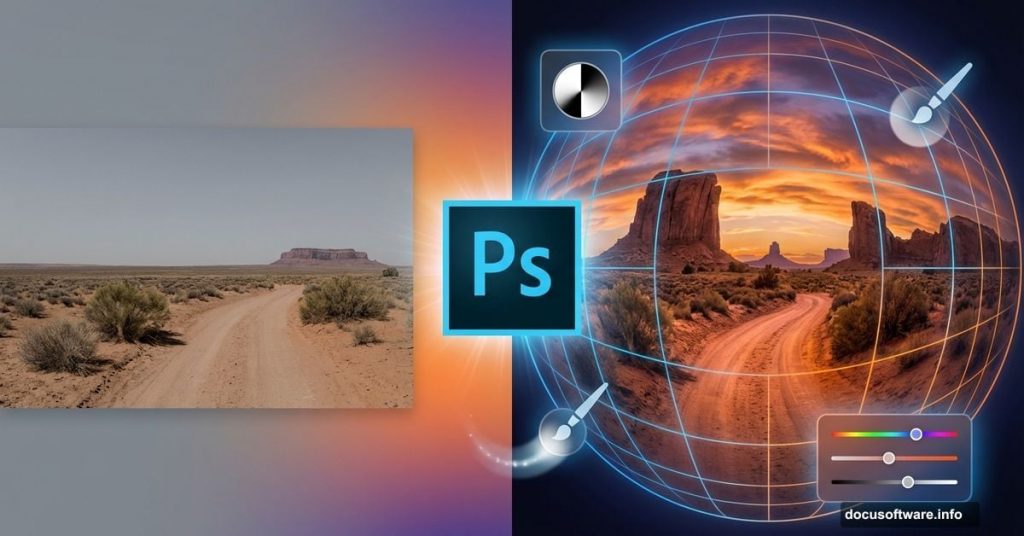
Creating dramatic perspective effects in Photoshop sounds complex. But with layer masks and smart blending, anyone can build professional-looking composite scenes.
This tutorial shows how to merge multiple desert images into a single dynamic composition with fisheye-style distortion. Plus, you’ll learn color-matching techniques that make separate photos look like they belong together.
The whole process takes about 20 minutes once you understand the workflow. Let’s break down each step.
Set Up Your Canvas Right
Start with a large canvas. Go with 7200 by 4800 pixels at 300 DPI. Yes, that’s huge. But it gives you flexibility to scale down without losing quality.
Can’t handle that file size? Cut everything in half. A 3600 by 2400 pixel canvas works fine for most projects. Just keep your resolution at 300 DPI so the final image stays sharp.
Large canvases eat RAM fast. So save your work frequently. Photoshop crashes are painful when you lose an hour of blending work.
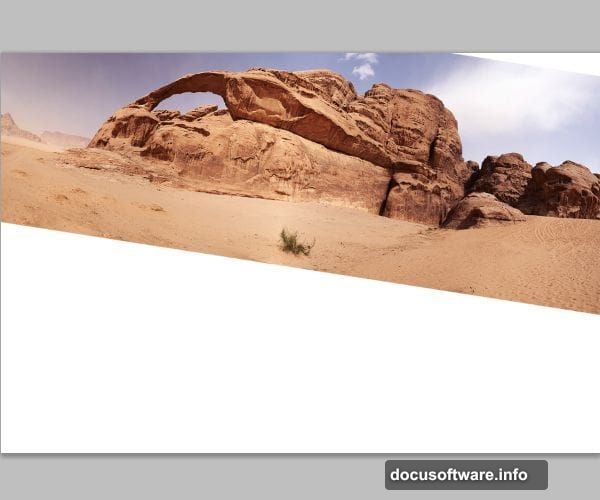
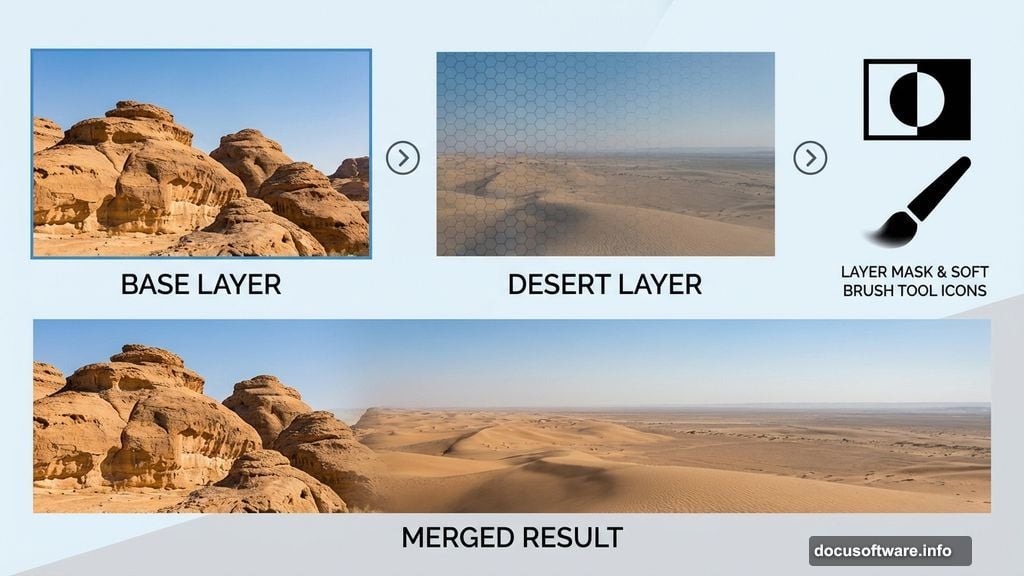
Build Your Base Landscape
Drag your rock formation image onto the canvas first. Rotate it slightly to create dynamic angles. This tilt starts building that fisheye perspective we’re after.
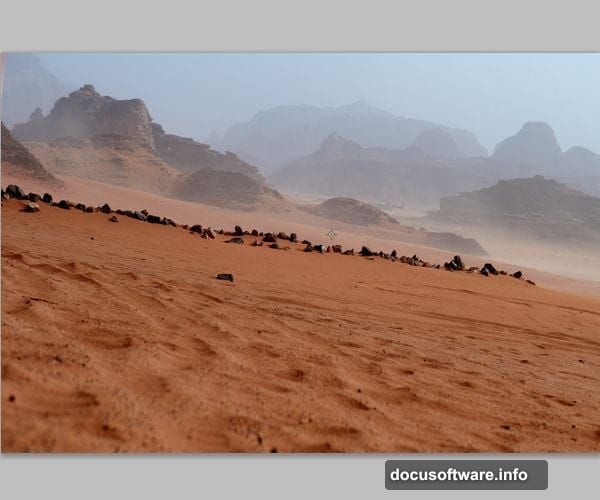
Next, place your desert stock photo directly over the rocks. Match their positions by rotating the desert layer. Having trouble seeing the alignment? Lower the desert layer’s opacity to 50%. This lets you see both images at once.
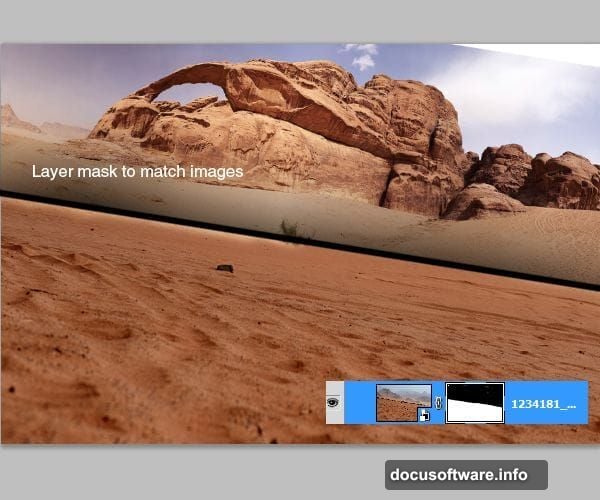
Now comes the crucial part. Add a layer mask to the desert layer. Grab a soft brush with 0% hardness. Then paint black on the mask to erase the top portion of the desert image. Your goal is making the horizon lines meet seamlessly.
Keep brushing until both images flow into each other naturally. The transition should feel invisible. If you can spot where one image ends and another begins, keep blending.
Match Colors Between Layers

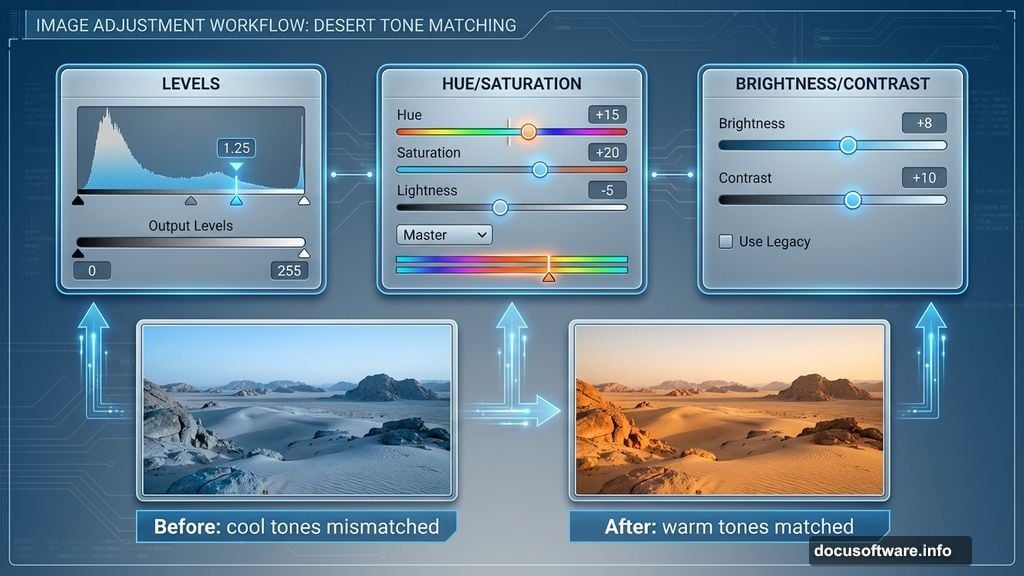
Separate photos rarely match in color and lighting. So we need to adjust the desert layer to match the rock formation.
First, open Levels (Ctrl+L) on your desktop layer. Move the middle slider slightly right to darken midtones. This matches the overall brightness between both images. Watch your histogram while adjusting. You want similar tonal distribution across both layers.
Next, hit Hue and Saturation (Ctrl+U). Shift the hue slider toward orange if your desert looks too cool. The rock formation probably has warm tones. So your desert needs to match that warmth.
Finally, tweak Brightness and Contrast. Small adjustments here make big differences. Add 5-10 points of contrast to make the desert pop against the rocks.
Your images should now look like they were shot in the same location. Similar colors, similar lighting, similar mood.
Blend Edges With Clone Stamp
Color matching gets you 80% there. But sharp edges between layers still look fake. So we’re fixing that with the Clone Stamp tool.
Create a new layer above everything. Select the Clone Stamp tool (press S). Use a soft round brush at 45% opacity. Set the sample option to “Current and Below”. This lets you clone from all visible layers.
Hold Alt and click somewhere on your image. This sets your clone source. Then brush along the seam where both desert images meet. You’re essentially painting texture from one area onto another.
The key is subtlety. Work slowly. Take samples from multiple areas. Vary your brush size. This creates natural-looking transitions that hide any obvious seams.
Keep cloning until you can’t tell where one image ends. The landscape should feel unified, not pasted together.
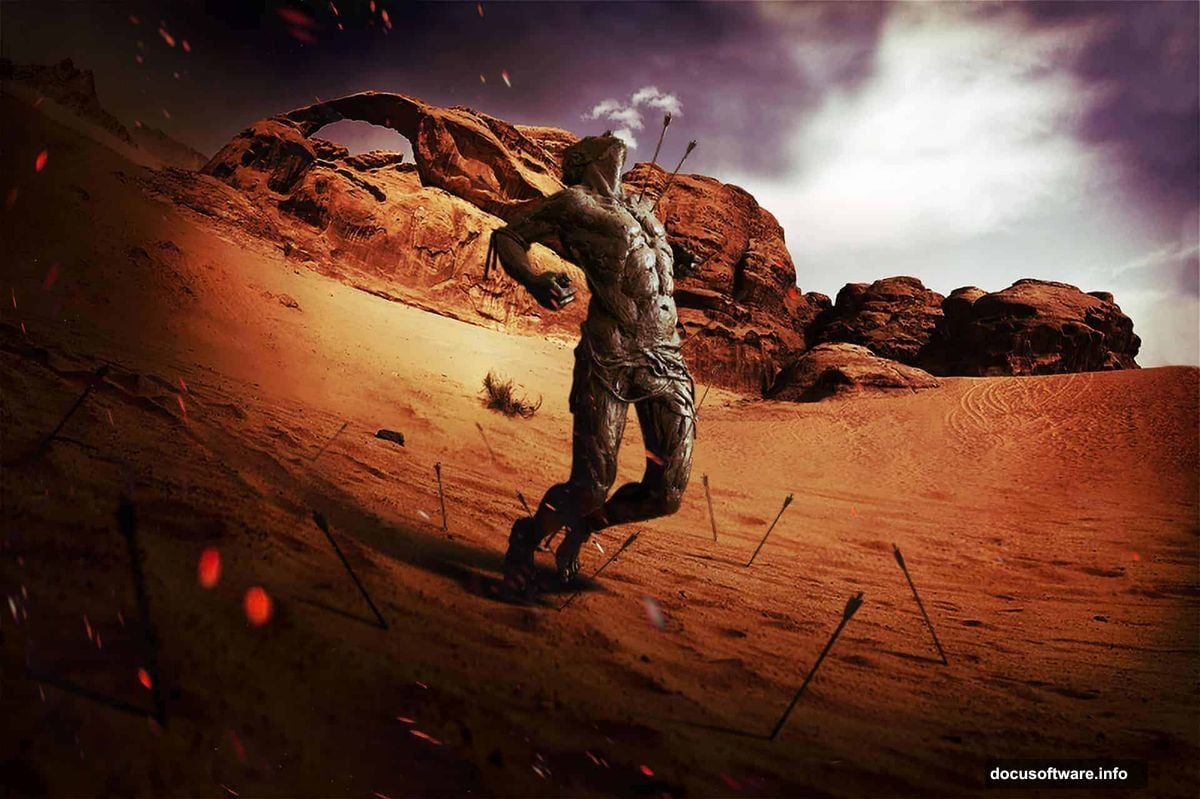
Add Your Central Subject
Time to place your main focal point. In this tutorial, that’s a Spartan statue. But you could use any dramatic subject.
Drag your statue image onto the canvas. Scale it to fit your composition. Remember, fisheye effects make objects in the center appear larger. So your statue should dominate the middle of your frame.
Use the same masking and blending techniques from earlier. Remove the statue’s background completely. Then blend its base into your desert landscape. Clone some sand texture around the statue’s feet to sell the illusion.
Adjust the statue’s colors to match your scene. Use the same Levels, Hue/Saturation, and Brightness/Contrast workflow. The statue should look like it belongs in this desert, not dropped in from somewhere else.
Create Fisheye Distortion
Here’s where things get interesting. We’re warping the entire image to create that dramatic fisheye look.
Merge all your layers into a single smart object. This lets you apply filters non-destructively. Then go to Filter > Distort > Spherize. Set the amount to 100% and mode to Normal.
The image bulges outward from the center. Your statue gets even more prominent. The horizon curves dramatically. Suddenly your flat composite looks like it was shot with an ultra-wide-angle lens.
Not enough distortion? Apply Spherize again. Stack multiple applications until you achieve your desired effect. Just don’t go overboard. Too much spherize makes images look cartoonish.
Boost Drama With Color Grading
Raw composites often look flat. So we’re adding punch with adjustment layers. This is where your image transforms from “good” to “wow”.
Add a Curves adjustment layer. Create an S-curve by pulling highlights up and shadows down. This adds contrast across your entire image. The statue pops. The sky deepens. Everything gains dimension.
Next, add a Color Lookup adjustment layer. Try the “Moonlight” or “Late Sunset” presets. These inject dramatic color shifts that make desert scenes feel cinematic. Experiment with different LUTs until something clicks.
Finally, add a Gradient Map adjustment layer. Set it to Soft Light blend mode at 30% opacity. Choose a gradient from orange to blue. This creates a subtle color split between foreground and background.
Add Atmospheric Effects
Almost done. Now we’re selling the scene with atmospheric elements. These final touches make everything feel real.
Create a new layer. Grab a soft brush with 10% opacity. Paint subtle shadows under your statue using dark brown or black. These ground shadows anchor your subject to the landscape.
Add another layer. Switch to white or light yellow. Paint soft highlights on the statue’s edges. This rim lighting creates separation from the background. It’s especially important on the side opposite your light source.
Want more drama? Add some flying dust or sand particles. Use a particle brush or grab stock images of airborne debris. Scatter them across your scene using low-opacity layers. This adds depth and atmosphere.
Consider adding lens effects too. A subtle vignette darkens the corners and draws eyes to the center. Light leaks or lens flares can suggest strong sunlight. Just use these sparingly. Overdone effects scream “amateur”.
Final Polish
Zoom out and look at your composition as a whole. Does anything feel off? Fix it now before flattening layers.
Check your edges. Are there any visible seams? Clone them out. Do colors match everywhere? Adjust layers individually if needed. Does the perspective feel consistent? Sometimes a slight rotation fixes wonky angles.
When everything looks right, create a stamped copy of all layers (Ctrl+Alt+Shift+E). This gives you a flattened version while preserving your layer stack. Apply final sharpening to this stamped layer. Use Unsharp Mask at 80% with a 1-2 pixel radius.
Save your master file as PSD to preserve layers. Then export a flattened JPEG or PNG for sharing. Your dramatic fisheye Spartan scene is complete.
The techniques here work for any composite project. Master layer masks, color matching, and smart blending. Those skills unlock endless creative possibilities. Plus, once you’ve done this workflow a few times, it becomes second nature.
Start practicing with simple two-image composites. Build up to complex multi-layer scenes. Before long, you’ll create jaw-dropping manipulations that look impossible.