Dark photo manipulation is one of those Photoshop skills that looks impossibly complex from the outside. Fire, smoke, mysterious figures, and dramatic lighting all blending together into something cinematic? It seems like sorcery.
But it’s actually a step-by-step process anyone can follow. This tutorial walks you through building an infernal scene featuring a burning figure reflected in a mirror, using layered photos, blending modes, smoke effects, and color grading techniques you can carry into future projects.
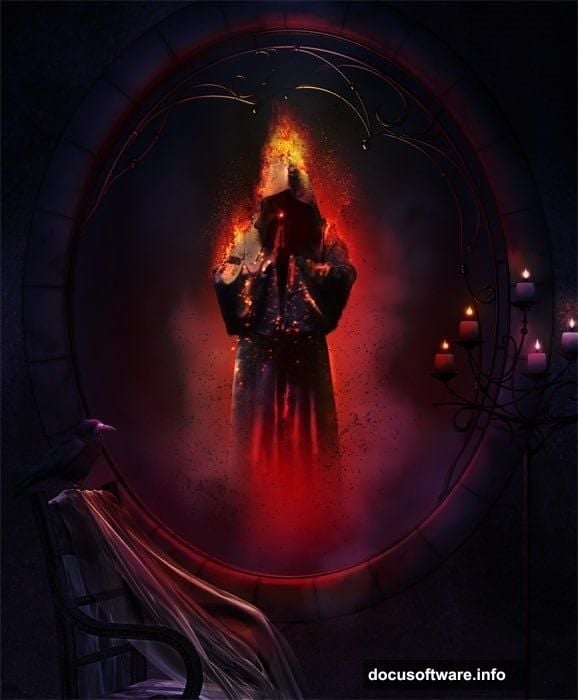
Here’s what you’ll create: a dark, atmospheric composition with a witch surrounded by fire and smoke, staged inside a moody interior setting. Let’s get into it.
Setting Up Your Canvas and Background Gradient
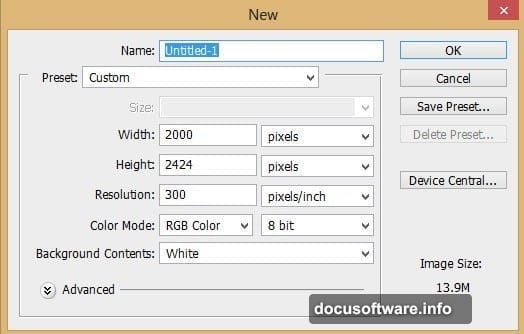
First, open Photoshop and create a new blank document. Set the dimensions to 2000 pixels wide and 2424 pixels high. This gives you plenty of room to work with detailed elements without losing quality.
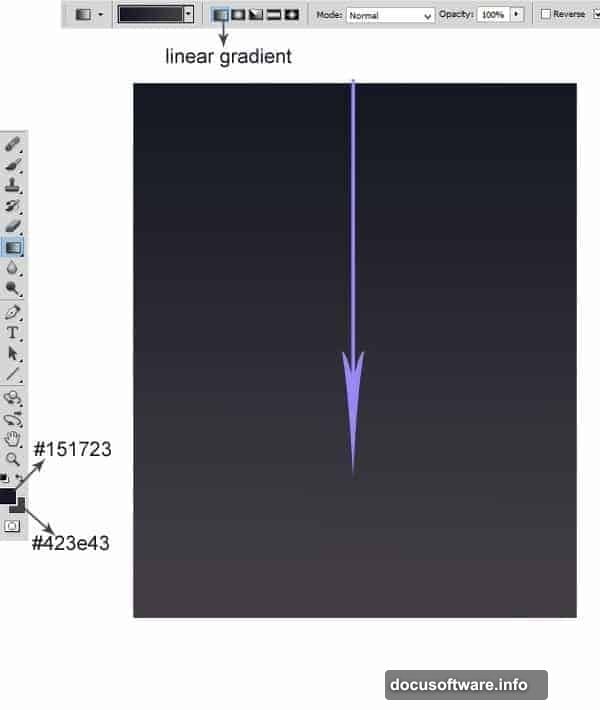
Next, grab the Gradient Tool from the toolbar and select the Linear Gradient option. You’ll use this to fill the canvas with a dark, atmospheric base color. Set your foreground color to #151723 (a deep navy-black) and your background color to #423e43 (a dark muted purple-grey).
Click and drag the gradient from the top of the canvas down to the bottom. This creates a subtle dark-to-dark transition that feels more alive than a flat black fill. Think of it as the foundation your entire scene builds on.
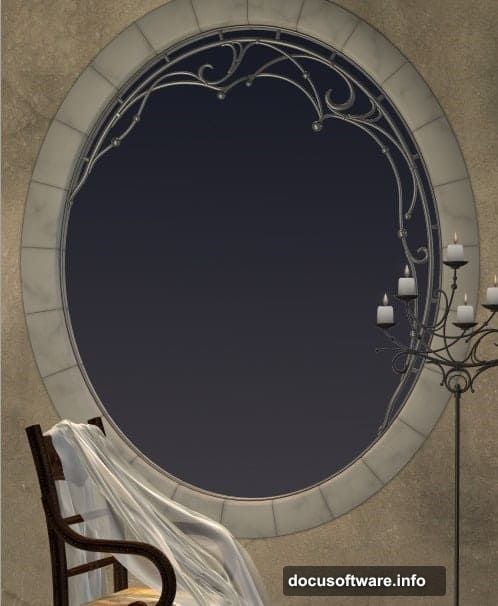
Placing and Positioning the Window Background
Now bring in the fenestra (window) image and place it into your document. Hit Ctrl+T to activate Free Transform, then scale it up so the window itself dominates the composition. This window becomes the visual anchor of your scene, so position it carefully as the centerpiece of the background.
The window framing creates an immediate sense of place. It grounds your supernatural elements in a real physical space, which makes the fire and smoke feel more dramatic by contrast.
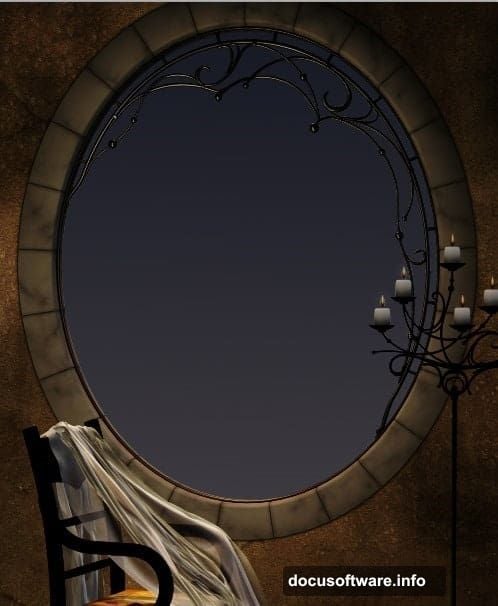
Building the Wall Texture With Blending Modes
Here’s where things get interesting. Instead of just placing the wall image once, you’ll duplicate it multiple times and stack the copies using different blending modes. This layering technique builds depth and richness that a single image can’t achieve.
Start with the original fenestra layer set to Multiply blending at 100% opacity. Duplicate it once and set that copy to Screen blending at 20% opacity. Then duplicate three more times, setting all three to Soft Light blending at 100% opacity.
Select all these layers together and press Ctrl+G to group them into a folder. Naming it “Wall” keeps things organized as the project grows more complex.
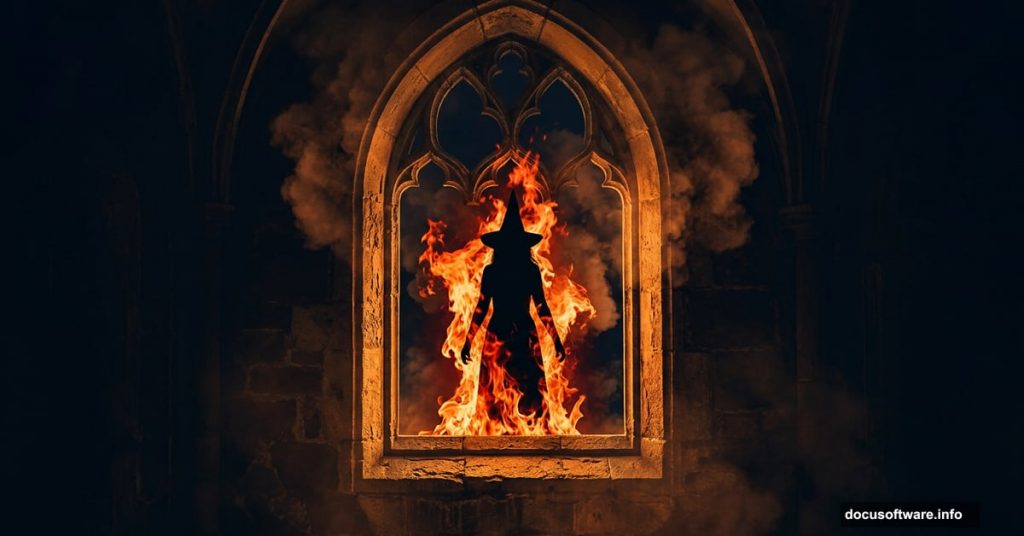
![Dark atmospheric Photoshop infernal scene showing a burning witch figure in a moody window interior with fire and smoke effects]
Now comes the masking work. Select the original layer inside the Wall folder and add a layer mask. Use a very soft round brush set to black and gently paint over the upper portion of the image to fade it out. Then select the first duplicate layer, add another mask, and brush out the area around the lower section of the window. This blending creates a seamless, painterly quality to the background.
Adding the Raven to the Scene
Open your raven image and carefully extract it from its background using your preferred selection method. Place the extracted raven into the main document, scale it to fit, and position it on the chair within the scene.
With the raven layer selected, go to Layer, then New Adjustment Layer, then Hue/Saturation. When the dialog box appears, check the option that says “Use The Previous Layer To Create A Clipping Mask.” This clips the adjustment layer directly to the raven, so any color changes only affect that specific element.
This clipping mask technique is essential for photo manipulation work. It lets you color-correct individual elements independently without touching anything else in your composition.
Smoke, Fire, and Particle Effects
The atmospheric magic of this scene comes from layering fire textures, smoke brushes, and particle effects over your figures and environment. Place your fire images from the resource pack above the figure layers and experiment with Screen or Add blending modes. These modes make dark areas transparent while letting the bright flame colors show through.
For smoke, soft round brushes or dedicated smoke brush sets work well. Build smoke gradually in thin layers rather than one heavy application. Multiple light passes give smoke its natural, wispy quality.
![Photoshop layers panel showing blending mode settings for fire, smoke, and particle effects in dark photo manipulation scene]
Particle brushes and firefly PNG images add the final layer of magic. Scatter them loosely around the figure and window to suggest embers drifting through the air. Scale individual particles at different sizes and vary their opacity to create depth.
Color Grading Your Infernal Scene
Color grading ties everything together and makes your composite feel like one unified image rather than a collection of separate photos.
Add a Color Balance adjustment layer above everything else. Push your shadows toward deep blues and purples. Shift midtones slightly toward orange-amber tones to suggest firelight. This warm-cool contrast is the visual signature of fire-lit scenes and instantly reads as dramatic and infernal.
A Curves adjustment layer gives you even more control. Darken the overall image slightly while lifting your highlights to increase contrast. Your fire elements will pop much brighter against the deeper shadows this creates.
Finally, consider adding a Photo Filter adjustment layer set to a warm amber or orange tone at low opacity, around 15 to 20 percent. This subtle color cast unifies the entire scene under the implied warmth of fire.
Bringing It All Together
Dark photo manipulation rewards patience more than any other Photoshop skill. The blending mode stacking technique for the wall texture, the clipping mask approach for individual element color correction, and the layered approach to fire and smoke all apply directly to future projects.
The resources for this scene come from DeviantArt and WeGraphics, covering the fenestra window background, model photography, fire textures, particle brushes, and firefly spark images. All are linked in the tutorial resources section above.
Start simple, build complexity gradually, and don’t rush the masking work. Clean masks make the difference between a composition that looks assembled and one that feels like a single, cohesive image. Work through each layer group methodically, and you’ll have a genuinely striking infernal scene worth sharing.