
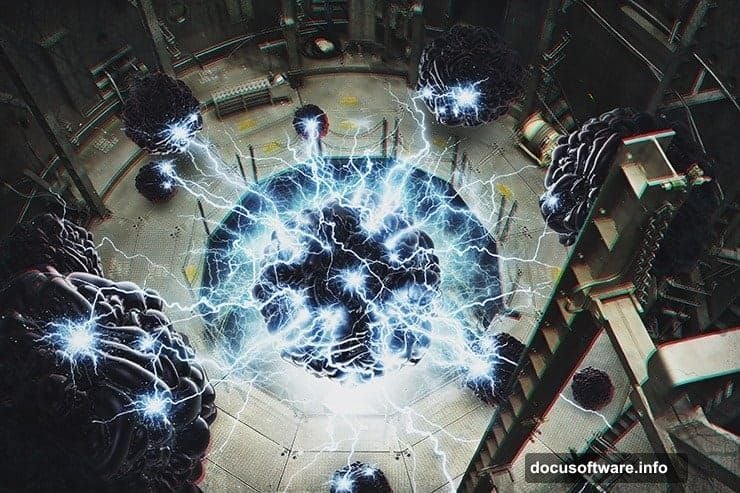
Creating jaw-dropping abstract art in Photoshop doesn’t require a massive asset library. Sometimes three carefully chosen resources are all you need to pull off something truly spectacular.
This tutorial walks you through building an immersive, otherworldly composite complete with 3D depth effects, glowing radiation textures, and custom lightning brushes. Whether you’re fairly new to Photoshop or just looking to sharpen your photo manipulation skills, this project is both approachable and genuinely fun.
Ready? Let’s build something wild.
The Three Resources You Actually Need
Before touching Photoshop, grab these three free assets. Each one plays a specific role in the final composition.
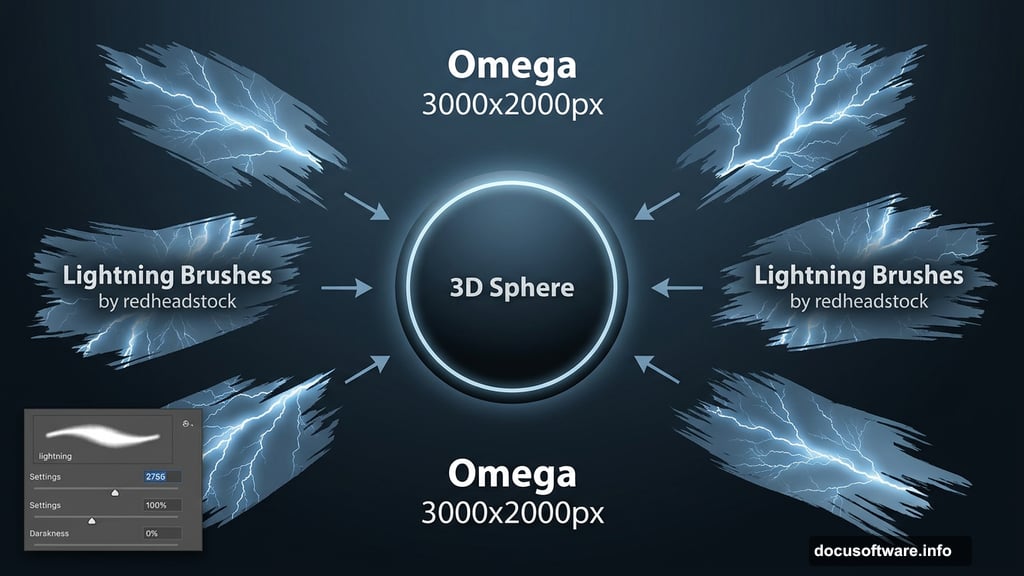
- Altitude Chamber by d3wd (the background environment)
- 3D Sphere by in-the-skies (the central focal object)
- Lightning Photoshop Brushes by redheadstock (for the electric effects)
That’s it. Three downloads, one remarkable result.
Setting Up Your Document
First things first. Open Photoshop and create a new document by pressing Cmd/Ctrl + N or going to File > New.
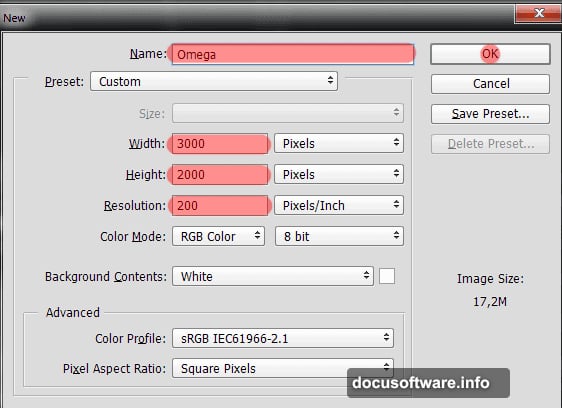
Set your canvas to 3000 pixels wide and 2000 pixels high, with a resolution of 200 pixels per inch. Name the document whatever feels right. The original tutorial calls it “Omega,” which honestly suits the dramatic vibe perfectly.
Placing and Sizing the Background
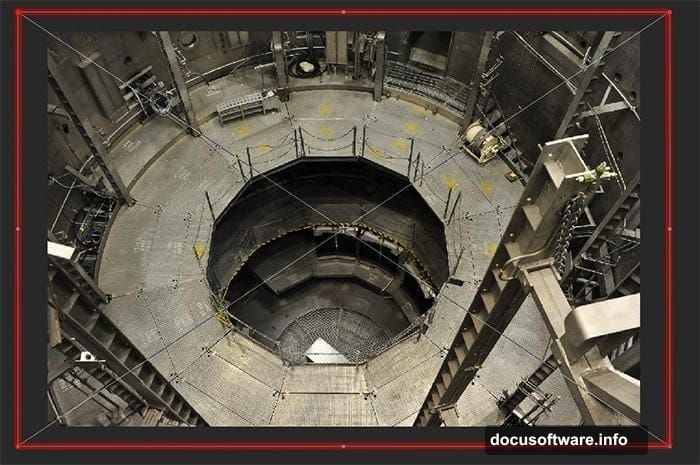
Now place your background image. Go to File > Place and select the Altitude Chamber file from d3wd.
Next, grab the Free Transform tool with Ctrl/Cmd + T. Scale the image up so the mesh texture extends slightly beyond the canvas edges. You want that foreground grid to bleed past the working area. It adds depth right from the start.
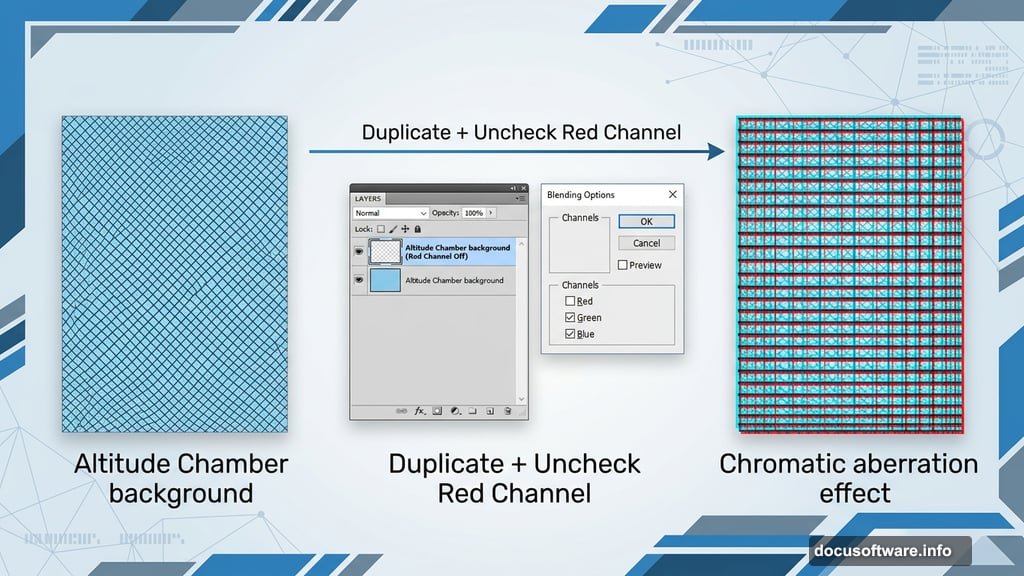
Creating a 3D Effect With Channel Tricks
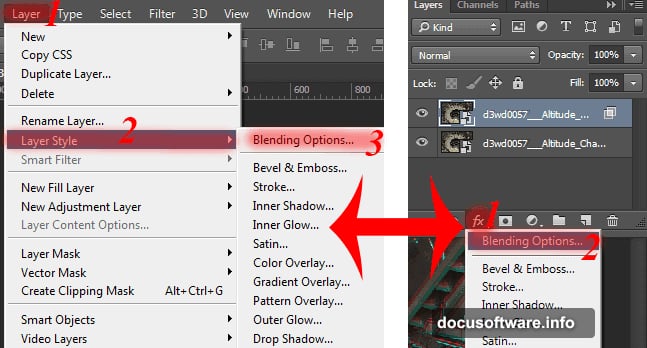
Here’s where things get interesting. Duplicate your background layer using Cmd/Ctrl + J.
With the duplicate layer selected, open Layer Style > Blending Options. Find the channel checkboxes and uncheck the red channel. This separates the color information between your two layers and creates a chromatic offset that reads as genuine 3D depth.
Don’t see the effect yet? That’s normal. The next step activates it.
Moving the Layer to Reveal the Depth
Switch to the Move Tool by pressing V. Now use your arrow keys to nudge the duplicated layer slightly. The tutorial suggests pressing the down arrow three times and the left arrow twice.
Small movements make a big difference here. You’ll immediately see that 3D chromatic separation pop. Too much movement looks chaotic, so keep adjustments subtle and check the result as you go.
Building the Lightning Brush
One of the most satisfying parts of this project is creating your own custom brush from the lightning assets you downloaded.
Load the lightning brushes from redheadstock into Photoshop. Pick one lightning shape you love. Use it to define a new brush preset, then adjust the brush settings to create an “exploding lightning” effect. Scatter, spacing, and size jitter all help give the strokes that organic, energetic feel.
Plus, having a custom brush means you can reuse it in future projects. It’s a skill that pays off well beyond this tutorial.
Adding Glow and Radiation Texture
Smart Filters are your best friend for the radiation effect. Apply a Smart Filter to your sphere layer so you can adjust settings non-destructively at any point.
Build up the glow with layer blending modes. Soft Light and Screen modes work particularly well for creating that luminous, radioactive feel. Stack several glow layers at low opacity rather than cranking one layer to full strength. The result looks far more natural and dimensional.
So experiment freely here. The Smart Filter approach means nothing is permanent.
Final Toning Options
The tutorial offers two distinct color grading directions for the finished piece. One leans dark and moody, keeping the atmosphere cool and dramatic. The other introduces color toning that pushes the piece toward something more vivid and surreal.
Neither option is wrong. Both produce striking results. The best choice depends entirely on the mood you want to communicate with the final image.
Try both before committing. Adjustment layers make switching between the two quick and non-destructive.
A Few Things Worth Knowing
This tutorial works across all versions of Photoshop. You don’t need any specific edition to follow along.
Also, the steps build on each other progressively, so it helps to work through them in order rather than jumping around. The 3D channel trick from Step 4, for instance, only makes sense once the background is properly sized and placed.
Most importantly, treat the settings here as starting points rather than rules. The channel offset, the lightning brush scatter, the glow layer opacity… all of these respond beautifully to experimentation. Your version of this composite should look like yours.
The tutorial spans eight pages in its full form, covering every step from document setup through final color grading. If you’re comfortable with Photoshop basics, the intermediate techniques here, especially the Smart Filters and custom brush creation, will meaningfully expand what you can do on future projects.
Three resources. Endless creative directions. That’s the real takeaway from this one.