
Creating a fantasy scene from scratch sounds intimidating. But with the right steps, even beginners can pull off something magical.
This tutorial walks you through building an autumn fairy photo manipulation in Photoshop. You’ll learn how to cut out a model, set up a dreamy forest background, create fairy hair and makeup, and add natural lighting effects. By the end, you’ll have a fully composited fantasy portrait and a solid set of techniques you can use on future projects.
Here’s what you’ll need before getting started: a model photo, a forest background, fairy wings, a texture, tree heart, leaves, and a hair brush set. All resources are linked in the tutorial notes.
Cutting Out Your Model with the Pen Tool
First things first. Open your model photo in Photoshop.
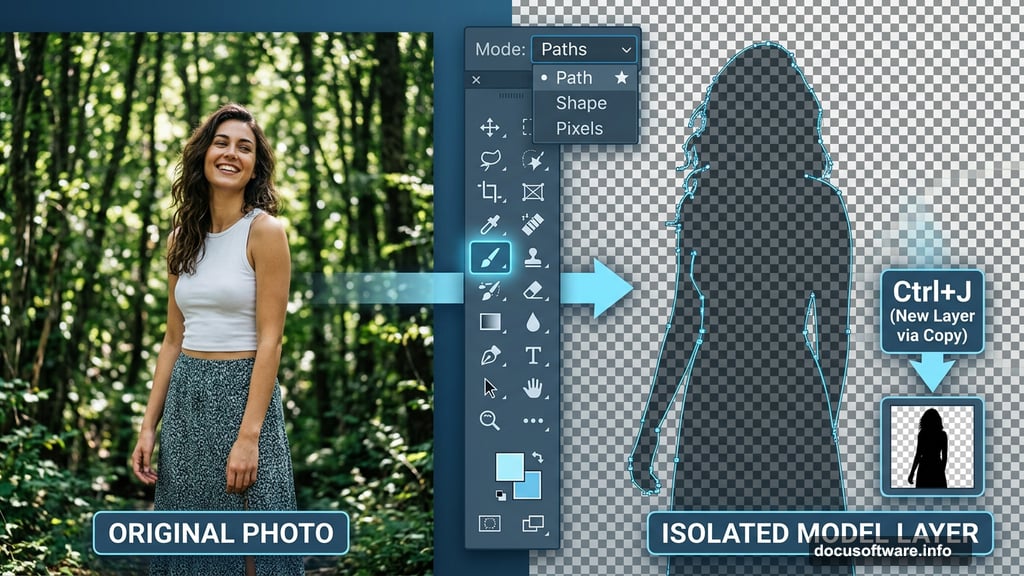
Select the Pen Tool from the toolbar. Make sure the mode at the top is set to “Paths,” not “Shape.” This gives you clean, precise control as you trace around the figure.
Carefully trace the outline of the model. Take your time here. A sloppy selection at this stage will show up in the final image.

Once you close the path, right-click on the canvas and choose “Make Selection” from the menu. Set it to “New Selection” and hit OK. Then press Ctrl+J to duplicate just that selection onto its own layer. You should see the model isolated with the background removed.
Setting Up Your Canvas and Background
Now build your working canvas. Go to File > New (or press Ctrl+N) and set the dimensions to 1750 x 1400 pixels. Drop your cut-out model into the new document and use Free Transform (Ctrl+T) to scale her to fit the composition.
Next, bring in your background image. A forest scene works beautifully here. Choose one that isn’t too busy with branches, since the model is the star of the show and you want her to stand out clearly.
Softening the Background for a Fantasy Look
A sharp, detailed background competes with your subject. So you’ll soften it to push it visually into the distance.
Go to Filter > Blur > Gaussian Blur and apply a radius of 4 pixels. This gives the background a gentle, out-of-focus quality that makes the fairy feel like she belongs in the scene.

Next, duplicate the background layer with Ctrl+J. On the duplicate, go to Image > Adjustments > Hue/Saturation (Ctrl+U), check the “Colorize” option, and click OK. Change that layer’s blend mode to Soft Light and drop the opacity to 80%. This adds a warm, unified color wash to the background.
Finally, right-click the layer and choose “Merge Down” so you’re working with a single clean background layer.
Adjusting the Model’s Skin Tone
Skin tones from different photos rarely match the background lighting straight out of the box. Here’s how to fix that.
Use the Lasso Tool to select just the skin areas on your model. Press Ctrl+J to duplicate that selection to its own layer. Then go to Image > Adjustments > Hue/Saturation and pull the Saturation down to -35. This tones down any overly warm or red skin tones from the original photo.
Duplicate that layer, set it to Soft Light blend mode, and reduce the opacity to 50%. This adds a subtle contrast boost that makes the skin look more luminous. Merge these layers down when you’re happy with the look.
For the final skin color step, duplicate the skin layer again and open Hue/Saturation. Check “Colorize,” set Hue to 22 and Saturation to 20. This gives the skin a soft, slightly otherworldly tone that sells the fantasy feel.

Adding the Fairy Wings
Bring in your fairy wings stock image and position it behind the model layer. Use Free Transform to resize and rotate them so they sit naturally at her back.
Wings from stock photos often come with white or light backgrounds. If yours does, try setting that layer to Multiply or Screen blend mode to blend them into the composition more naturally. You may also need to use the Eraser Tool or a layer mask to clean up any hard edges.
Adjust the wing colors using Hue/Saturation to match the warm autumn palette you’re building. A slight golden or amber shift works well here.
Building the Fairy Hair
This is one of the most creative parts of the whole process. Fairy hair should feel wild, flowing, and magical rather than photographic.

Use a custom hair brush set (the Dezzan brush set works great for this). Create a new layer above the model. Pick a warm brown or auburn color that complements the autumn tones.
Paint the hair in loose, flowing strokes radiating from the model’s head. Work in multiple layers, starting with darker base tones and building up lighter highlights on top. Vary your brush size and opacity as you go for a natural look.
Don’t be afraid to let some strands drift far from the head. Long, flowing hair that moves with an imaginary breeze instantly reads as magical.
Painting Fantasy Makeup
Fairy makeup goes well beyond what you’d apply in real life. Think bold eye colors, glowing skin, and dramatic lips.
Create a new layer and set it to Soft Light or Overlay blend mode. Use a soft brush with low opacity to paint color over the eyes, cheeks, and lips. This lets the underlying skin texture show through while layering in saturated color.
For the eyes, try deep purples, forest greens, or burnt ambers. Build up color gradually rather than painting it all at once. Add small dots or star shapes near the outer corners for an extra touch of magic.

A gentle glow around the eyes also helps. Use a very soft, large brush with a warm yellow or white at very low opacity and paint lightly over the eye area.
Adding the Tree Heart and Autumn Leaves
These two elements ground the fairy in her natural setting and add storytelling detail to the image.
Place the tree heart stock image into your composition. Position it somewhere natural, like growing from a tree trunk in the background. Adjust the size, brightness, and color using Curves and Hue/Saturation until it blends convincingly with the background.
For the leaves, scatter them around the model using the leaf stamp brushes. Vary the size, angle, and opacity of each leaf so they don’t look copy-pasted. Some leaves falling across the model’s arm or shoulder create a sense of depth and movement.
Try adding a few leaves on a layer above the model to give the impression that some are falling in front of her.
Applying the Final Lighting Effects
Good lighting ties a composite together. Right now, elements from different source photos may feel disconnected. Light unifies them.
Think about where your main light source sits in the scene. For an autumn fairy, warm golden light coming from slightly above and behind works beautifully. It suggests late afternoon sun filtering through trees.
Create a new layer on top of everything and set it to Soft Light. Use a large, soft brush with a warm golden color and paint lightly over the areas where light would naturally fall: the top of the head, shoulders, and the tips of the wings. This gives the scene a warm, magical glow.
For shadows, use a similar approach with a cool, dark blue or purple on a Multiply layer. Paint into the recessed areas of the face and body to add dimension.
Adding the Background Texture
Drop the texture image over your composition as the top layer. Set the blend mode to Soft Light or Overlay and dial the opacity back to around 30-40%.
A subtle texture across the whole image helps all the elements feel like they exist in the same physical space. It also gives the image a painterly, storybook quality that fits the fairy theme perfectly.

If the texture looks too strong in certain areas, add a layer mask and paint over those spots with black to hide it selectively.
Finishing Touches and Color Grading
Almost there. Now step back and look at the whole image with fresh eyes.
A final color grade pulls everything together. Create a Color Balance adjustment layer and push the overall tone slightly warmer. Add just a touch of yellow and red to the midtones to lean into that rich autumn mood.
You can also add a Curves adjustment to boost contrast slightly. Lift the shadows a tiny bit so they’re not pure black. This gives the image that soft, dreamy quality you see in professional fantasy photography.
If any elements still feel out of place, use adjustment layers clipped to individual layers to fine-tune them separately until the whole scene feels cohesive.
The result is a richly layered autumn fairy portrait that shows off a wide range of Photoshop skills, from selection and masking to painting and color grading. Each technique you practiced here applies directly to your future photo manipulation projects too.