
Ever looked at a piece of digital art and wondered, “How on earth did someone make that?” Surreal photo manipulation is one of those skills that looks incredibly complex from the outside but breaks down into surprisingly manageable steps once you see the process.
This tutorial walks you through building a stunning surreal scene from scratch. Think a dramatic tree bathed in moonlight, multiple glowing moons hanging in a dark sky, and a mysterious girl standing in a night-transformed grassy landscape. The best part? You only need Photoshop CS3 or newer to follow along.
Let’s build something beautiful.
What You Will Create and Why It Works
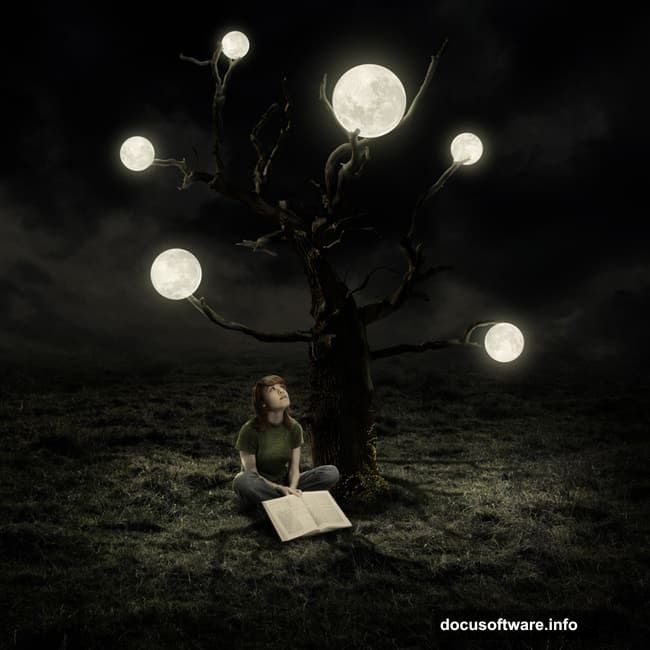
The finished artwork combines five stock images into one cohesive, otherworldly scene. You will work with a model, a tree, grass, sky, and moon images.
What makes this tutorial genuinely useful is the technique variety. You will practice masking, adjustment layers, color correction, and lighting effects all in one project. Plus, the day-to-night transformation alone is a skill worth learning for dozens of other projects.
So grab your stock images and fire up Photoshop.
Setting Up the Canvas and Placing Your Grass
Start by creating a new document with your preferred dimensions. Once your canvas is ready, open the grass image and drag it in using the Move Tool (V). Position it to fill the lower portion of the canvas naturally.

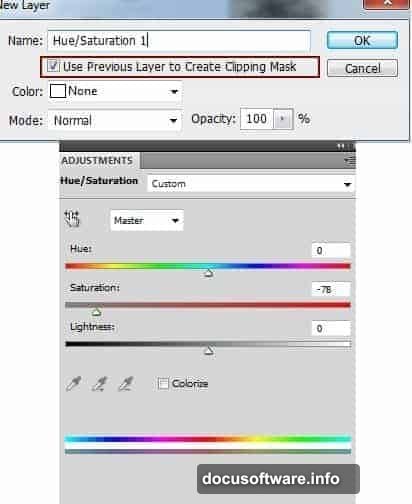
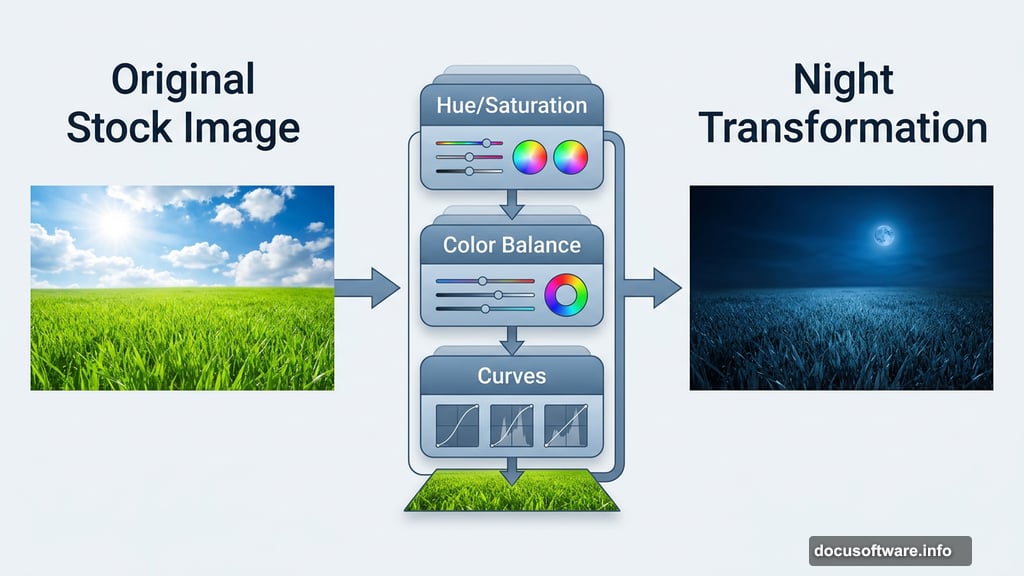
Now the grass needs some color work. Create a new adjustment layer by going to Layer > New Adjustment Layer > Hue/Saturation. Clip this layer to your grass layer using a Clipping Mask. Pull the saturation down slightly to tone down the vibrant daytime colors.
Next, add a Color Balance adjustment layer (also clipped) to shift the grass toward cooler, more nocturnal tones. Then use a Curves adjustment layer to darken the grass overall. On the Curves layer mask, paint with a soft black brush at about 40-50% opacity to brighten the foreground slightly, keeping depth in the scene.
Building the Sky and Blending the Horizon
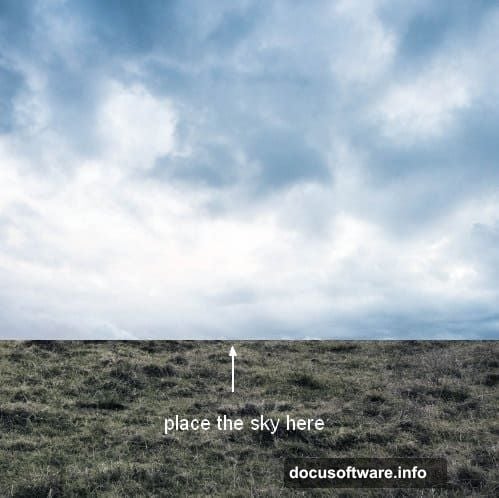
Open your sky image and use the Rectangular Marquee Tool (M) to select just the sky portion. Drag it into your document and position it at the top of the canvas. Use Free Transform (Cmd/Ctrl+T) to resize it until it fits perfectly.

Add a layer mask to the sky layer. Then paint along the bottom edge with a soft black brush to dissolve the hard horizon line into the grass below. This blending step makes or breaks the realism of your composite.
Add a Curves adjustment layer clipped to the sky to darken it further. Follow that with a Hue/Saturation adjustment to bring the sky color into harmony with the grass tones. Both adjustments work together to push the scene away from daytime and toward a moody, moonlit atmosphere.
Adding the Tree and Branch
Open your tree image. Since it has a transparent background, simply drag it straight into your working document. Position it wherever feels visually interesting, then add a layer mask and use a soft black brush to blend the base of the tree into the grass naturally.
Next, select a branch from the same tree image and place it to the left of the main trunk. Add another layer mask and carefully blend the branch where it meets the trunk. This extra branch adds fullness and visual complexity to the tree silhouette.
Creating the Tree Shadow
Good lighting tells a story. Because the moons will sit above the scene, the tree shadow needs to fall directly beneath the tree rather than stretching sideways.
Create a new layer and position it below both the tree and branch layers in the panel. Hold Cmd/Ctrl+Shift and click the tree thumbnail and branch thumbnail to load their combined selection. This selection outlines the exact shape of your tree.
Fill the selection with dark color on your new layer, then use Free Transform to flatten and position the shadow directly under the tree. Reduce the layer opacity and apply a blur to soften it. The result is a grounded, realistic shadow that anchors your floating tree to the earth.
Working with Adjustment Layers and Clipping Masks
One question from the tutorial comments worth addressing directly: what exactly is a Curves Clipping Mask? It sounds complicated but it is a simple concept.
A Clipping Mask ties one layer to the layer directly below it. So when you add a Curves adjustment layer and clip it, that adjustment only affects the single layer it is clipped to. Without clipping, the adjustment would change every layer beneath it in the stack.
To clip an adjustment layer, hold Alt/Option and click the line between the two layers in the Layers panel. Or right-click the adjustment layer and choose Create Clipping Mask. This technique keeps your adjustments precise and non-destructive throughout the whole workflow.
Placing the Moons and Building Atmosphere
Add your moon images and position them in the sky with intention. Vary the sizes to create depth, placing larger moons closer and smaller ones farther away. Use layer masks to blend each moon softly into the sky without harsh edges.
Adjustment layers clipped to each moon help match their brightness and color temperature to the overall scene. Cooler, slightly blue-tinted light works beautifully for a night scene. The goal is for the moons to feel like they belong in this sky, not like they were dropped in from a different image.
Adding the Girl and Final Lighting Effects
Bring your model image in and carefully cut her from the background using your preferred selection method. Position her within the scene, then use adjustment layers to match her lighting and color temperature to the night environment.

The final stage involves pulling everything together with scene-wide adjustment layers. Darken the overall image, cool the shadows, and add subtle blue or purple tones to the midtones. A soft glow effect around the moons created with a large, low-opacity brush on a new layer set to Screen blend mode adds the finishing magical touch.
Why This Tutorial Is Worth Your Time
Surreal photo manipulation teaches you to see images differently. Every photo becomes a potential ingredient in something bigger and stranger and more beautiful than the original.
The techniques here, including adjustment layer stacking, careful masking, and lighting logic, carry over into virtually every compositing project you will ever attempt. Master this workflow and you will approach future work with far more confidence and creativity.
Start with these five images. See where you end up. The skills you build along the way are the real prize.