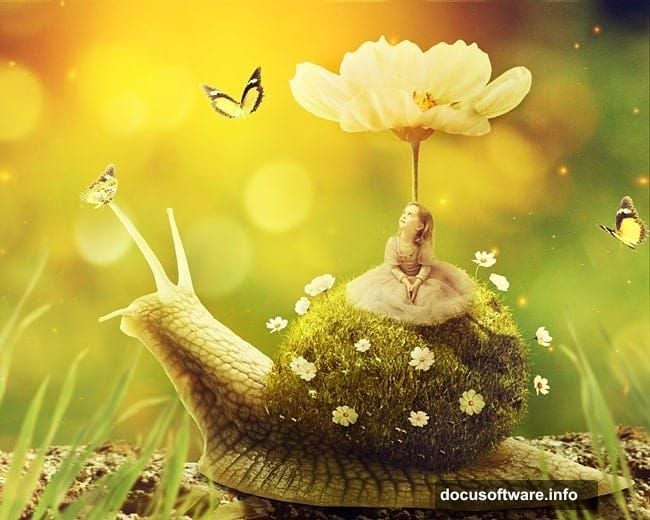
Ever look at a photo and think, “what if that snail had a tiny meadow growing on its shell?” No? Well, after this tutorial, you might start seeing the world a little differently.
This step-by-step Photoshop walkthrough shows you how to build a surreal fantasy scene featuring a little girl riding a snail with a grassy shell. Think storybook magic, but built entirely from stock photos and textures you layer together yourself.
The best part? You don’t need to be a Photoshop wizard to follow along. Each technique builds naturally on the last, and by the end you’ll have a dreamy, atmospheric composite that looks like it belongs on the cover of a children’s fantasy novel.
What You’ll Build and Why It Works
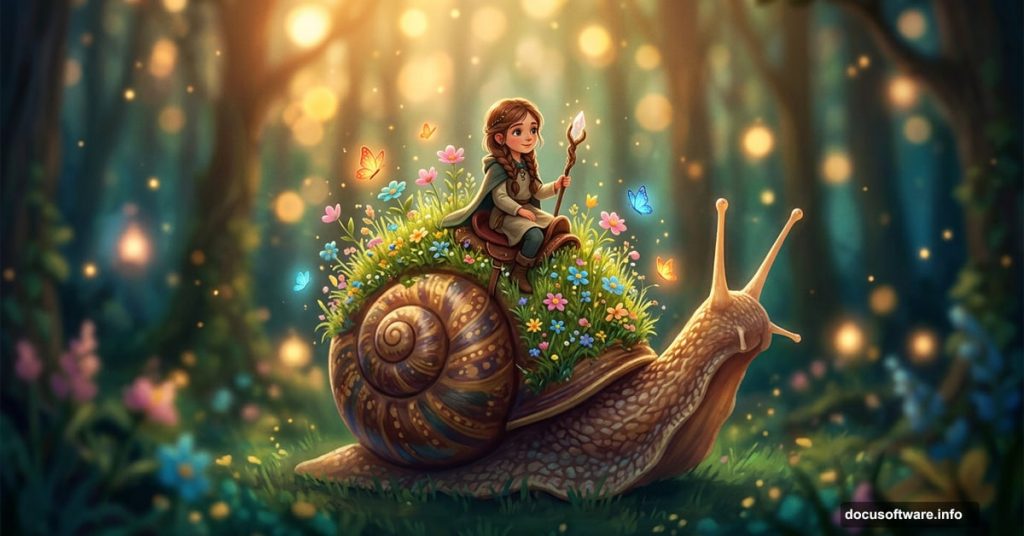
The finished scene combines a blurry outdoor background, a snail, a child, meadow grass, flowers, butterflies, and atmospheric bokeh lighting into one cohesive image.
What makes this project so satisfying is how many foundational Photoshop skills it covers in one go. You’ll practice masking, lighting, depth of field, blending, and color grading all in a single project. Plus, the surreal subject matter gives you room to be creative without worrying about photorealism.
Before diving in, Photoshop CS5 or newer works best here. Grab the resource images listed in the tutorial, including the background, snail, child, grass pack, meadow, flowers, light texture, butterflies, and bokeh image.
Setting Up Your Document
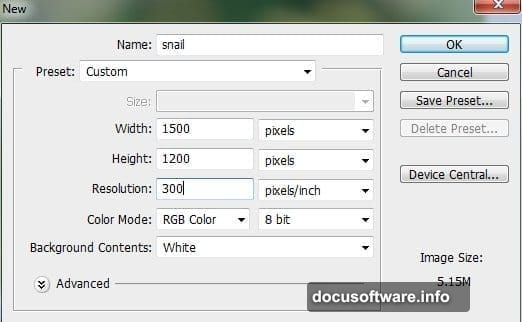
Start fresh. Create a new Photoshop document with the dimensions specified in the tutorial. A clean canvas gives you full control over how elements get layered.
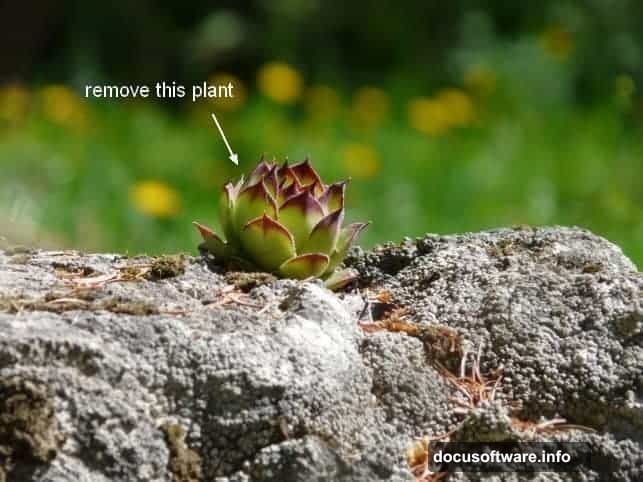
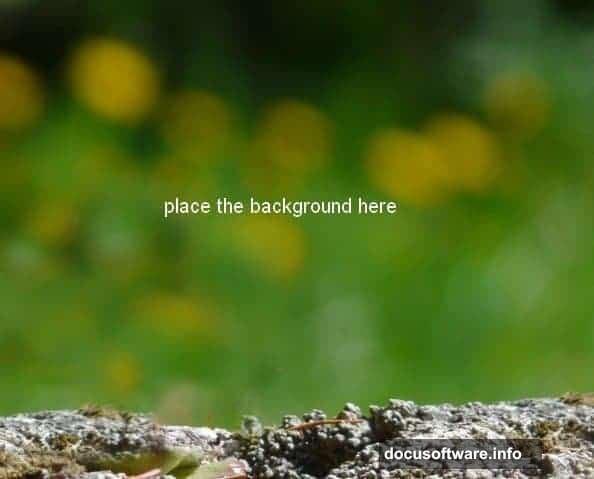
Open your background image next. You’ll notice a plant growing on the rock that needs to go. Create a new layer, grab the Clone Stamp Tool (S), and carefully paint over the plant using nearby rock texture as your source. It takes a little patience, but the result is a much cleaner base.
Once you’re happy with it, press Cmd/Ctrl + Option/Alt + Shift + E to merge your background and clone layers into a single new layer. Then drag that merged layer onto your white canvas using the Move Tool (V).
Adjusting the Background Colors and Lighting
Raw stock photos rarely match each other straight out of the box. So before adding anything else, get the background looking the way you want it.
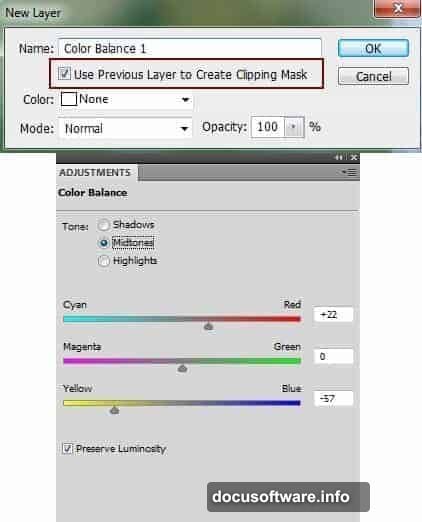
Go to Layer > New Adjustment Layer > Color Balance. Use this with a Clipping Mask to shift the background tones toward your desired mood. A slightly cooler, more atmospheric palette works beautifully for fantasy scenes.
Next, add a Curves adjustment layer to darken the background. But here’s a key move: on that Curves layer mask, grab a soft black brush and paint over the bokeh areas of the background. This keeps the glowing bokeh effect bright and dreamy while the rest of the scene stays properly shadowed. It’s a small step that makes a big difference to the overall atmosphere.
Bringing in the Snail and Building Its Shadow
Add your snail image to the main document. Remove the white background using a layer mask, painting carefully around the snail’s edges so it sits naturally in the scene.
Now create a new layer directly under the snail layer. This is where you paint the shadow. Use a soft black brush set to about 40% opacity and gently build up darkness beneath the snail’s body. Name this layer “shadow 1” so your layer panel stays organized.
Think about where your light is coming from. In this scene, the light source sits to the upper left of the snail. That means the shadow falls behind and slightly to the right. Hold Cmd/Ctrl and click the snail layer’s mask thumbnail to load its selection, then use that as a guide for painting a second, deeper shadow layer underneath “shadow 1.”
Growing Grass on the Snail Shell
This is the step that makes the whole image pop. You’re going to replace the snail’s plain shell with a lush meadow texture, creating the illusion that an entire grassy landscape is growing right on its back.
Add your meadow image to the document and position it over the shell area. Use a layer mask and careful brushwork to blend the meadow edges into the shell shape. The trick is keeping the curvature of the shell visible through the grass so it still reads as a three-dimensional object rather than a flat texture stamp.
Adjustment layers with clipping masks help here too. A subtle Curves tweak can match the meadow’s lighting to the rest of the scene so the grass doesn’t look pasted on.
Adding the Child, Flowers, and Butterflies
Now the scene really comes to life. Add the child image, mask out the background, and position her on top of the snail as if she’s riding it. Scale carefully so the proportions feel believable given the snail’s size.
Flowers come next. Layer them around the base of the snail and scattered through the scene. Use multiple flower images at varying scales and opacities to build depth. Some flowers in the foreground can be slightly larger and sharper. Others further back can be softer and more muted.
Butterflies add movement and whimsy. Scatter a few around the scene using the butterfly image, adjusting each one’s size and rotation so they look naturally in flight. A touch of motion blur on some helps sell the illusion that they’re actually moving.
For all these elements, masking and soft brushwork are your best friends. Blend edges gently rather than cutting cleanly, especially where elements overlap the blurry background.
Painting in the Grass Blades
The grass pack gives you individual grass blade images to scatter around the base of the snail and across the foreground. These small details add an enormous amount of believability to the composite.
Layer grass blades at different heights, angles, and opacities. Some can partially overlap the snail’s shadow area. Others can catch the light from the upper left. Use adjustment layers clipped to each grass group to match the color temperature of the scene.
This step is time-consuming but deeply satisfying. The more care you put into the grass placement, the more the scene feels like a real miniature world rather than a collection of cut-out images.
Adding Light and Bokeh Textures
At this point you have all the main elements in place. Now it’s time to make the scene feel magical rather than just assembled.
Add your light texture layer and set its blend mode to Screen. This drops out the dark areas of the texture and lets only the glowing light elements show through. Position it so the brightest areas complement your existing light source.
Do the same with the bokeh texture. Bokeh layers on Screen mode create those beautiful soft circles of light that make fantasy composites feel genuinely atmospheric. Reduce the opacity if the effect feels too heavy. You want it to enhance the mood, not overwhelm the detail in your other elements.
Final Color Grading With Adjustment Layers
The last stage ties everything together. Use a series of adjustment layers at the top of your layer stack to unify the whole image under one consistent color grade.
A Photo Filter adjustment in warm amber or golden tones works nicely for a fantasy scene. A gentle Hue/Saturation tweak can make the greens in the grass feel more lush and saturated. One final Curves layer can add a subtle S-curve to boost contrast and give the whole image more depth and punch.
Step back and look at the whole composition. Check that the light feels consistent across all elements. Make sure the child and snail feel grounded in the scene rather than floating. Adjust any individual element masks where edges look too sharp or too soft.
What starts as a collection of unrelated stock photos becomes a cohesive little world. That’s the real magic of photo manipulation in Photoshop, and once you understand how these techniques work together, you can apply them to any fantasy scene you can imagine.