Creating your own space art in Photoshop sounds intimidating. But it’s actually one of the most rewarding projects you can take on as a digital artist.
In this tutorial, you’ll build a complete space composite from scratch. That means stars, planets, nebulae, and dramatic lighting effects — all created with Photoshop tools you probably already know. And the best part? Every technique is designed to spark your creativity, not just follow a recipe.
Let’s build something spectacular.
What You’ll Create Before You Start
The final image combines several distinct elements built layer by layer. First comes a deep, colored background. Then stars for depth. Next, a hand-crafted nebula using brushes and blend modes. Then planets with rings, textures, and atmospheric effects. Finally, dark matter and cinematic lighting round everything out.
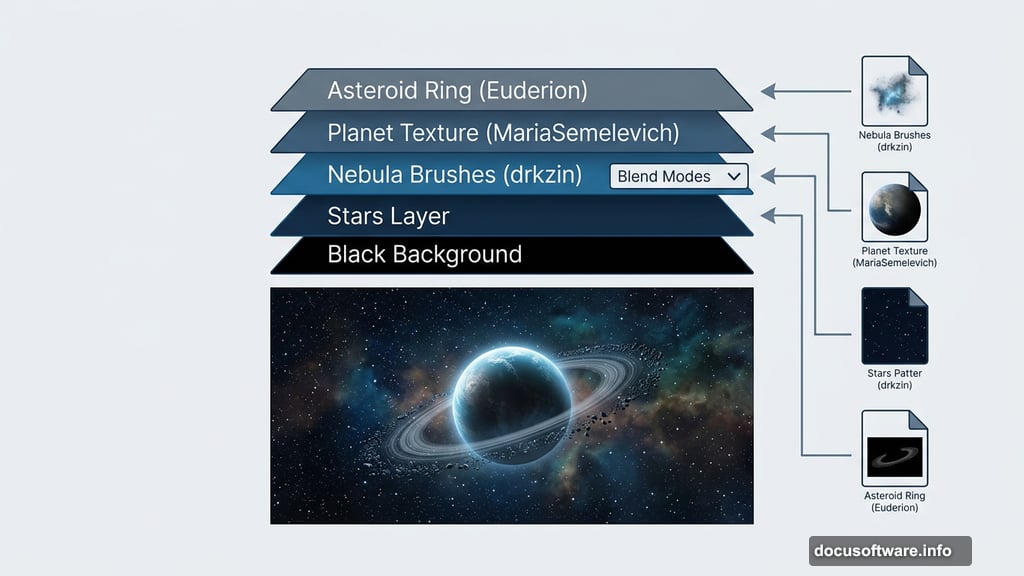
You’ll need four resources to follow along. Download the planet texture from MariaSemelevich, the Galactic Space Brushes Set from drkzin, a sky stock image from affen92, and the Asteroid Ring Stock Pack from Euderion. Any version of Photoshop will work for this project.

Setting Up Your Photoshop Document
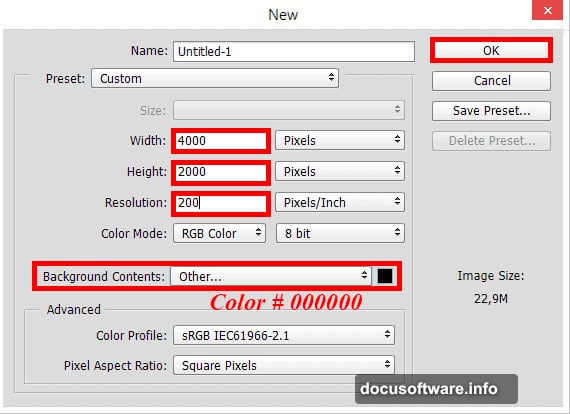
Open Photoshop and create a new document using File > New (or Cmd/Ctrl + N).
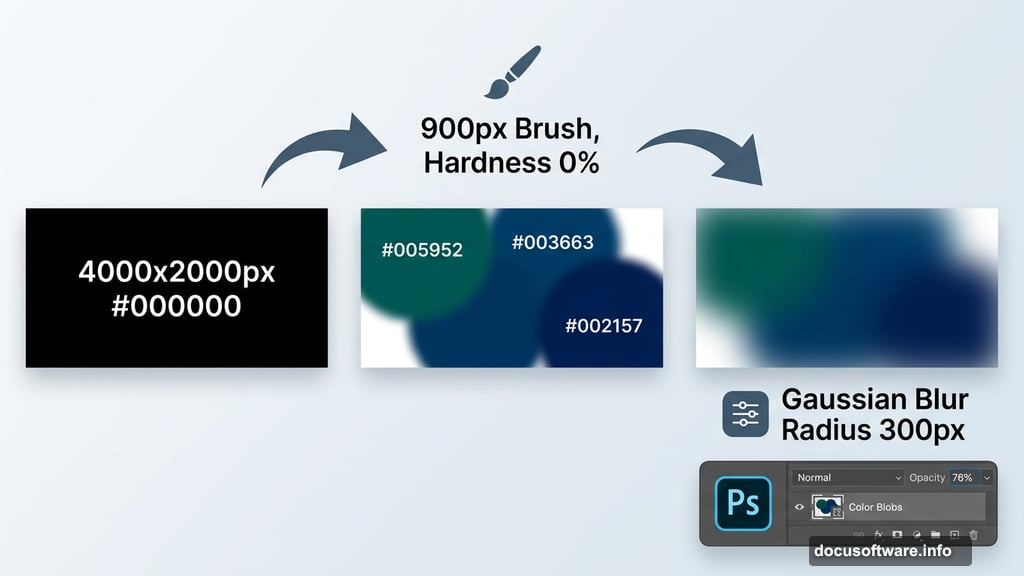
Set the width to 4000 pixels and the height to 2000 pixels. Use a resolution of 200 pixels per inch. For Background Contents, choose Other and set the color to pure black (#000000). This gives you a large, high-resolution canvas with a true void of space to start from.
Building the Colored Background
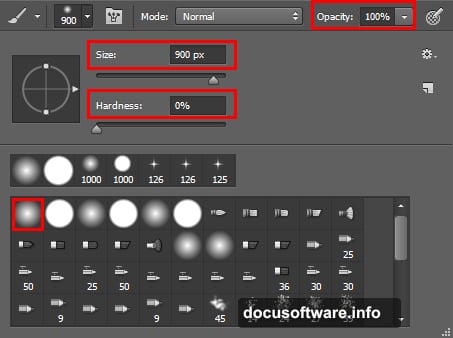
Create a new layer using the icon in the Layers panel or Cmd/Ctrl + Shift + N.
Select the Brush Tool (B) from the toolbar. Set your brush to Size: 900px, Opacity: 100%, Hardness: 0%, and Flow: 100%. The soft, zero-hardness brush is key here — it creates smooth color gradients instead of hard edges.
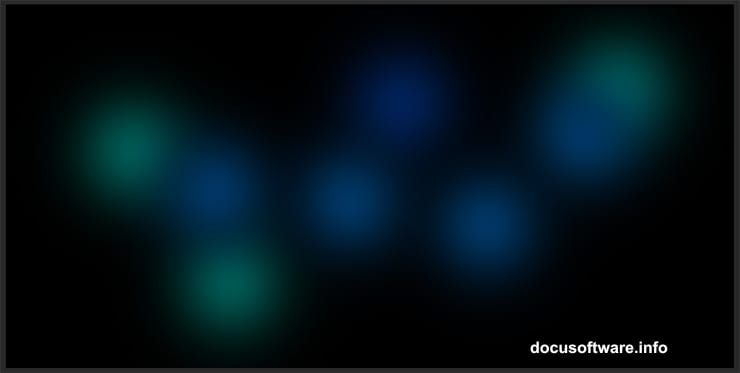
Open the Swatches panel and choose deep blues and teals. Maria’s original tutorial uses #005952, #003663, and #002157 as starting points. But feel free to experiment with purples, magentas, or warmer hues depending on the mood you want. Paint loose, overlapping spots across the full canvas.
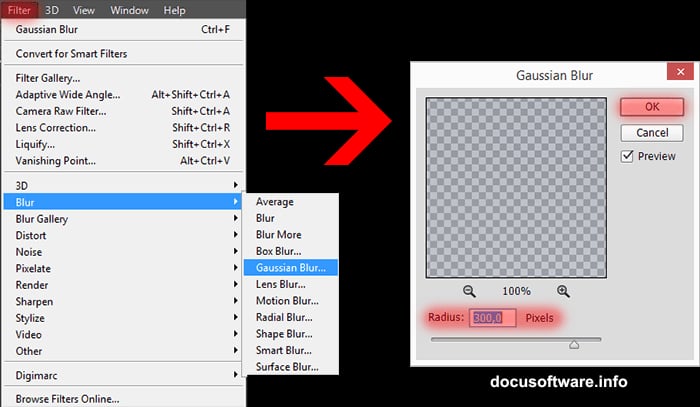
Smoothing the Colors with Gaussian Blur
Your color patches look rough right now. That’s fine. Go to Filter > Blur > Gaussian Blur and set the Radius to 300px.
This one step transforms blocky color shapes into a smooth, atmospheric gradient. It mimics the soft glow you see in real nebula photography. Then drop the layer Opacity to 76% so the black background shows through slightly. That subtle transparency adds real depth.
Adding Stars for Depth and Scale
Stars make a space scene feel genuinely vast. And creating them in Photoshop takes less effort than you’d expect.
Create a new layer and fill it with black. Press D on your keyboard to reset colors to default, then press X to swap so black becomes your background color. Use Cmd/Ctrl + Delete to fill the layer completely black.
Now comes the clever part. Go to Filter > Noise > Add Noise. Set a high Amount value, choose Gaussian distribution, and check Monochromatic. This creates a field of random white dots across the entire layer. Then apply Filter > Blur > Gaussian Blur with a very small radius — around 0.5px to 1px — to soften the noise slightly.
Finally, set this layer’s blend mode to Screen. The black areas vanish completely, leaving only the tiny bright dots floating over your colored background. That’s your star field.
Creating the Nebula with Blend Modes
The nebula is where this tutorial gets genuinely fun. Create a new layer and set its blend mode to Color Dodge before you paint anything.
Select a medium brush with low opacity. Paint loose cloud-like shapes using the same color palette as your background. Color Dodge brightens whatever sits beneath it, so your painted strokes will glow rather than simply cover.
Now go to Filter > Render > Difference Clouds. Make sure your foreground and background colors are set to defaults (press D). This filter adds organic, unpredictable texture to your nebula layer. Press Cmd/Ctrl + F repeatedly to keep applying it. Each press creates a different variation. Stop when the nebula looks suitably complex and alive.
A common problem here is seeing nothing happen. Check that your Color Dodge blend mode is actually applied to the nebula layer. Also confirm you have a colored background layer beneath it — Difference Clouds needs something to react to.
Building the Nebula and Star Brushes
Custom brushes take your space scene from decent to extraordinary. Install the Galactic Space Brushes Set from drkzin, which includes brushes specifically designed for nebulae and star clusters.
Create a new layer above your nebula. Select one of the galactic brushes and paint at low opacity — around 20-30%. Build up star clusters gradually with multiple strokes rather than one heavy pass. This creates natural variation in density, exactly like real star-forming regions.
Vary your brush size between passes. Small brushes add tight, dense clusters. Larger brushes scatter wider regions of fainter stars. The mix of both makes the scene feel three-dimensional.
Creating Planets with Texture Mapping
Planets bring a focal point to your composition. Start by creating a new document at whatever size you want your planet to be. Place the planet texture from MariaSemelevich into this document.
Duplicate the texture layer and apply Filter > Distort > Spherize at 100%. This wraps the flat texture around a sphere shape. Apply it a second time at 50% to strengthen the effect. Now use the Elliptical Marquee Tool (M) with the Shift key held down to select a perfect circle. Add a layer mask to keep only the circular planet shape.
Bring the planet into your main space document. Add a Curves adjustment layer clipped to the planet layer. Darken one edge to simulate the shadow side facing away from your light source. Add a subtle outer glow in the Layer Style panel to suggest atmospheric haze.
Adding Asteroid Rings
Rings add drama and instant visual interest. Import the Asteroid Ring Stock Pack from Euderion into your document.
Position the ring image so it overlaps your planet in perspective. Set the blend mode to Screen to remove the dark background, leaving only the ring details. Adjust the ring layer’s position and rotation using Free Transform (Cmd/Ctrl + T) until the angle looks natural.
Here’s the tricky part that confuses many people: making the planet appear to sit inside the rings rather than on top of them. Select all your ring layers and convert them to a Smart Object by right-clicking and choosing Convert to Smart Object. Use the Elliptical Marquee Tool to select the area behind the planet. Add a layer mask and hide that selection. The rings now appear to wrap behind and in front of the planet correctly.
Adding Dark Matter and Lighting Effects
Dark matter gives a space scene mystery and visual complexity. Create a new layer and set it to Multiply blend mode.
Paint large, wispy shapes using a very dark purple or navy — something close to black but not quite. The Multiply mode makes these areas subtly darker than pure black, suggesting vast invisible mass between the stars. Keep the opacity of this layer low, around 20-40%.
For lighting effects, add a new layer set to Screen. Select a large, very soft brush with a warm orange or yellow color. Click once near your planet to add a single point of light suggesting a distant sun. Then use Lens Flare under Filter > Render to add an optional stylized flare. Apply it to a separate filled layer so you can adjust or remove it freely.
Color Grading the Final Composite
Color grading pulls every element together into a unified scene. Add a Curves adjustment layer at the top of your layer stack.
Pull the blue channel up slightly to increase the cold, space-like feel. Pull the red channel down gently to desaturate any overly warm tones. Then add a Hue/Saturation adjustment layer and increase overall saturation by about 15-20 points. Space art tends to look better with punchy, vivid colors rather than muted ones.
Finally, add a Photo Filter adjustment layer. Choose Deep Blue and set the density to around 15%. This ties every layer together under one consistent color temperature, making the whole scene feel intentional rather than assembled.
Every choice in this tutorial — colors, sizes, brush types, blend modes — reflects one person’s creative vision. Your version should reflect yours. Swap the blues for reds. Make the planet enormous. Cluster the stars differently. The techniques are the foundation. What you build on them is entirely up to you.
Space art rewards experimentation more than almost any other Photoshop genre. The universe has no rules. Neither should your canvas.