
Parrots are genuinely remarkable animals. Some species outlive humans by decades, and the way they mimic speech without truly understanding it makes them endlessly fascinating subjects. So when it comes to photo manipulation, they make perfect centerpiece material.
In this tutorial, we’ll build a lush, atmospheric nature scene featuring parrots as the stars. We’ll combine a background photo, cut out the birds with precision, layer in ivy plants, and finish everything with Camera Raw for that polished, cohesive look.
Here’s what we’ll cover: canvas setup, background placement, Pen Tool cutouts, Curves and Hue/Saturation adjustments, ivy layering with Gaussian Blur, and a Camera Raw finish. Grab your resources and let’s get into it.
Tutorial Resources:
- Parrots
- Background
- Ivy 1, 2, 3, 4, 5
- Leaf
Setting Up Your Canvas
First things first. Go to File > New and enter these values:
- Preset: Custom
- Width: 3280px
- Height: 4100px
- Resolution: 300px
- Color Mode: RGB Color, 8 bit
- Background Contents: Transparent
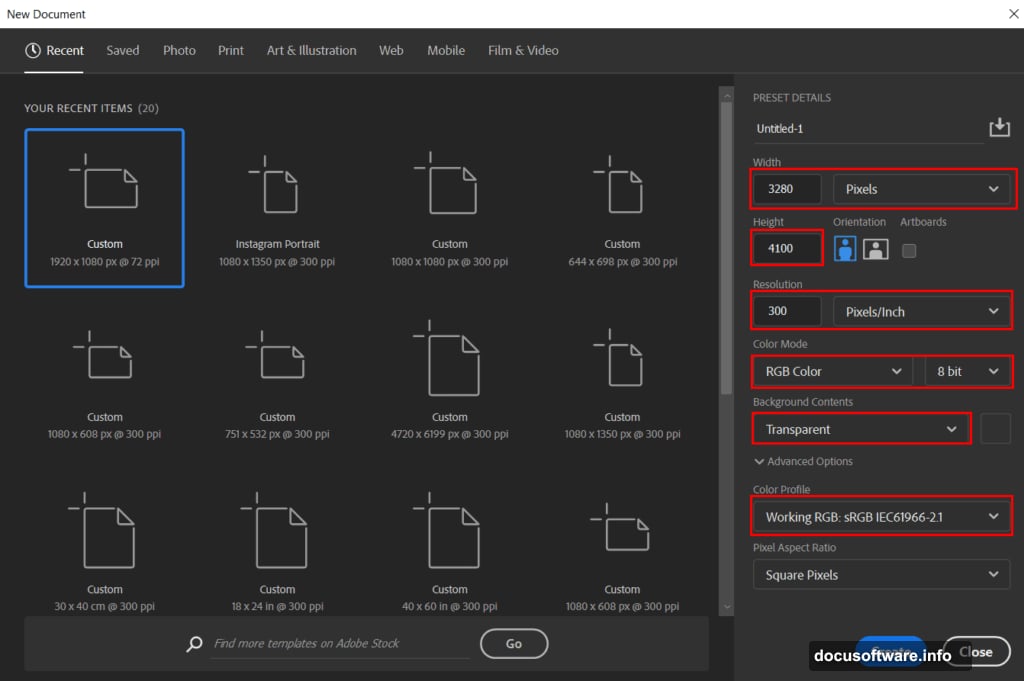
This high-resolution setup gives you plenty of room to work. Plus, starting at 300px resolution means the final image prints beautifully if you ever want a physical copy.
Next, go to File > Place and bring in your Background photo. Position it to fill the canvas.
Curves Adjustment on the Background
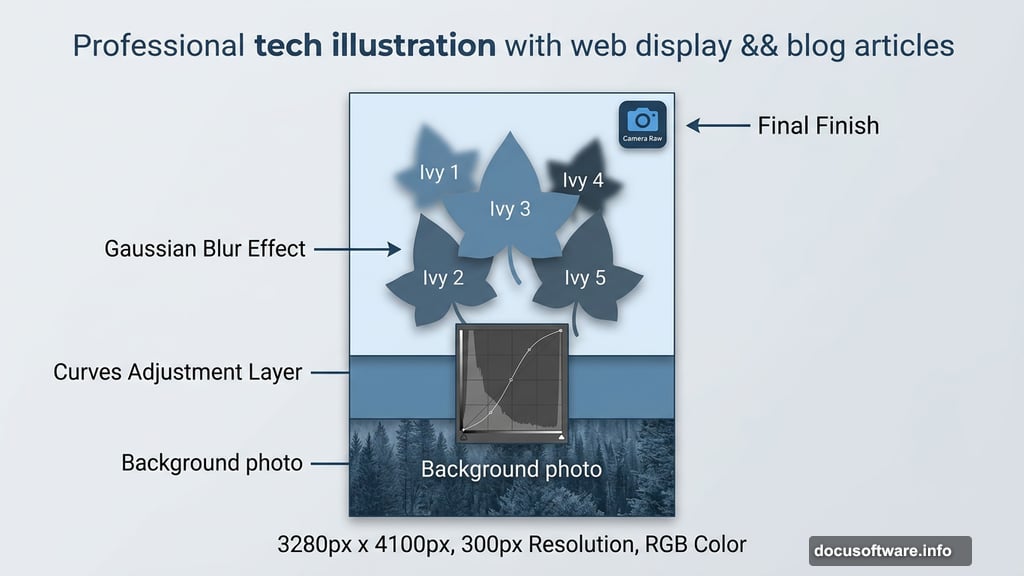
With the background placed, add a Curves Adjustment Layer directly above it. This gives you control over the overall brightness and contrast before adding anything else.
Think of Curves as a flexible dimmer switch. Pull the middle of the curve down to darken the scene, or push it up to brighten. A subtle S-curve adds nice contrast without blowing out your highlights.
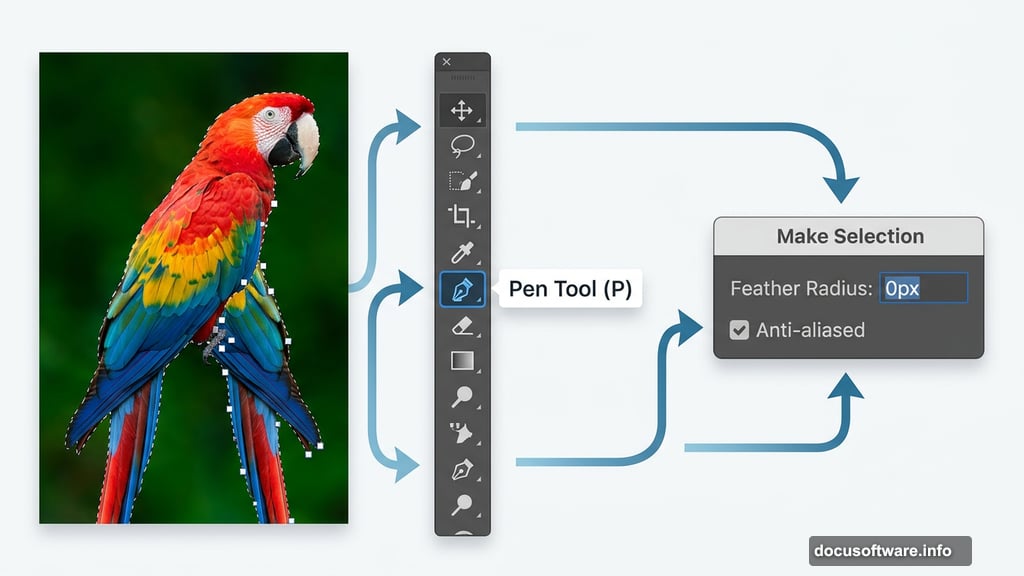
Cutting Out the Parrots with the Pen Tool
Now for the most important technical step. Go to File > Open, select your Parrots image, and grab the Pen Tool (P).
The Pen Tool creates clean, precise selections that you simply can’t get from a quick selection or magic wand. Here’s how it works:
Click once to place your first anchor point. Then click again where the line should end. Keep clicking around the edge of the parrot, building a path made of connected straight segments. Each new anchor point appears as a solid square, while older ones turn hollow.
When you’re ready to close the path, hover back over your first anchor point. A small circle appears next to the cursor. Click to close. Then right-click and choose Make Selection.
Set Feather Radius to 0px and make sure Anti-aliased is checked. This keeps edges sharp without harsh jagginess.
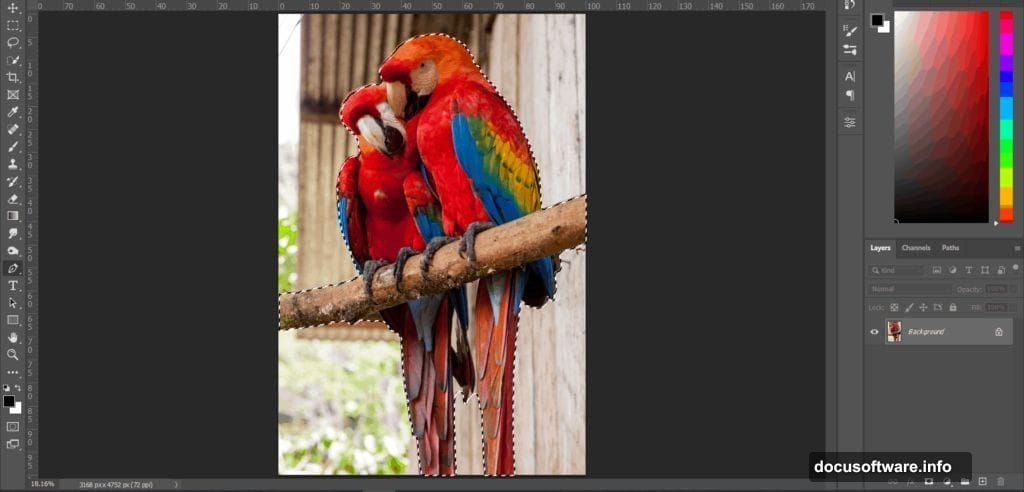
Once your selection is active, hit Ctrl/Cmd + C to copy, then Ctrl/Cmd + V to paste the parrots onto your main canvas. Use Ctrl/Cmd + T to transform and position them. Hold Alt + Shift to scale proportionally (or just Alt in Photoshop CC to resize all sides together). Then add a layer mask to keep your cutout non-destructive.
Shaping the Light with Multiple Curves Layers
This is where the compositing magic really happens. We use three separate Curves adjustments to blend the parrots convincingly into the scene.
Curves Layer 1: Add a general Curves adjustment above the parrot layer. Adjust overall brightness to match the background lighting.
Curves Layer 2: Add another Curves layer, then press Ctrl/Cmd + I to invert the mask (turning it black). Now grab the Brush Tool (B) with a Soft Round tip and white as your foreground color. Paint over the left side of the parrots. This brightens just that area, simulating light coming from one direction.
Curves Layer 3: Same process, but this time paint the right side. Set the layer Opacity to 80% so the effect feels subtle rather than obvious.
The reason for painting on inverted masks is control. Instead of affecting the entire image, you apply light exactly where you want it. That’s what separates a believable composite from something that looks pasted together.
Fine-Tuning Color with Hue/Saturation
Add a Hue/Saturation Adjustment Layer above everything you’ve built so far. Set the layer Opacity to 24%.
This gentle nudge ties the parrot’s colors closer to the background palette. At full strength it would look overdone. At 24%, it’s a whisper of adjustment that reads as natural.
Adding the Ivy Layers
Now we build the environment around the parrots. Open your first Ivy image. Hold Ctrl/Cmd and click on the layer thumbnail to load it as a selection. Copy, paste onto your main canvas, and transform it into position.
Repeat this process for each of the five ivy images. Layering multiple ivy assets creates depth and variety. Place some ivy in front of the parrots and some behind to frame them naturally within the scene.
Here’s a key step many tutorials skip. Once an ivy layer is placed, go to Filter > Blur > Gaussian Blur and set the Radius to 8px. This soft blur pushes background foliage into a convincing depth of field effect. Elements closer to the viewer stay sharp. Elements further back blur gently. It’s a simple technique that adds serious visual depth.
Final Polish with Camera Raw Filter
Once all your elements are in place, flatten or merge your layers into a smart object. Then go to Filter > Camera Raw Filter.
Camera Raw gives you a non-destructive suite of finishing tools. Use the Basic panel to dial in exposure, contrast, highlights, and shadows. The HSL panel lets you shift individual colors, perfect for making parrot greens and reds really sing against the ivy. The Effects panel adds subtle vignetting that draws the eye toward the center of the scene.
Take your time here. Camera Raw is where good composites become great ones.
Bringing It All Together
Photo manipulation like this teaches you to think in layers, literally and creatively. The Pen Tool gives you precise cutouts. Curves layers shape light realistically. Gaussian Blur adds depth. And Camera Raw ties every element into a single cohesive image.
The best part? Each technique here applies to nearly any composite you’ll ever build. Once you understand how to control light with masked Curves adjustments and add depth with strategic blurring, the specific subject almost doesn’t matter.
Build this parrot scene once and you’ll carry those skills into every project that follows.