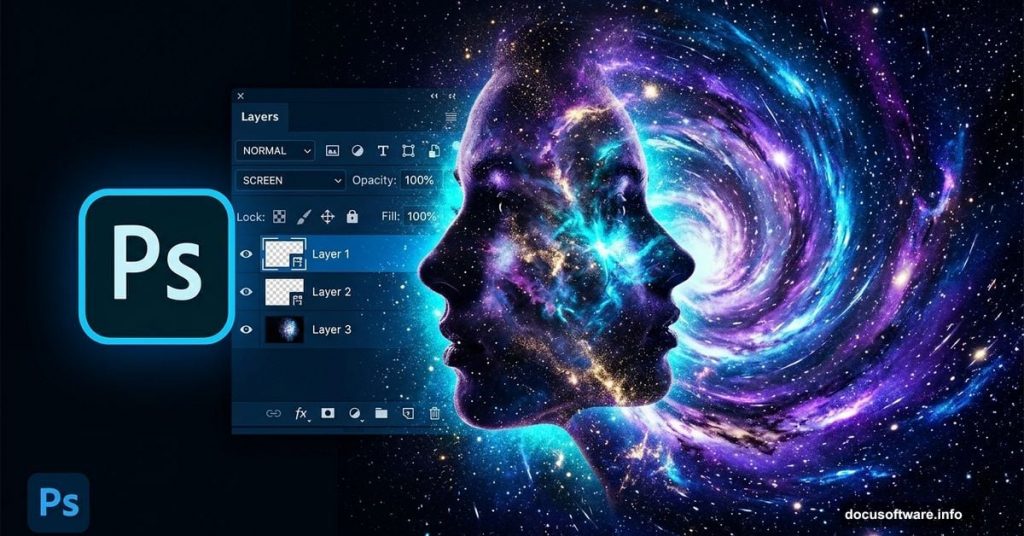
Space and portraiture don’t seem like natural partners. But mix them together in Photoshop, and you get something genuinely breathtaking.
This tutorial walks you through building a full galaxy portrait from scratch. You’ll blend a model into a cosmic background, layer textures, add planets and nebulas, and finish everything with Camera Raw. The result feels like your subject exists somewhere billions of light-years away.
Let’s get into it.
Setting Up Your Canvas First
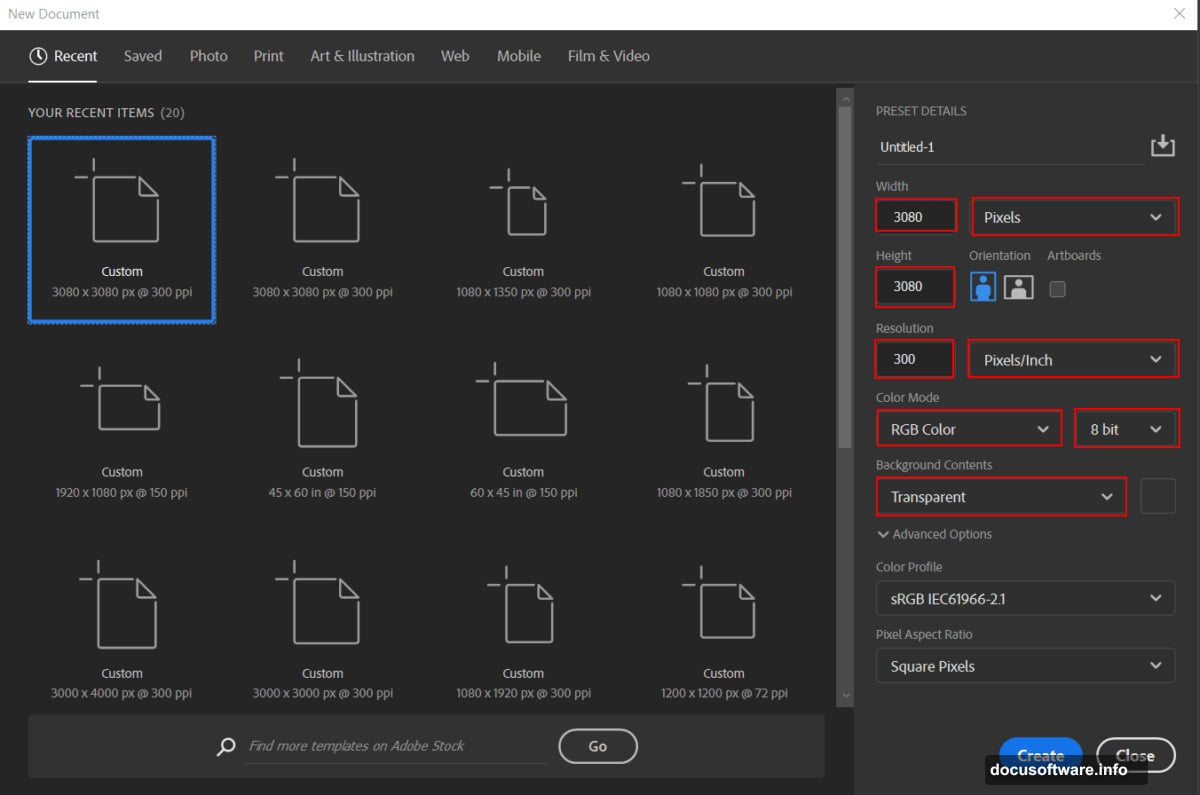
Start by creating a new document. Head to File > New and punch in these values:
- Preset: Custom
- Width: 3080px
- Height: 3080px
- Resolution: 300px
- Color Mode: RGB Color 8 bit
- Background Contents: Transparent
That square canvas gives you room to work without feeling cramped. Plus, the 300px resolution keeps everything crisp if you want to print it later.
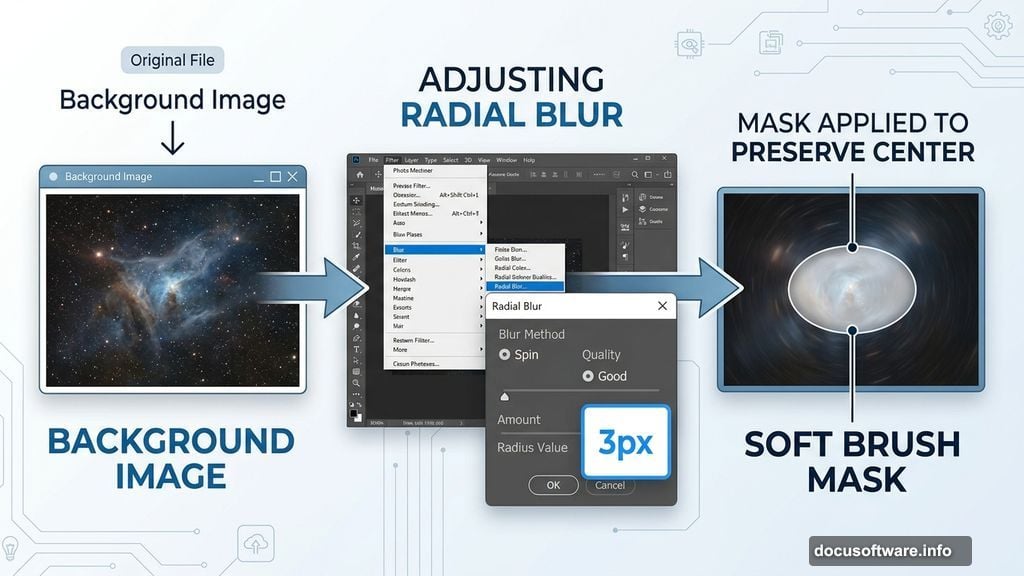
Adding the Space Background With Radial Blur
Go to File > Place and drop your background image onto the canvas. Use the Transform tool (Ctrl/Cmd + T) to position it. If you’re on Photoshop CC, hold Alt while dragging corners to resize all sides together.
Now here’s a small trick that makes a big difference. Go to Filter > Blur > Radial Blur and set the radius to 3px. This adds a subtle sense of depth and movement to the background, like you’re looking into a swirling galaxy rather than a flat image.
Next, create a layer mask on the background layer. Grab a soft round black brush and paint over the center area. This softens the blur effect right where your model will sit, keeping the focus on her face rather than the background chaos.
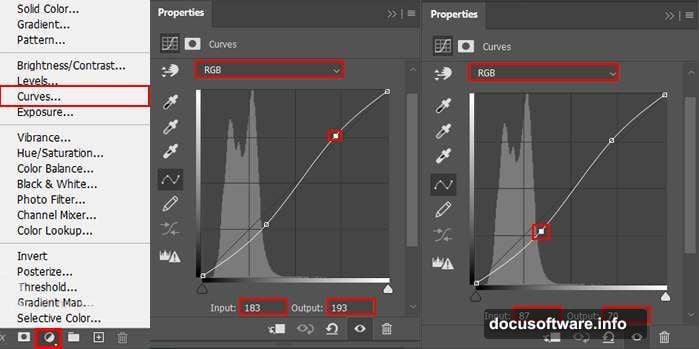
Color Grading the Background
Before bringing in your model, dial in the background colors. Add a Curves Adjustment Layer and tweak the tones to suit the cosmic mood you’re going for. Then add a Color Balance Adjustment Layer on top.
Color Balance is where the magic starts. Pushing the shadows toward blue and cyan gives that classic deep-space feel. Play around until the background feels like it actually belongs in orbit.
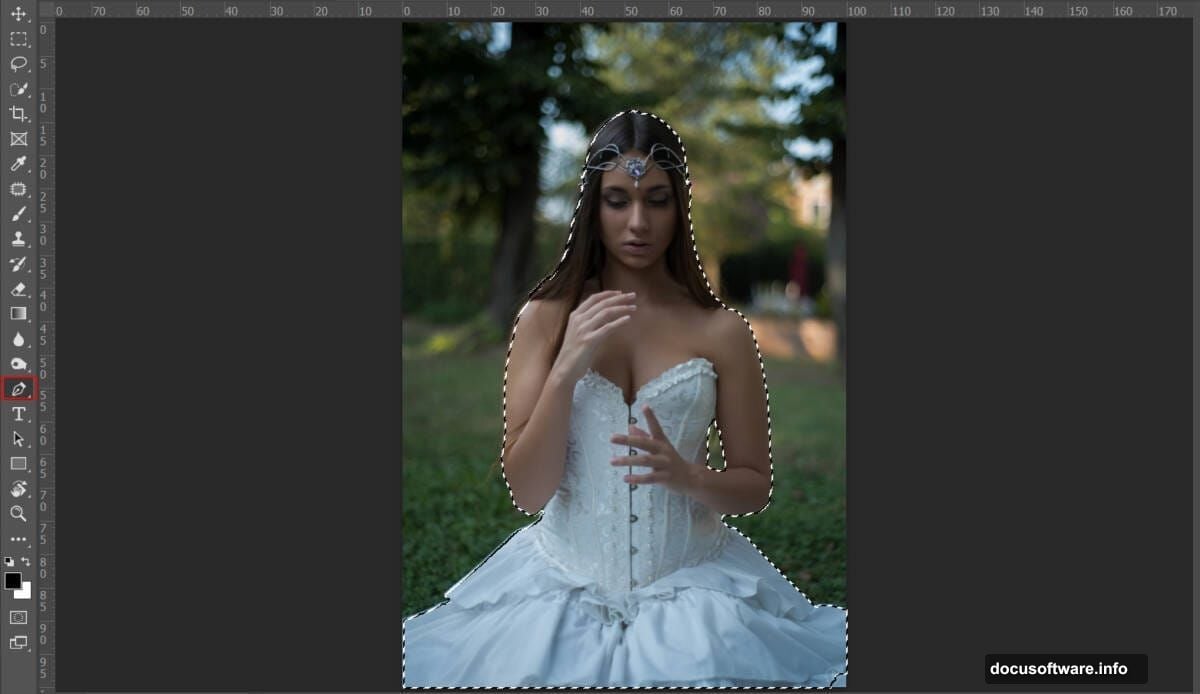
Cutting Out Your Model With the Pen Tool
Go to File > Open and load your model photo. Now grab the Pen Tool (P). This is the most precise way to cut a subject out cleanly, and it’s worth taking your time here.

Click to place your first anchor point where you want the selection to start. Keep clicking around the edges of your subject, building anchor points along the outline. Straight segments connect each click, so for curved areas like shoulders or hair, you’ll want to click and drag slightly to create curved paths.
A few things worth knowing about the Pen Tool process:
- The last anchor point you add appears as a solid square, showing it’s selected
- Previous anchor points turn hollow as you continue
- To close the path, hover back over your first anchor point until a small circle appears next to the cursor, then click
- To close an open path without completing the loop, Ctrl-click (Windows) or Command-click (Mac) anywhere away from your subject
Once your path is complete, right-click and choose “Make Selection.” Then add a layer mask. Your model is now floating clean against a transparent background, ready to blend into the cosmos.
Painting Natural Shadows
Create a new layer directly below your model layer. Select the Brush Tool (B) with a soft round tip and drop the Flow down to about 10%. Set your foreground color to black and change the blend mode to Multiply.
Now gently paint shadows around the base of your model where she meets the background. The low flow setting means you’re building shadow gradually, which looks far more natural than one heavy stroke. This grounding step is easy to skip but makes the whole composition feel believable.
Refining With Curves Adjustments
Add another Curves Adjustment Layer clipped to your model. This lets you match her lighting to the background tones so she doesn’t look pasted on.
Then add a second Curves Adjustment Layer, but this time press Ctrl/Cmd + I to invert the mask. This makes the adjustment invisible everywhere. Now take a soft white brush and paint over the left side of your model. You’re selectively brightening one side of her face, mimicking a light source coming from that direction.
This two-Curves approach gives you much finer control than a single adjustment ever could.
Layering Textures and the Nebula
With your model sitting comfortably in the scene, it’s time to add texture. Place your texture files over the composition and experiment with blend modes like Screen, Overlay, or Soft Light. Screen works especially well for nebula clouds and star particles since it drops out the dark areas and lets the bright, colorful parts shine through.
Add your nebula layer and position it so the colors frame your model naturally. Think of it like dramatic lighting rather than a random blob of color. Place the planet somewhere in the composition too. Scale it down or up depending on the story you want to tell.
Stars come in layers here. Use your Stars Texture as a base, then layer Stars Particles on top for the bright specks and sparkle effect. Reduce opacity on these layers so they feel atmospheric rather than overwhelming.
The Final Polish With Camera Raw Filter
Once all your elements are in place, merge everything into a single Smart Object. Then go to Filter > Camera Raw Filter.
Camera Raw gives you a powerful set of tools to unify the whole image. Boost the Clarity slightly to add punch to the details. Pull the Highlights down to keep the bright star clusters from blowing out. Add a touch of Vibrance to make the nebula colors pop without looking overdone.
The Tone Curve inside Camera Raw is worth exploring too. An S-curve adds contrast and depth, which helps the portrait feel epic rather than flat.
Resources You’ll Need
Before you start, gather these assets:
- Background (space scene)
- Model photo
- Texture 1 and Texture 2
- Nebula image
- Planet
- Stars Texture
- Stars Particles
Having everything organized in folders before you open Photoshop saves a surprising amount of time. Nothing breaks creative momentum like hunting for files mid-project.
Galaxy portraits are one of those projects that looks complicated but breaks down into very manageable steps. Each layer builds on the last, and by the time you hit Camera Raw, the image practically finishes itself.
The Pen Tool selection is where most beginners hesitate, but honestly, a careful path around your model makes everything else easier. Spend twenty minutes getting the cutout right, and the blending steps practically fall into place.
Try swapping the color palette once you’ve got the basics down. A warm amber nebula with orange tones creates a completely different mood from the classic blue and purple space look. That’s the best part of this kind of project. You can run it a dozen times and get a dozen completely different portraits.