Photoshop isn’t just for editing photos. It’s a full creative studio where you can build entire characters from nothing but a blank page and your imagination.
This tutorial walks you through drawing an adorable pirate character completely from scratch. No stock images, no templates, no shortcuts. Just Photoshop tools, a little patience, and your creativity. You’ll work with shape layers, the Pen Tool, and manual brush painting to bring this character to life.
Adobe Photoshop CS3 or higher works perfectly here. Let’s get started.
What You’ll Build
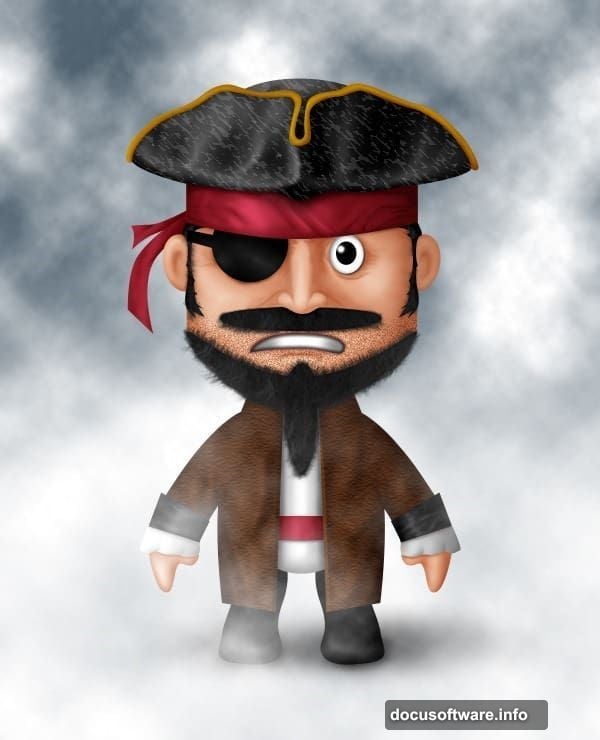
The finished result is a charming cartoon pirate. Think round face, headband, eye patch, the whole deal. Along the way, you’ll get comfortable with shape manipulation, anchor points, and understanding how highlights and shadows give your character depth.
Every step builds on the last. So even if you’re new to character design, following along closely will get you to a polished result.
Building the Pirate’s Face
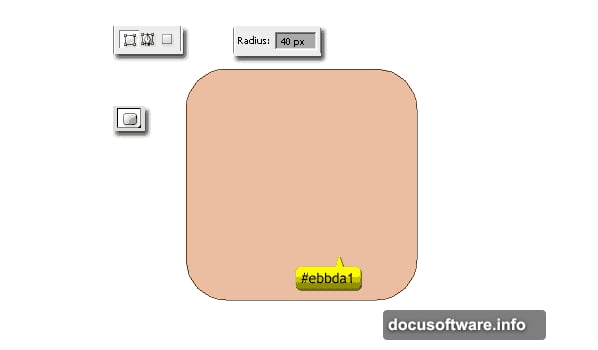
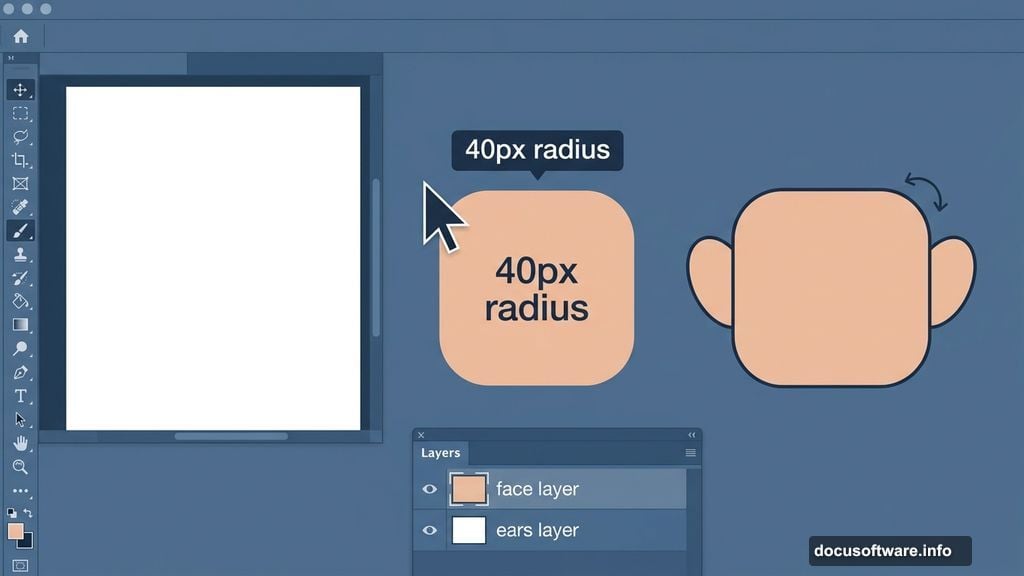
Start with a new document. Grab the Rounded Rectangle Tool (U), set the radius to 40px, and pick the color #ebbda1. This warm peachy tone becomes your pirate’s face.
Draw your rounded rectangle. Hold Shift while drawing to lock it into a square shape. That symmetry keeps the face looking balanced and friendly.
Shaping the Chin With Anchor Points
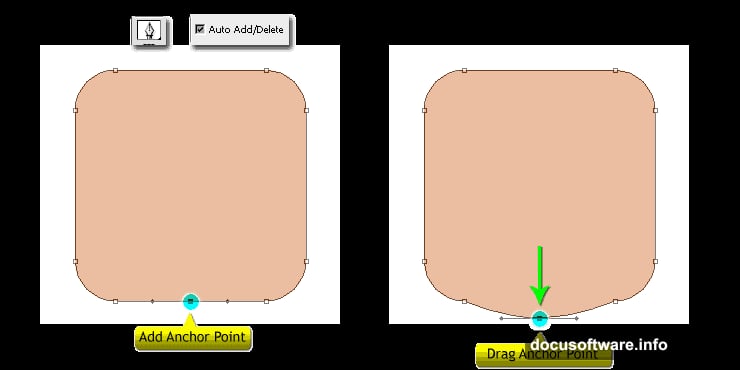
Now switch to the Pen Tool (P). Check the “Auto Add/Delete” option in the option bar. Click the center of the bottom edge of your rounded rectangle to add a new anchor point.
Hold Cmd (Mac) or Ctrl (PC) to temporarily switch to the Direct Selection Tool. Drag that new anchor point downward to create a slight chin. Release the key, then delete the two anchor points on either side of it. The Pen Tool automatically becomes the Delete Anchor Point Tool when you hover over an existing point. Clean and simple.
Adding Ears That Look Natural
Use the Ellipse Tool (U) to draw the ears. Hold Shift while drawing so the new shape joins the same layer as the face. Draw one ear, rotate it slightly for a natural angle, then duplicate it for the other side.
Small details like ear angle make a big difference. Even cartoon characters feel more believable with a little asymmetric personality baked in.
![Step-by-step Photoshop character design showing a cute pirate face built from shape layers with rounded rectangle head and ellipse ears]
Drawing the Headband
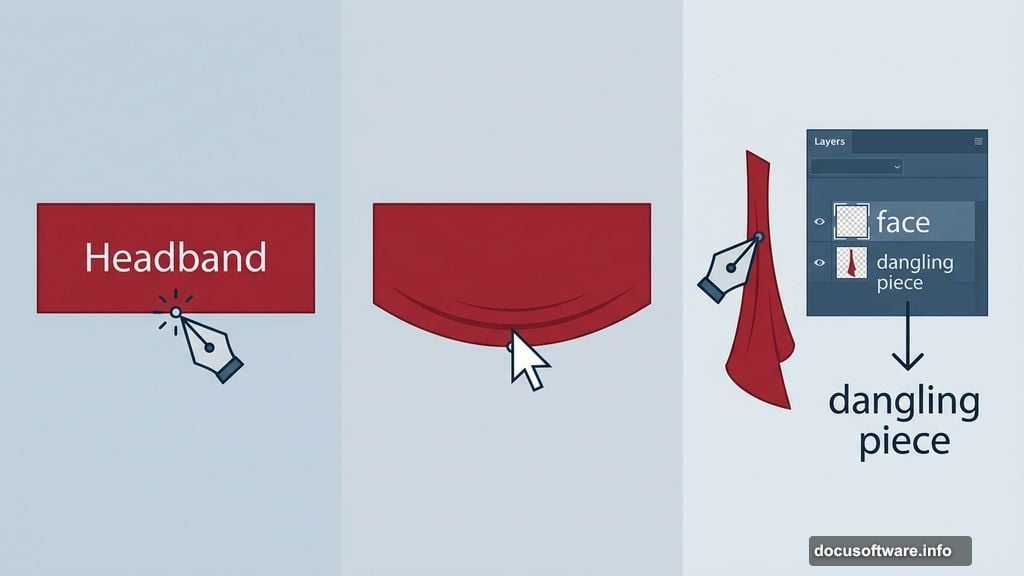
Select the Rectangle Tool (U) and switch your color to #a42335. That’s a deep red, classic pirate territory. Draw a rectangle across the top of the face for the headband.
Add an anchor point at the center of the bottom edge, just like you did with the chin. Pull it downward slightly. This gives the headband a subtle draping curve instead of a flat, stiff look.
The Dangling Headband Piece
Switch to the Pen Tool (P) and draw the fabric that hangs down from the headband. Place this layer behind the face layer in your stack. It should peek out from behind the face, not sit on top of it.
Getting layer order right here matters. The headband tail sitting behind the face instantly makes the character look three-dimensional.
Drawing the Eyes
Grab the Ellipse Tool (U) and draw a white ellipse for the iris of the left eye. Add a smaller black ellipse centered inside it for the pupil. Select both shapes, group them together, and name the group “Left Eye.”
Staying organized with named groups saves you serious headaches later. Character designs can get complicated fast, and labeled layers keep everything findable.
Brush Tool, Highlights, and Shadows
Once the basic shapes are in place, the real magic happens with the Brush Tool. Manual painting lets you add highlights on the nose, cheeks, and forehead, plus shadows under the chin and around the eyes.
Think about where light hits a round face from above. The forehead and nose tip catch the most light. The chin and the sides of the face fall into shadow. Even subtle color variations here make your flat shapes feel genuinely three-dimensional.
Adding Texture to the Hat
For the hat’s texture, position your cursor on the black front piece in the layer palette and activate it. Create a new layer with Ctrl+Shift+N, fill it with black, then create a clipping mask using Ctrl+Alt+G.
Go to Filter > Sketch > Chalk and Charcoal. Adjust the settings until you get a worn, fabric-like texture. The clipping mask keeps the texture locked inside the hat shape, so it won’t bleed onto anything else.
Patience Is the Real Tool Here
Honestly, this tutorial isn’t difficult because of any single step. It’s challenging because of how many small steps connect together. The Pen Tool takes practice. Anchor points feel fiddly at first. Manual brush painting looks rough before it looks good.
But that’s exactly what makes finishing this worthwhile. Every pirate character you draw from scratch after this one will feel faster and more natural. The skills stack up quickly once your hands know where to go.
If you get stuck on anchor point steps or the headband shape, slow down and re-read that section. Several readers found the Pen Tool instructions needed a second pass to click. That’s completely normal.
Give it a try. Your blank canvas is waiting.