Creating dark, cinematic artwork in Photoshop is one of the most satisfying creative projects you can tackle. This Catwoman poster tutorial pulls together several core photo manipulation skills into one striking final image — and the best part is that you don’t need to be an expert to follow along.
Let’s walk through how to build this moody night city scene step by step.
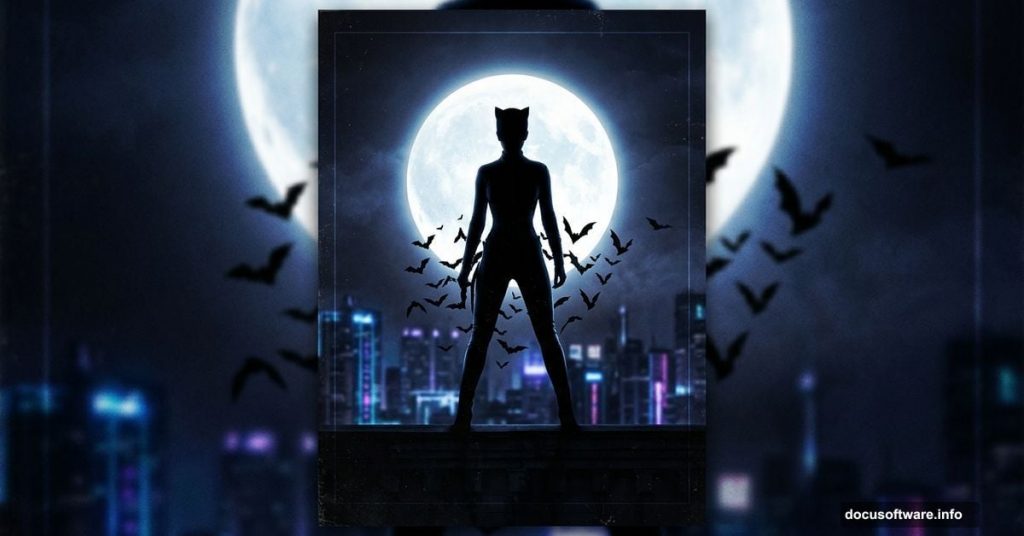
What You’ll Build
The finished piece combines a dark city skyline, a glowing moon, textured walls, a model, and atmospheric bat brushes — all layered together to create a gritty, dramatic Catwoman movie poster feel.
You’ll need Photoshop CS3 or newer. Plus, you’ll want to grab these free resources before starting: a Catwoman model photo by photographer David MacKenzie, a sky image, a city image, a moon photo, two wall textures (including a New York skyline wall), and a set of bat brushes.
Setting Up Your Canvas
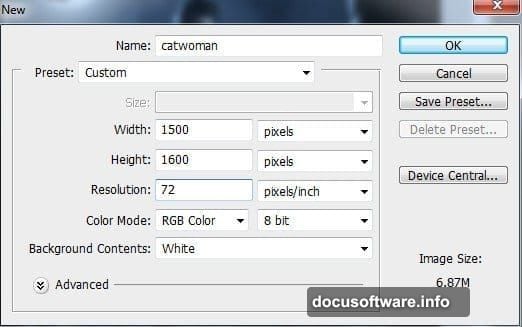
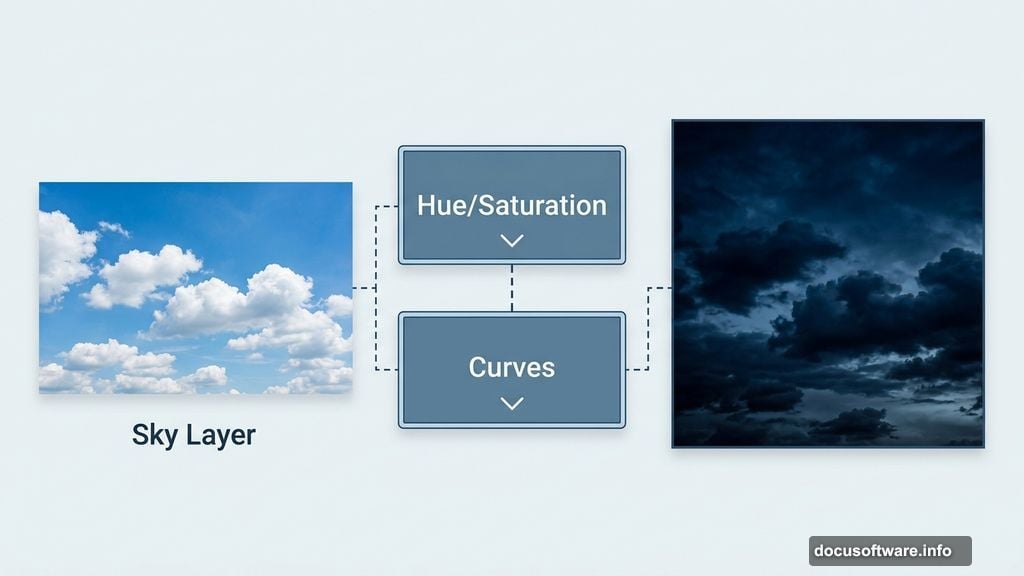
First, create a new document in Photoshop using the settings from the tutorial. Then open your sky image and drag it into the blank canvas using the Move Tool.
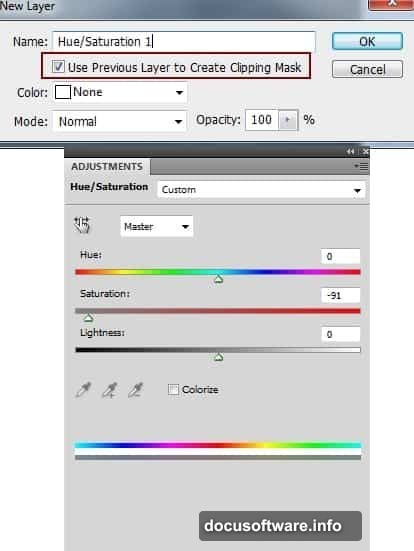
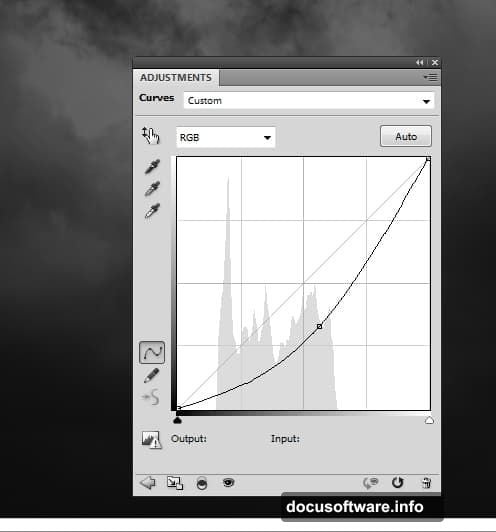
Now it’s time to strip out that daytime brightness. Add a Hue/Saturation adjustment layer directly above the sky layer, then set it as a Clipping Mask. Drag the Saturation slider down to desaturate the sky and give it that cold, washed-out feel.
Follow that up with a Curves adjustment layer — also set as a Clipping Mask — and pull the curve down to darken things further. This gives the sky a properly ominous nighttime quality.
Building the City Scene
Place your city image into the document and rotate it slightly using the Free Transform Tool (Cmd/Ctrl+T). A subtle tilt adds tension and visual interest right away.
Next, add a layer mask to the city layer by clicking the mask icon at the bottom of the Layers panel. Grab a soft black brush and paint over the sky area of the city photo. This reveals the dark sky layer underneath and makes the two images feel like one continuous scene.

Then go to Filter > Blur > Gaussian Blur and set the radius to 6px. This slight blur pushes the city into the background, creating a sense of depth. It’s a simple trick that makes a big difference.
Adjusting the Color Tone
Add another Hue/Saturation adjustment layer as a Clipping Mask over the city. Use it to reduce the blue tones on the large background building — those bright blues can pull focus away from your subject.
Then add a Color Balance adjustment layer to shift the overall scene toward a cooler, more cinematic palette. Subtle tweaks here go a long way toward tying the whole composition together.
Adding the Moon
Place the moon image in the upper left area of the sky. Remove its background using a layer mask, then change the layer blending mode to Screen at 100% opacity. Screen mode makes dark areas invisible, so only the bright moon itself shows through.
Apply a Gaussian Blur at 4px to soften the moon slightly — sharp edges would make it look pasted on rather than naturally lit.
For the glow effect, double-click the moon layer to open the Layer Style panel. Enable both Outer Glow and Inner Glow. These add that beautiful, atmospheric halo around the moon without any complex masking work.
Want even more light? Create a new empty layer above the moon. Pick a soft brush, set the color to a cool light gray (#d5dae2), and paint gently over the moon area. Change this layer’s blend mode to Screen at 100%. It adds a dreamy, diffused glow that sells the nighttime lighting beautifully.
Bringing in the Walls and Model
The tutorial continues with adding the two wall textures, blending them into the scene using the same masking and adjustment layer techniques you’ve already practiced. Consistency in technique is what makes every new element feel native to the scene rather than dropped in from nowhere.
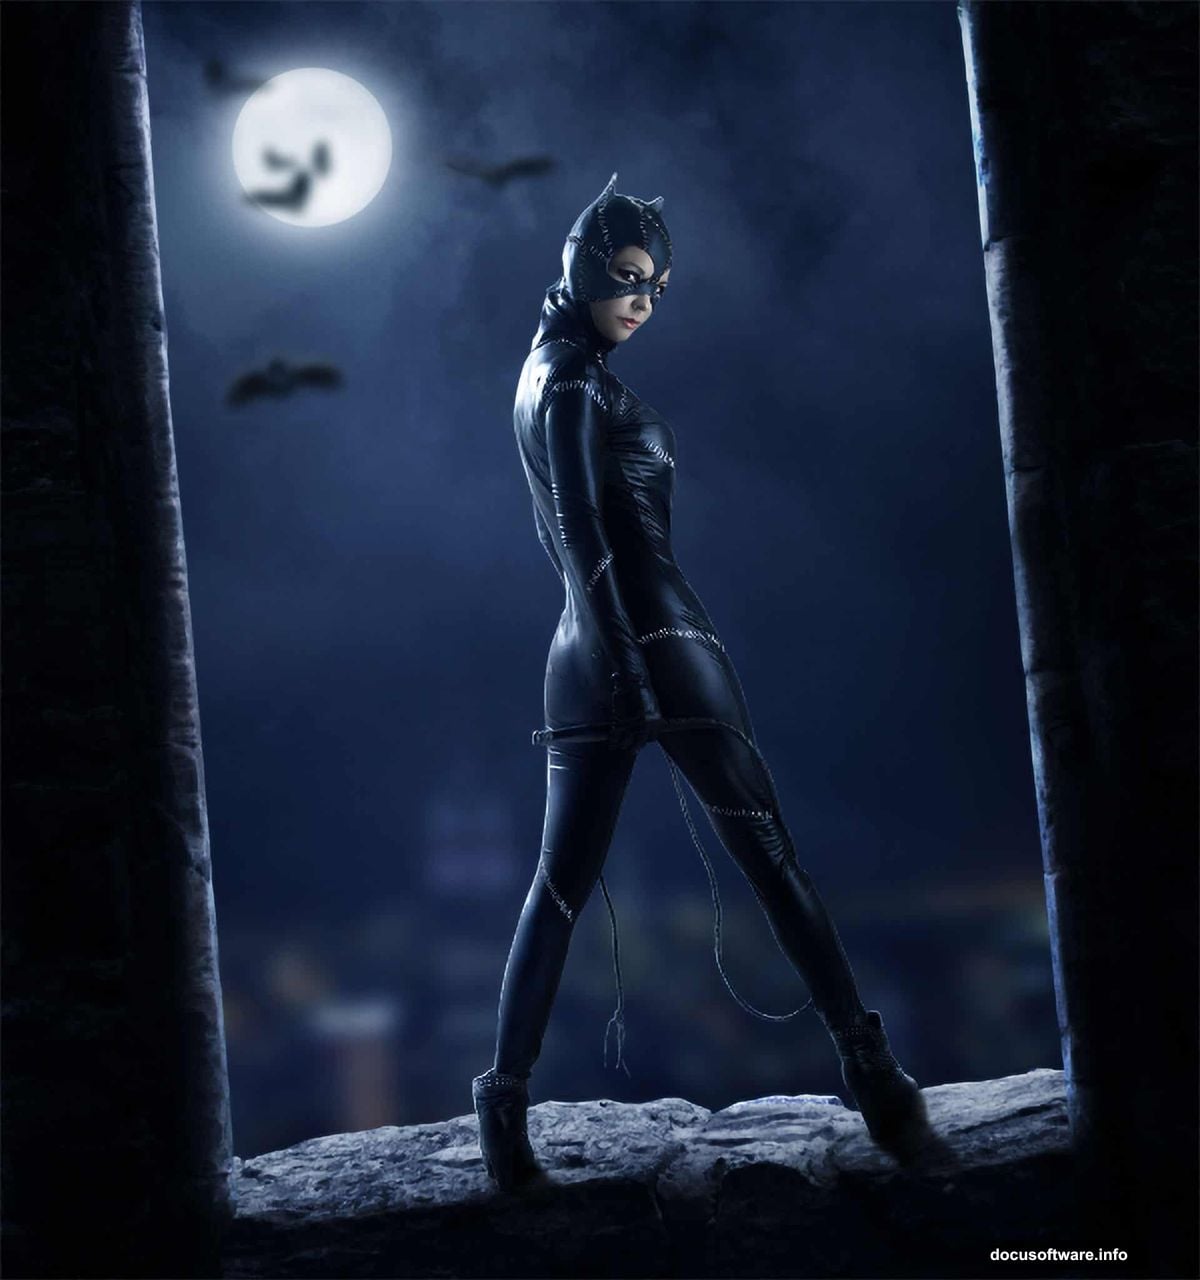
After that comes the most important element: the Catwoman model. Once placed, you’ll do light retouching work on her to match the overall dark aesthetic. Think skin tone adjustments, shadow enhancement, and making sure her lighting reads as part of the same night scene.
Creating Atmosphere With Bat Brushes
This is where the composition really comes alive. Load the bat brushes into Photoshop and scatter bats around the model and sky. Dark atmospheric elements like these reinforce the mood and make the scene feel genuinely cinematic rather than like a simple composite.
Use them sparingly at first. A few well-placed bats create tension. Too many become noise.
Final Adjustments and Enhancements

The last stage involves stacking multiple adjustment layers over the entire composition — tweaking contrast, deepening shadows, and fine-tuning color balance across the whole image. This is where you tie everything together so it reads as a single, unified piece rather than a collection of separate photos.
Pay close attention to how light and shadow fall across the model versus the background. Consistency there is what separates a polished composite from an obvious one.
Photo manipulation projects like this one are genuinely great for building Photoshop confidence. Each technique — masking, blend modes, adjustment layers, layer styles — shows up in almost every serious project you’ll ever work on. So even when the final image is fictional and dramatic, the skills are completely real and transferable.
Give yourself time with each step. The city-building phase alone teaches you more about masks and blending than most dedicated tutorials cover. And once you’ve built one dark cinematic scene, you’ll find yourself reaching for these techniques constantly.