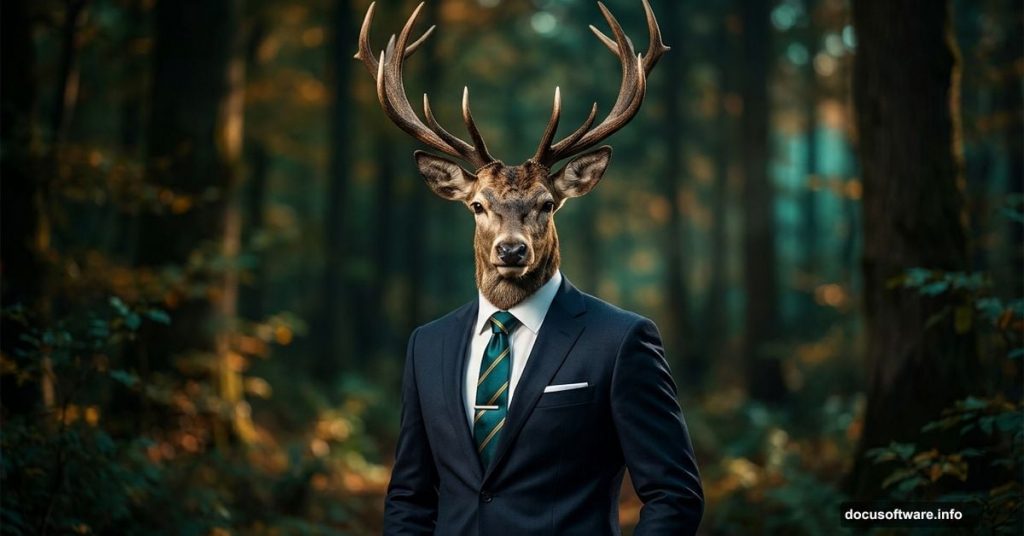
Some of the most memorable digital art comes from the strangest ideas. And honestly? A deer wearing a human suit might be the perfect starting point.
This tutorial walks you through creating a surreal photomanipulation that blends wildlife and human elements into one striking portrait. You’ll build a custom background, merge multiple photos together, add atmospheric lighting effects, and finish everything with Camera Raw Filter polish. By the end, you’ll have a completely original composite image that feels eerie, elegant, and a little bit magical.
Let’s dig in.
Set Up Your Canvas Before Anything Else
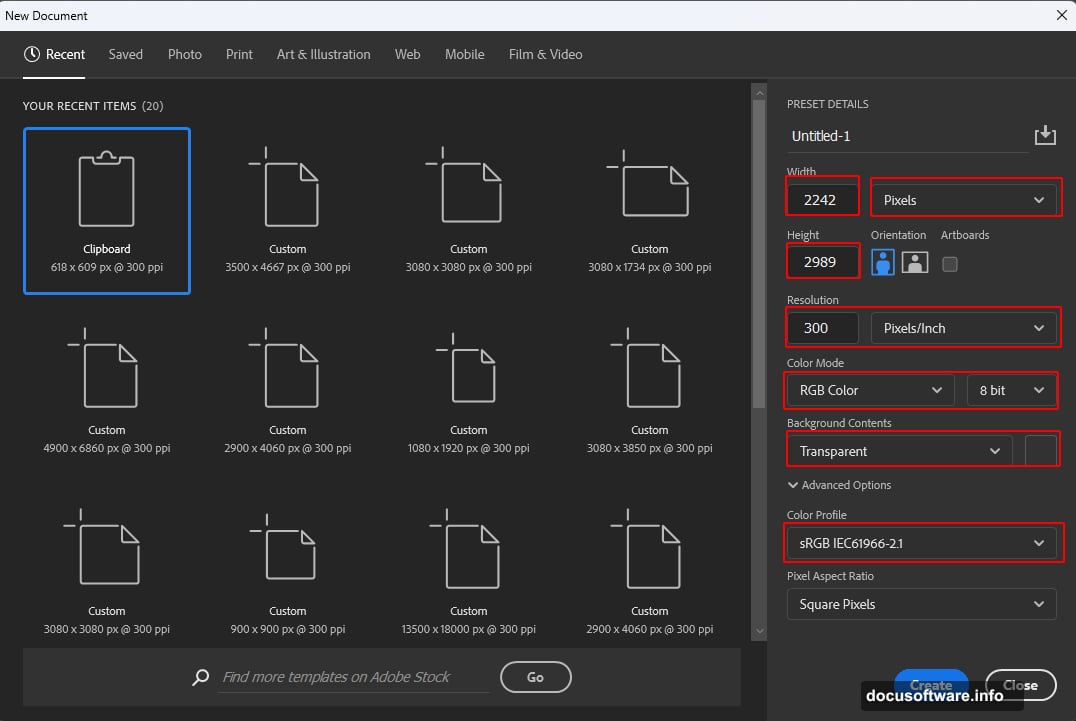
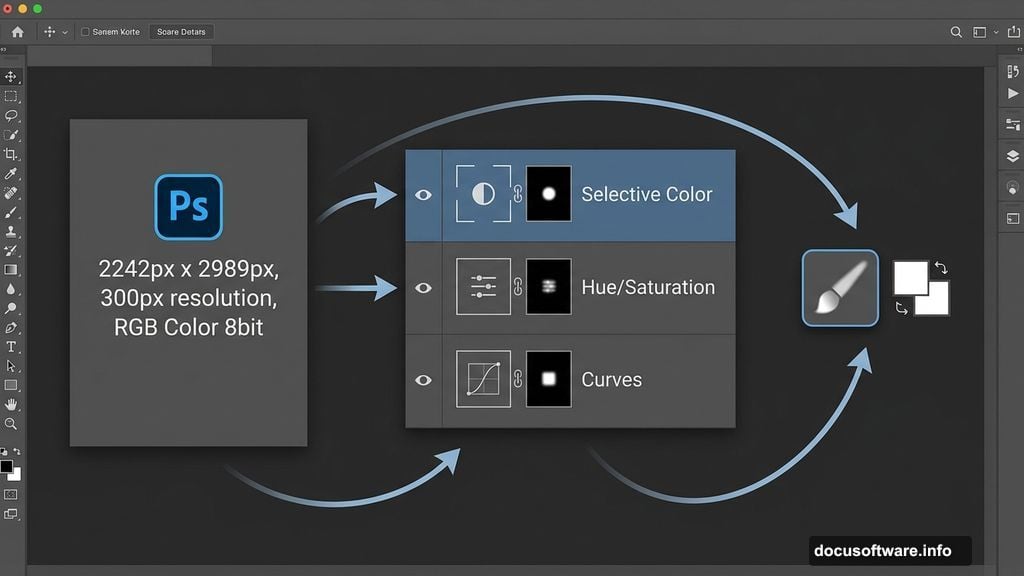
First things first — you need a properly sized workspace. Go to File > New and enter these settings:
- Width: 2242px
- Height: 2989px
- Resolution: 300px
- Color Mode: RGB Color, 8 bit
- Background Contents: Transparent
This creates a high-resolution canvas that’s perfect for print or detailed digital work. Getting these settings right from the start saves a lot of headaches later.
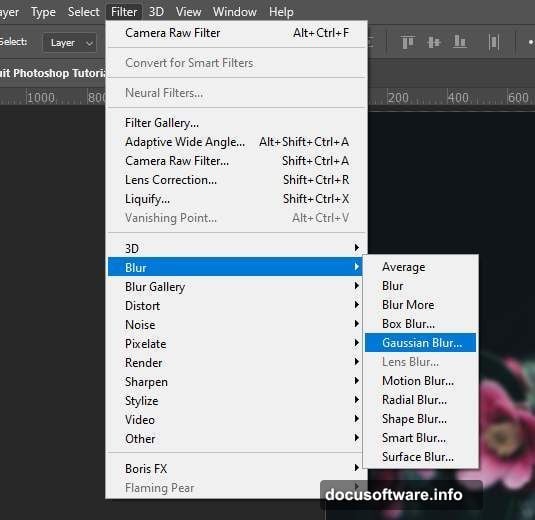
Place and Soften the Background Photo
Next, bring in your background image. Go to File > Place and select your background photo. Then use the Transform tool (Ctrl/Cmd + T) to position and scale it on your canvas.
Hold Alt + Shift while dragging to resize all sides together. If you’re using Photoshop CC, just hold Alt alone — it handles all sides simultaneously.
Once placed, go to Filter > Blur > Gaussian Blur and set the radius to 5px. This slight blur pushes the background out of focus. So your subject stands out more clearly when you add it later. Think of it like shooting with a shallow depth of field on a camera.
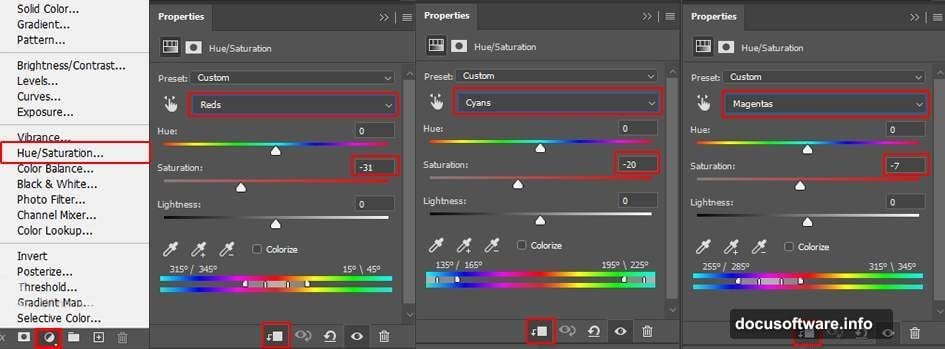
Color Grading With Adjustment Layers
Here’s where the mood really starts to take shape. Add three Adjustment Layers in sequence to shift the color and tone of your background.
Selective Color lets you push individual color ranges — great for adding warmth or cool tones to specific areas. Hue/Saturation controls the overall color feel of the whole image. And Curves gives you precise control over shadows, midtones, and highlights.
For your Curves layers, press Ctrl/Cmd + I after adding each one to invert the mask. This hides the adjustment by default. Then grab the Brush Tool (B), set it to Soft Round with white as your foreground color, and paint only where you want the effect to show. It’s a non-destructive way to apply lighting exactly where you want it.
Use one Curves layer to darken shadows. Use a second to lift and brighten the highlights. Together, they create natural-looking depth.
![A Photoshop workspace showing a blurred forest background with Selective Color and Curves adjustment layers applied, creating a moody atmospheric tone]
Cut Out and Place the Man in a Suit
Now for the fun part. Open your man-in-suit image separately. Use the Quick Selection Tool (W) to trace around the suit. It’s faster than you might expect — drag across the fabric and Photoshop grabs the edges automatically.
Once you’re happy with the selection, copy it (Ctrl/Cmd + C) and paste it (Ctrl/Cmd + V) onto your main canvas. Use the Transform tool again to scale and position him. Hold Alt + Shift to resize proportionally.
Add two more Curves Adjustment Layers clipped to the suit layer. The first handles overall tonal matching — making sure he looks like he belongs in the scene rather than pasted on top of it. The second, with an inverted mask, lets you paint in highlights selectively. This is how you match the lighting direction from your background to your subject.
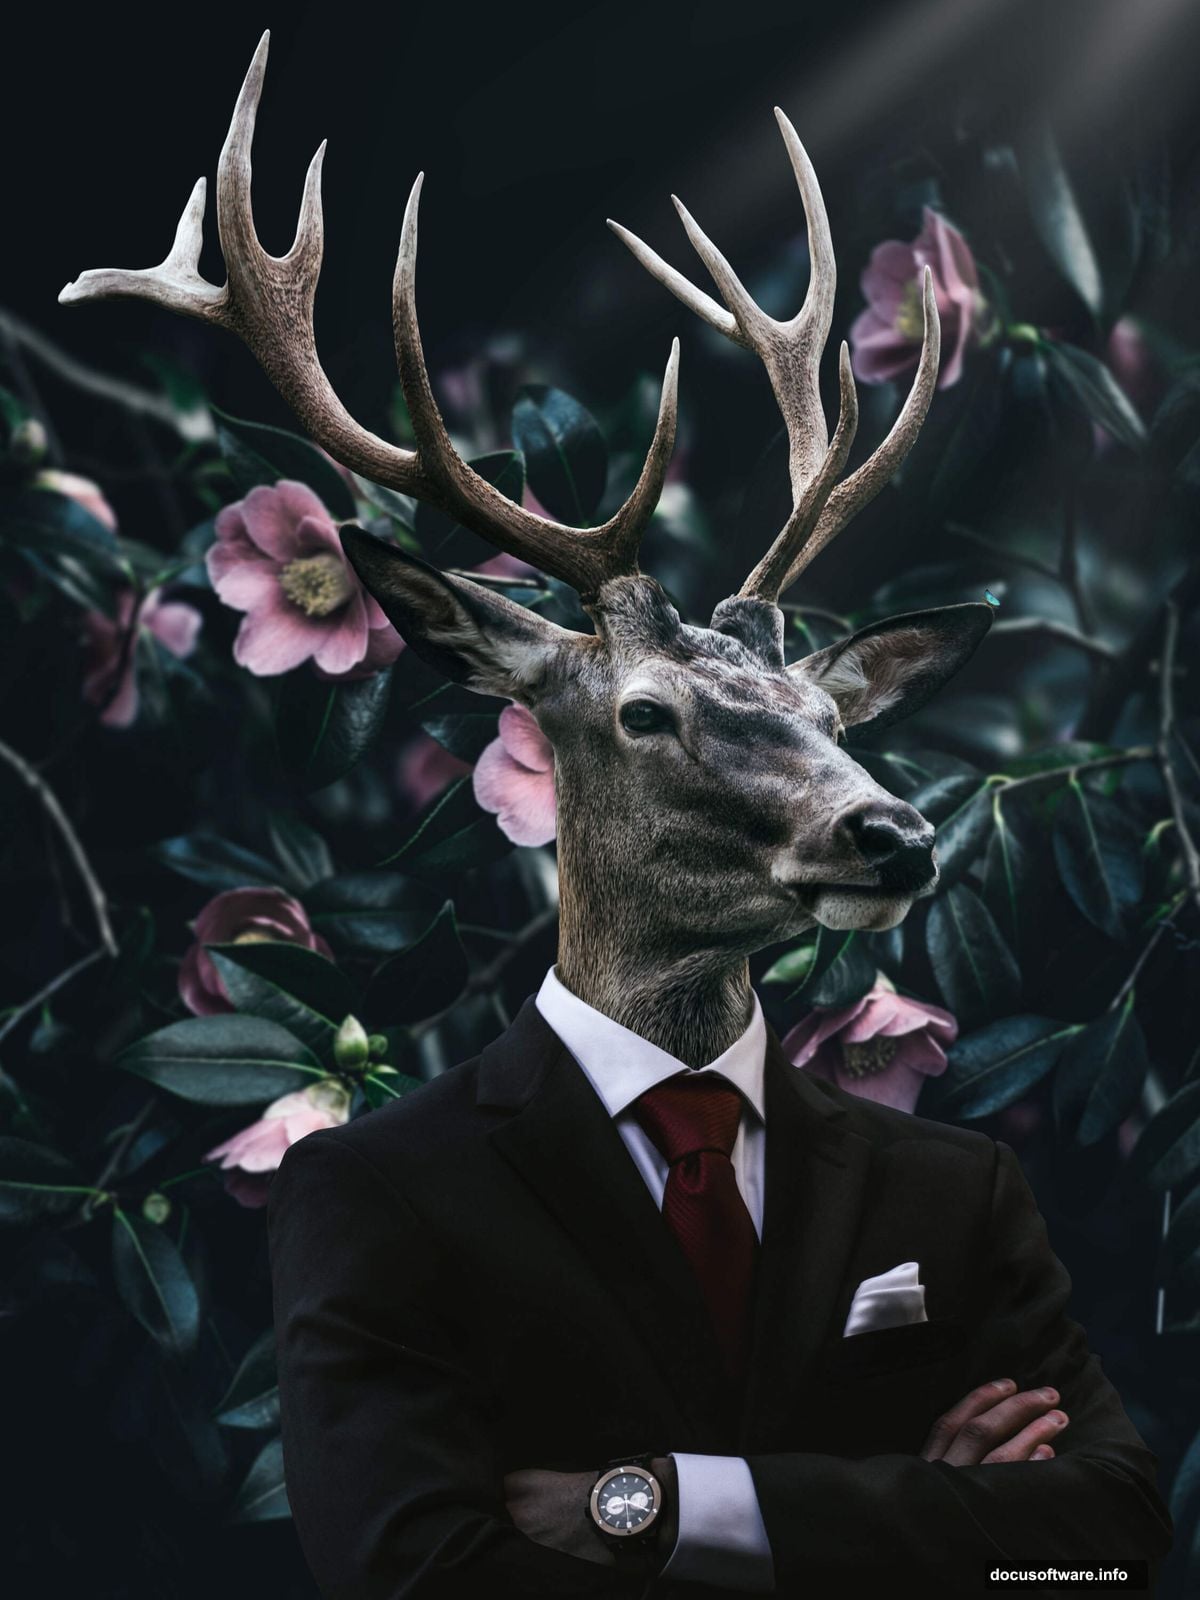
Bring In the Deer
This is where the real surrealism kicks in. Open your deer image and select just the deer’s head using the Quick Selection Tool. Copy and paste it onto your canvas, then position it where the man’s head would naturally sit.
The goal is a seamless blend — not just one image slapped on top of another. Pay close attention to scale and angle. The deer head should feel like it genuinely belongs on those suited shoulders.
Add Adjustment Layers clipped to the deer layer the same way you did for the suit. Match the shadows and highlights so both elements sit in the same light. This is the most important step for believability.
Add Atmospheric Light Rays
A surreal portrait needs atmosphere. Load your rays brushes into Photoshop and create a new layer above your background but below your subjects.
Set your brush blend mode or layer to something like Screen or Soft Light so the rays blend naturally with the scene rather than sitting harsh on top. Paint rays coming from a single light source direction — usually upper left or upper right works well for portraits.
Keep the opacity low. Subtlety wins here. The goal is mood, not distraction.
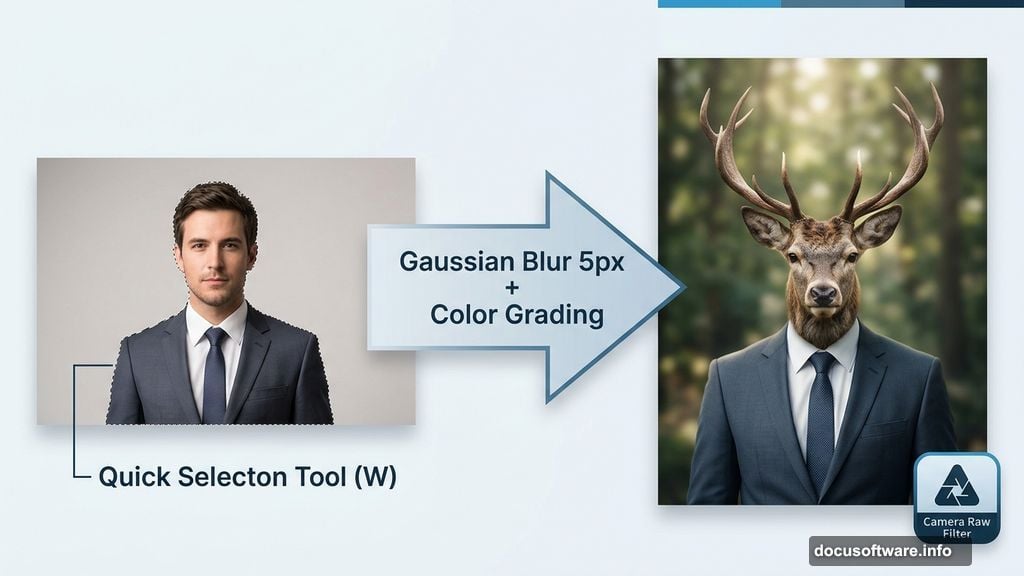
Final Touches With Camera Raw Filter
This is the step that ties everything together. Go to Filter > Camera Raw Filter with all your layers flattened or merged into a smart object.
Camera Raw gives you powerful controls for final color grading — temperature, tint, clarity, vibrance, and split toning. Bring up the clarity slightly to add edge definition. Adjust the color temperature to unify the whole image. Add a gentle vignette to draw the eye toward the center.
This finishing pass is what separates a good composite from a polished, professional-looking piece. It gives everything that final cohesion, like color grading on a film.
The result is something genuinely strange and beautiful. A deer in a sharp suit, standing in soft light, existing in a world that’s almost ours but not quite. That tension between the familiar and the wild is exactly what makes surreal photo manipulation so compelling to create — and so hard to look away from.