Ever looked at a photograph and thought, “what if the moon were impossibly huge, glowing over a dark desert with a lone child standing beneath it?” That dreamy, otherworldly feeling is exactly what photo manipulation in Adobe Photoshop lets you create.
This tutorial walks you through building a stunning surreal scene from scratch. You’ll combine three landscape photos with a portrait, shape a glowing crescent moon, and use adjustment layers, layer masks, and blending techniques to make everything feel like it belongs together.
Let’s get into it.
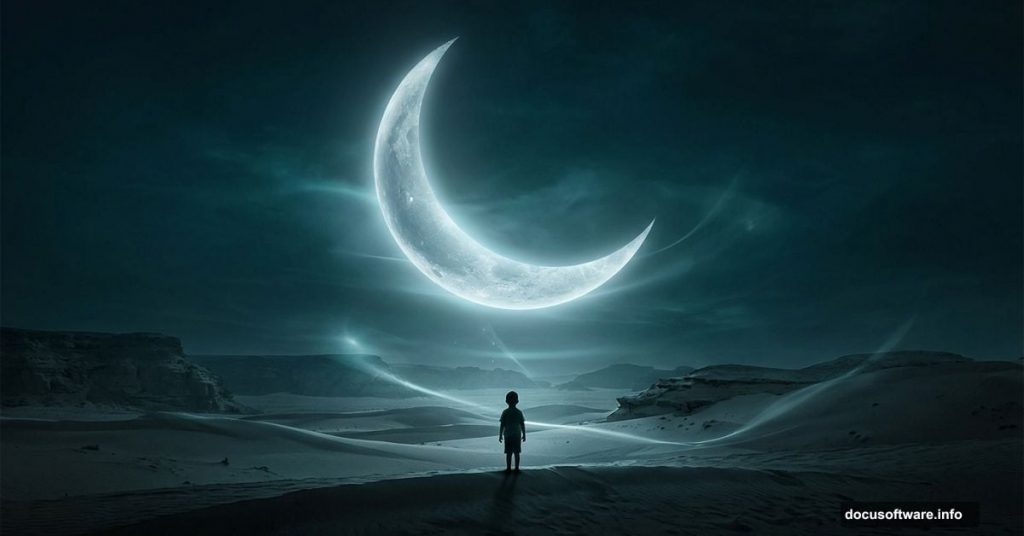
![A surreal Photoshop composite showing a glowing crescent moon over a dark desert landscape with a small child silhouette in the foreground]
Setting Up Your Canvas and Sky Background
Start by creating a new document. Set it to 2000 x 1333 px and fill it with white, or any base color you like. This gives you plenty of resolution to work with without slowing Photoshop to a crawl.
Next, open your sky image and drag it onto the canvas using the Move Tool (V). Position it in the upper half of the document. The sky will anchor the mood of the entire scene, so take a moment to place it thoughtfully.
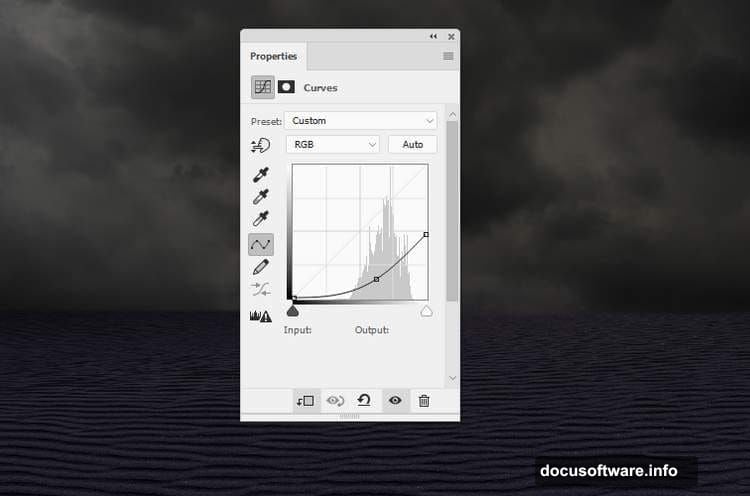
Now add a Curves adjustment layer above the sky. Pull the curve down to decrease overall lightness. A dark, moody sky sets the tone for everything that follows.
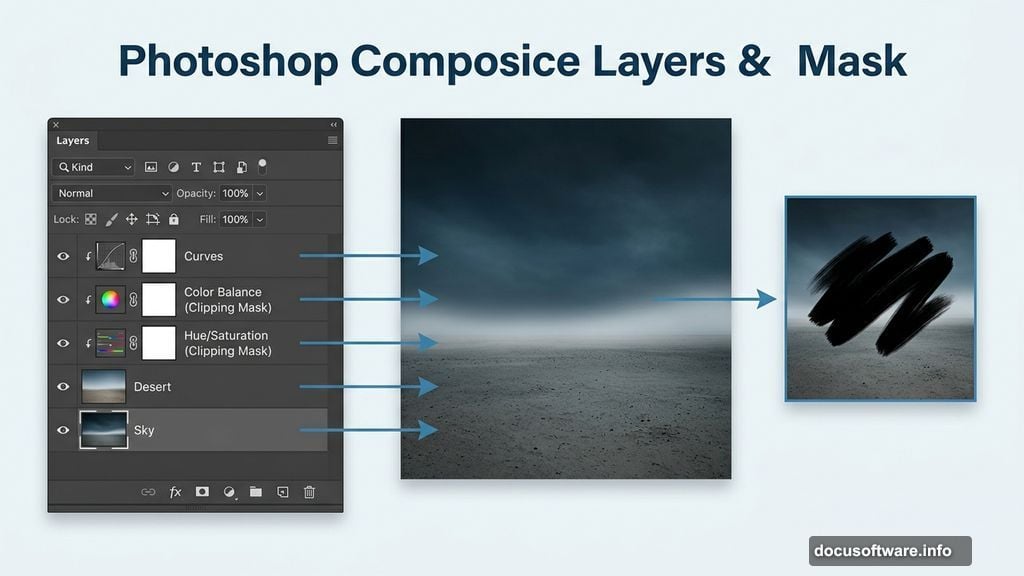
Blending the Desert With Layer Masks and Hue/Saturation
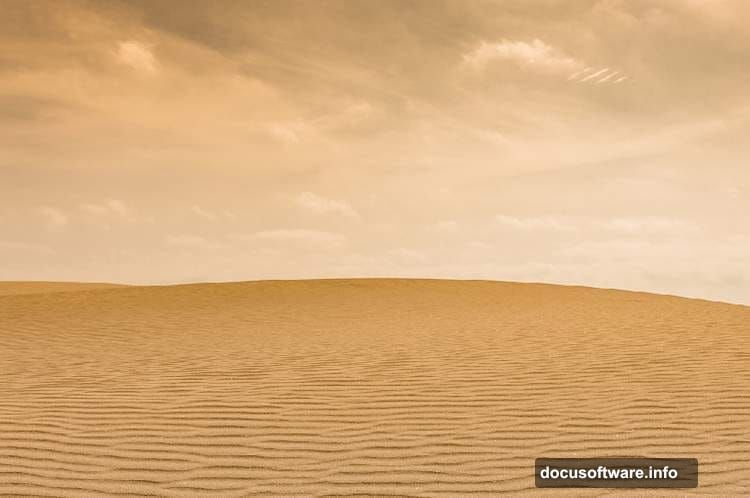
Open your desert photo and place it over the canvas. Use the Free Transform Tool (Ctrl+T) to resize it so it fills the document. You want it to feel like a seamless ground plane, not a floating rectangle.
Click the mask icon at the bottom of the Layers panel to add a layer mask to the desert layer. Hit B to grab the Brush Tool, pick a soft round brush, and set your color to black. Paint over the sky portion of the desert image and soften those hard horizon edges. This blends the ground naturally into the sky behind it.
Now add a Hue/Saturation adjustment layer directly above the desert layer. Right-click it and choose “Create Clipping Mask” so it only affects the desert. Drop the Saturation value to -78. That strips out most of the color, pushing the desert toward a cool, desaturated tone that matches a nighttime atmosphere.
Color Grading With Color Balance and Curves
Add a Color Balance adjustment layer, also clipped to the desert. Adjust the Midtones sliders to introduce some cool blue or teal tones. This subtle shift ties the desert color to the sky and makes the whole scene feel unified.
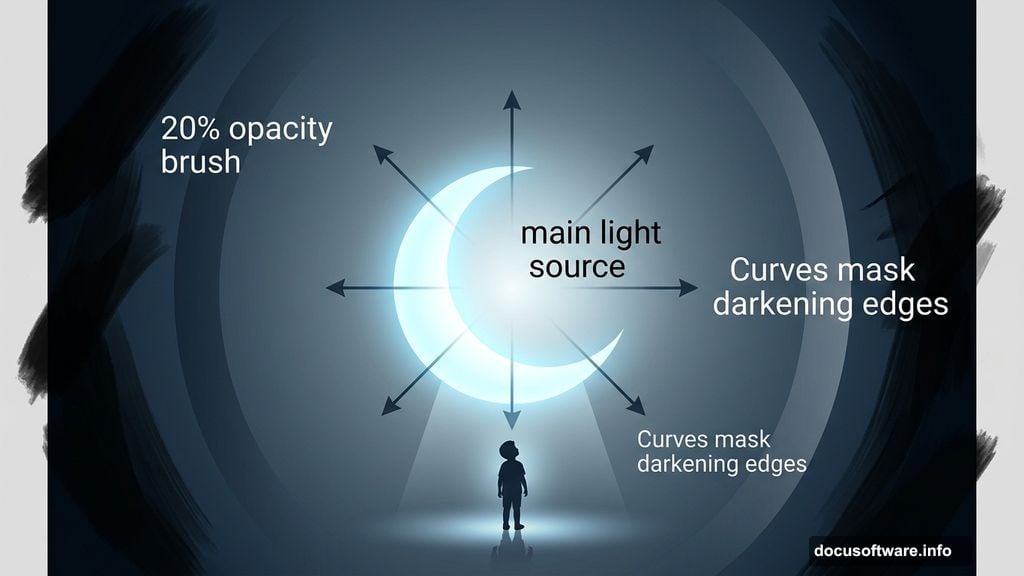
Then add another Curves adjustment layer to darken the desert further. Here’s the clever part: on this layer’s mask, use a soft black brush at about 20% opacity. Paint lightly on both left and right sides of the image to reduce the darkness there. Then switch to 100% opacity and paint the middle section darker.
Why? Because the crescent moon and main light source will sit in the center of the composition. So the edges stay relatively lighter, drawing the eye inward.
Adding Mountains With Gaussian Blur Depth
Open the mountain image and place it onto the canvas. Convert it to a Smart Object by right-clicking the layer and selecting “Convert to Smart Object.” Smart Objects let you apply filters non-destructively, which you’ll appreciate in a moment.
Add a mask to the mountain layer. Use a soft black brush to erase most of the ground beneath the mountains and trim away some of the sky above them. You want the mountain silhouette to sit naturally between the desert floor and the sky.
Next, go to Filter > Blur > Gaussian Blur and set the radius to 6 px. This creates a soft depth-of-field effect, pushing the mountains slightly out of focus like a distant range seen through hazy air.
Here’s the smart move: on the Gaussian Blur filter mask that appears automatically under the Smart Object, paint with a soft black brush to remove the blur from most of the background. Leave the blur visible only on the outer edges of the mountains on both sides. That creates gentle atmospheric perspective without making the whole mountain range look out of focus.
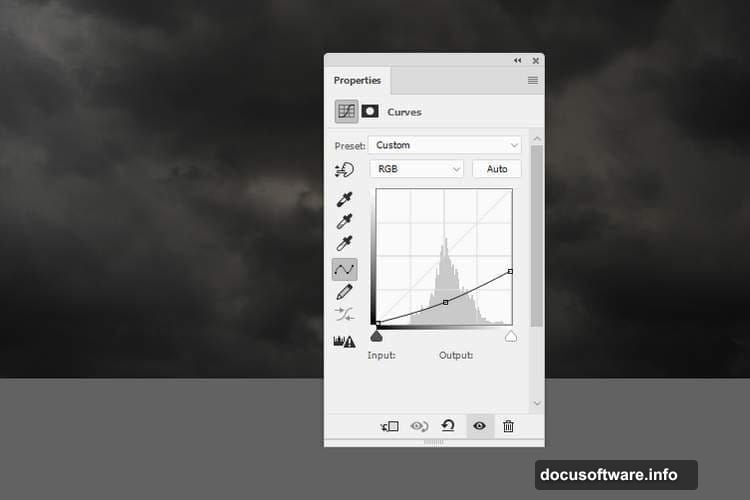
![Photoshop Layers panel showing Smart Object mountain layer with Gaussian Blur filter mask and clipped Curves adjustment layer]
Finally, add a Curves adjustment layer clipped to the mountain layer. Darken it slightly. Then on that Curves layer mask, use a soft black brush at 5-10% opacity. Paint very gently on parts of the mountain sides to preserve some tonal variation. You want shadows that feel natural, not a flat, heavy darkness.
Building the Crescent Moon With Glow Effects
This is where the magic really starts. To create the crescent moon shape, you’ll draw two overlapping circles on separate layers. The trick is subtracting one circle from the other using layer blend modes or selections to reveal that classic crescent shape.
Once you have the crescent, add a soft outer glow. Go to Layer > Layer Style > Outer Glow and dial in a warm, pale yellow or cool white tone. Adjust the spread and size until the glow feels luminous without being harsh. The moon should look like it’s actually emitting light into the surrounding atmosphere.
Add a separate soft brush stroke on a new layer set to Screen blend mode directly behind the moon. A wide, very low-opacity white or pale gold brush stroke painted in the center reinforces that glowing halo feeling around the crescent.
Importing and Blending the Child Figure
Open the child photo and drag her onto the canvas. Position her toward the lower center of the composition, directly beneath where the moon sits. She should feel small against that vast sky, which amplifies the dreamlike scale of the whole scene.
Add a mask to her layer and use a soft black brush to blend her feet and lower body naturally into the ground. Hard edges instantly break the illusion in a composite, so take your time here.
Now clip several adjustment layers directly to the child layer. Start with Curves to match her overall brightness to the dark scene. She should feel lit from above by that glowing moon, so brighten her slightly from the top while keeping her lower half in shadow.
Add a Color Balance adjustment layer and shift her midtones toward cooler blues and teals. This matches the moonlit color temperature of the background. Without this step, she’ll look like she was photographed in warm afternoon sunlight and pasted into a midnight scene.
Final Retouch With Adjustment Layers
At this point your composite has all its pieces. But it still needs polish to feel cohesive.
Add a global Curves adjustment layer at the very top of your layer stack, affecting everything. Pull the shadows down slightly and push a gentle blue or teal into the shadow tones using the channel dropdowns. This unifies the whole image under a single color grade.
Consider a global Hue/Saturation layer to drop overall saturation just slightly across the entire scene. Surreal composites tend to feel more atmospheric when the colors are slightly muted rather than vivid. Think about how moonlight actually looks. It drains color from everything it touches.
Finally, add a soft vignette by creating a new layer, filling it with black, and setting the blend mode to Multiply at very low opacity. Use a large soft eraser to remove the center, leaving dark edges that frame the moon and child naturally.
The whole process is really about patience with the small details. Getting the edges clean, the colors matched, and the lighting consistent takes time. But when it all comes together, you end up with something that feels genuinely otherworldly, like a moment that could never exist in real life but somehow feels completely believable anyway.
That’s the real reward of photo manipulation in Photoshop.