Creating space art feels intimidating at first. Stars, nebulae, glowing planets — how do you even start? Turns out, you build it layer by layer, and each piece is simpler than it looks.
This tutorial walks you through the full process. You’ll paint a colored background, scatter realistic stars, build a glowing nebula using Photoshop’s built-in filters, and assemble planets complete with rings and lighting effects. By the end, you’ll have a complete composite space scene you built entirely from scratch.
The best part? All of this works in any version of Photoshop. So whether you’re running an older copy or the latest release, you’re good to go.
Start With a Black Canvas and Colorful Brushwork
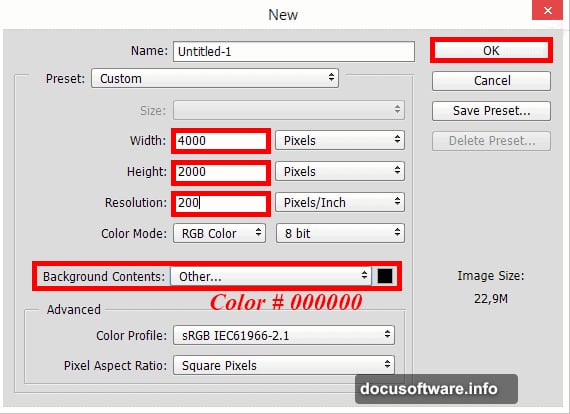
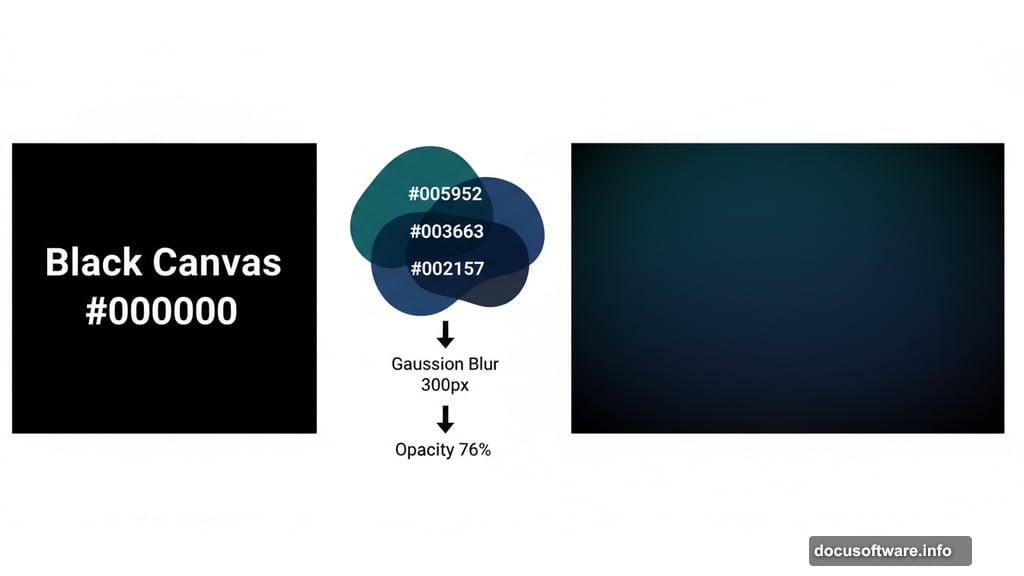
First things first — open Photoshop and create a new document. Go to File > New (or press Cmd/Ctrl + N). Set your canvas to 4000 pixels wide by 2000 pixels tall, with a resolution of 200 pixels per inch. For Background Contents, choose Other and fill it with pure black (#000000).
Black gives you the perfect foundation. Space is dark, and building color on top of darkness feels much more natural than fighting against a white canvas.
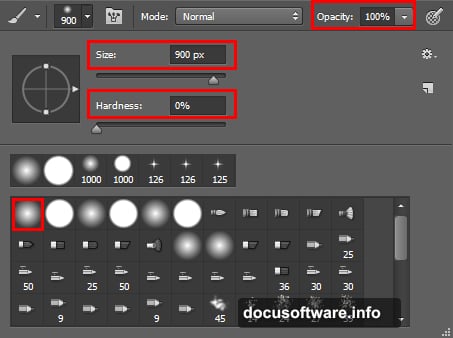
Next, create a new layer using the icon in the Layers panel (or press Cmd/Ctrl + Shift + N). Grab the Brush Tool by pressing B. Set your brush to 900px size, 100% opacity, 0% hardness, and 100% flow. The soft edge is important here — it creates smooth, cloud-like color blobs rather than sharp circles.
Now pick some deep blues and greens from the Swatches panel. Maria uses #005952, #003663, and #002157. Paint loose, overlapping spots across your canvas. Don’t be precise — randomness looks more natural. Think of it less like painting and more like smearing color around.
Gaussian Blur Turns Blobs Into Beautiful Backgrounds
Those colorful spots look rough right now. That’s fine. A single filter fixes everything.
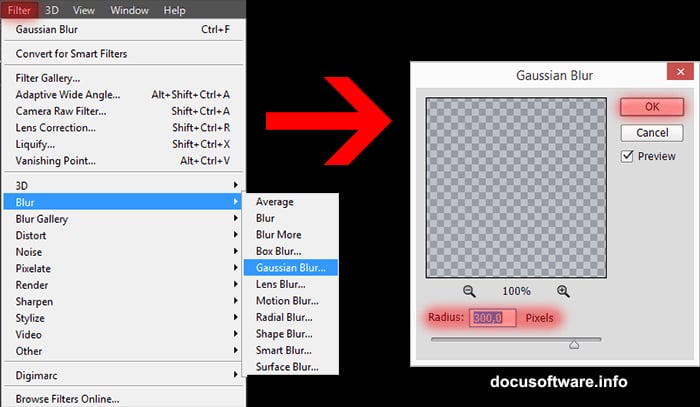
Go to Filter > Blur > Gaussian Blur and set the radius to 300 pixels. Watch as your messy brushwork transforms into a smooth, atmospheric color field. This technique is the secret behind most space background art — paint loosely, blur heavily, and suddenly it looks professional.
After applying the blur, drop the layer opacity to 76%. This lets the black background show through slightly, keeping your colors rich without looking oversaturated. The result should feel like deep space with a faint aurora glow.
Scatter Stars With Add Noise and Threshold
Stars need their own dedicated layer. Create a new layer and fill it completely with black. Press D to reset your colors to default, then press X to swap them so black is your background color. Now press Cmd/Ctrl + Delete to flood-fill the layer with black.
Here comes the clever part. Go to Filter > Noise > Add Noise. Set a high amount — somewhere around 150% works well — and choose Gaussian distribution with the Monochromatic option checked. Your layer now looks like grainy static.
Then go to Image > Adjustments > Levels (or press Cmd/Ctrl + L). Drag the black input slider hard to the right. Most of the noise disappears, leaving only the brightest specks. Those surviving dots become your stars. The more you push the slider, the fewer and brighter your stars appear. Adjust until the density feels right.
Change this layer’s blending mode to Screen. The black background vanishes completely, leaving only your white star specks floating over the color background. Now you have depth.
Build Your Nebula With Difference Clouds
This is where things get exciting. Create a new layer and set its blending mode to Color Dodge before you draw anything. This blending mode makes everything on this layer illuminate what’s beneath it — perfect for glowing nebula effects.
Press D on your keyboard to set your colors back to default black and white. Now go to Filter > Render > Clouds. A soft cloud pattern appears. Then immediately go to Filter > Render > Difference Clouds. Press Cmd/Ctrl + F repeatedly to reapply this filter. Each press generates a completely different pattern.

Keep pressing until you see a shape you love. The Color Dodge blending mode makes bright areas glow intensely against the dark background. Some iterations look like smoke. Others look like cosmic gas clouds. Stop when it feels like something you’d see through a telescope.
If your nebula isn’t showing up, double-check that you actually set the blending mode to Color Dodge before applying the filter. Also make sure your colored background layer exists below it — without something to interact with, Color Dodge has nothing to brighten.
Create Custom Star Brushes for Sparkle Effects
Individual star brushes add drama that noise filters can’t replicate. You’ll create a custom brush that scatters star shapes randomly across your canvas.
Create a new small document — something like 200×200 pixels with a white background. Paint a simple four-pointed star shape in black using a soft round brush. Make it simple and small. Then go to Edit > Define Brush Preset and name your new brush.
Back on your space canvas, select your new brush. Open the Brush Settings panel (Window > Brush Settings). Enable Shape Dynamics and set Size Jitter to around 80% — this randomizes star sizes so they don’t all look identical. Enable Scattering and push the scatter value high, around 1000%. Turn on Both Axes. This throws stars in every direction.
Now paint across your canvas with low opacity, maybe 30-40%. Build up star clusters where you want visual focus. Paint more heavily around your planned nebula region, since real star density peaks near galactic cores. Step back and look — the scene should already feel like outer space.
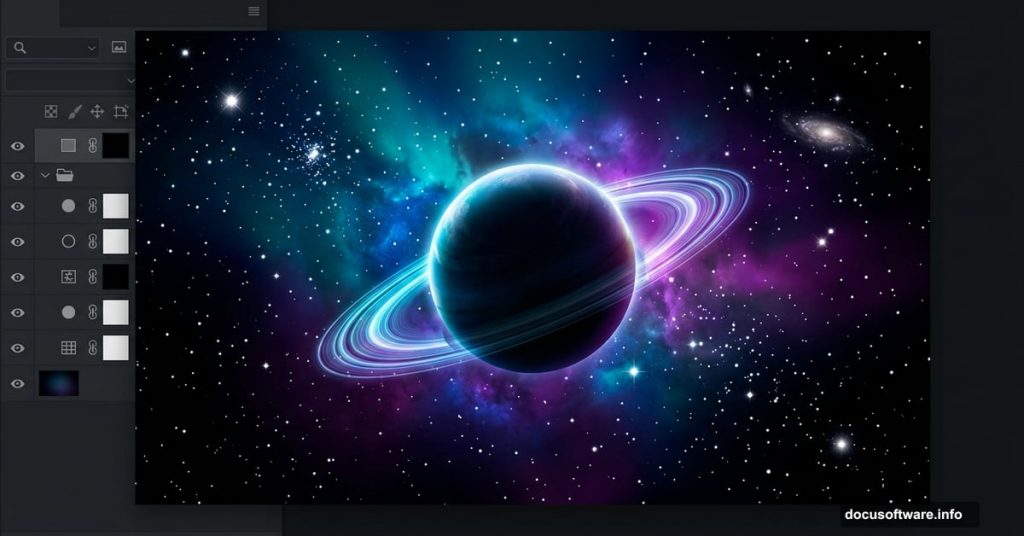
Place and Texture Your Planets
Planets need a texture source. You can download free planetary textures, including the one Maria uses from her own portfolio, or find any high-resolution rocky or gaseous surface photo. The texture wraps around a sphere shape to create your planet.
Create a new layer and use the Elliptical Marquee Tool (M) to draw a perfect circle. Hold Shift while dragging to constrain proportions. Fill the selection with your chosen texture, then use Edit > Transform > Warp to curve the texture around the circular shape. This gives the flat image the feeling of a curved surface.
Add a Layer Style by clicking the fx icon at the bottom of the Layers panel. An Outer Glow in a soft blue or orange color creates atmospheric haze around the planet’s edge. An Inner Shadow creates a subtle darkening on one side, suggesting the planet receives light from a specific direction. Consistent light direction across your whole scene makes everything feel believable.
Add Asteroid Rings and Dark Matter Effects
Rings use a clever masking technique. Import your asteroid ring stock image onto a new layer above your planet. Position and scale it so it overlaps the planet naturally. Right now the ring passes in front of the planet everywhere, which looks wrong. The back half of the ring should sit behind the planet.
Select the Elliptical Marquee Tool again and draw a selection matching your planet circle exactly. Create a layer mask on your ring layer, then make sure you’re painting on the mask itself. Paint the selection area black. The portion of the ring inside that circle disappears, creating the illusion that the ring passes behind the planet correctly.
For dark matter and additional atmospheric depth, create a new layer and use a very large, very soft black brush. Paint subtle darkening around the edges of your composition. This technique — called vignetting — focuses the viewer’s eye toward the center and adds a sense of depth that flat compositions often lack.
Final Color Grading Brings Everything Together
Individual elements look good separately. But they need to feel like they exist in the same universe. Color adjustment layers handle this beautifully.
Add a Color Balance adjustment layer (Layer > New Adjustment Layer > Color Balance). Push your shadows toward blue and cyan — this gives the whole scene a cold, deep-space atmosphere. Push your highlights slightly warm if you have a hot star or sun in the composition. The contrast between warm light source and cold ambient space feels immediately convincing.
Add a Curves adjustment layer next. Create a subtle S-curve — slightly brighten the midtones and darken the shadows. This adds contrast without blowing out your glowing nebula. Finally, add a Hue/Saturation layer and push saturation up about 10-15 points. Space art benefits from punchy, vivid color.
Group all your layers into labeled folders. Background elements in one group, nebula in another, planets in a third. This keeps the project manageable and makes it easy to revisit individual elements later.
The great thing about this workflow is that no two people following these steps produce the same result. Every Gaussian Blur, every Difference Clouds press, every brush stroke comes out differently. Your composition will look uniquely yours — and that’s exactly the point. Space art is about exploration, both literally and creatively.