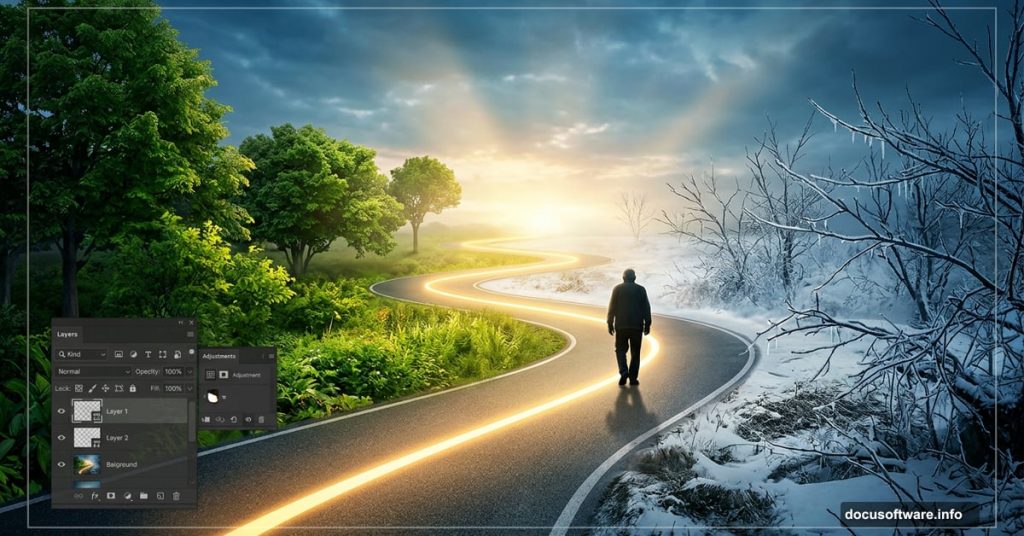
Few creative projects feel as rewarding as building a conceptual photo manipulation from scratch. This particular project tells a visual story about the stages of life — a zigzag road winding through seasons, from lush green to bare branches — all assembled from separate photos into one seamless scene.
Here’s what you’ll build, step by step.
What You Need Before Starting
Gather these resources before opening Photoshop. You’ll need a sky photo, rock texture, grass image, an old man figure, tree branches, a full tree, and falling leaves.
Also set up a new document first. Create a canvas at 2800 x 2000 px and fill it with white. That gives you plenty of room to work comfortably.
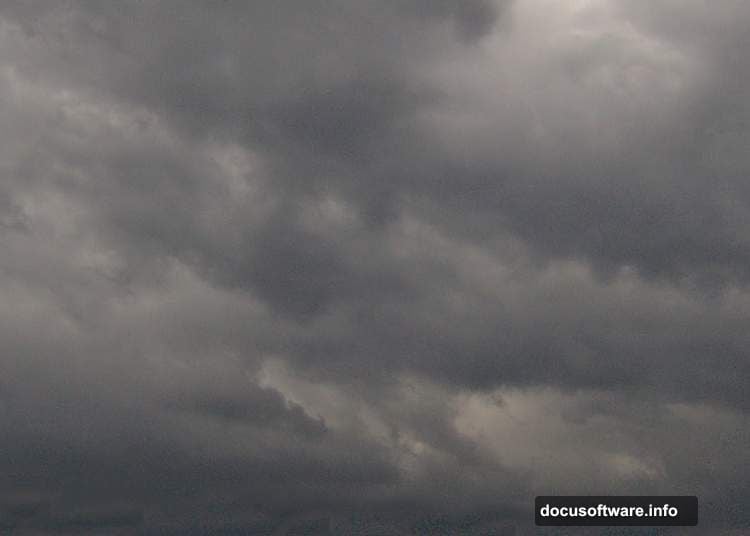
Build the Sky Foundation
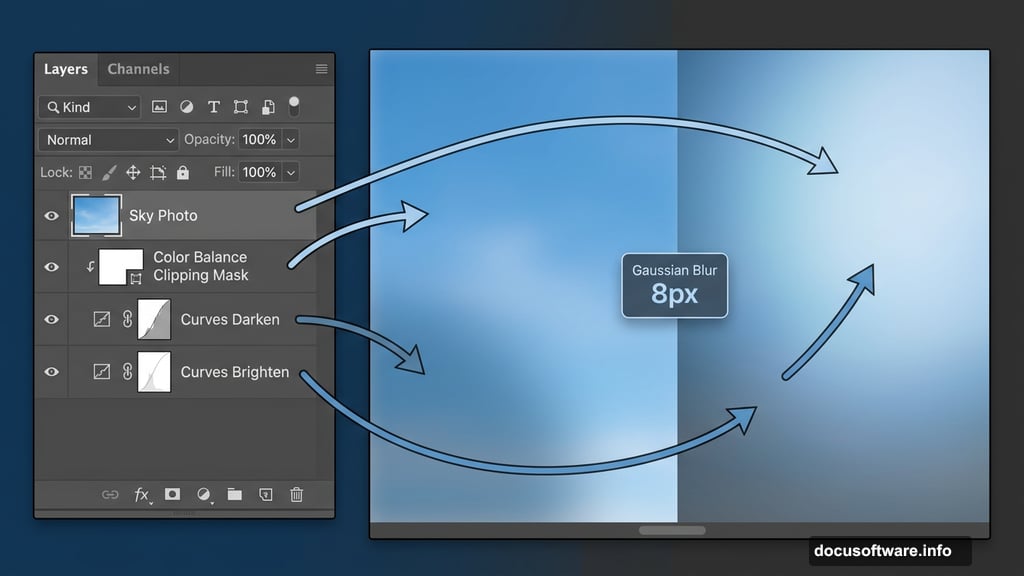
Drag your sky image onto the canvas using the Move Tool (V). Then hit Ctrl+T to pull up Free Transform and scale it up until it fills the entire document.
Next, right-click the layer and convert it to a Smart Object. This protects your original image so you can make non-destructive edits throughout the process.
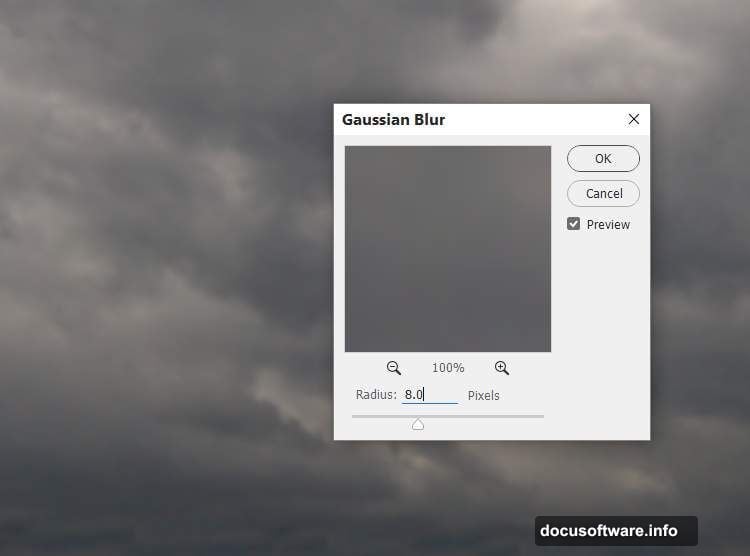
Now soften the sky. Go to Filter > Blur > Gaussian Blur and set the radius to 8 px. That slight softness gives the sky a more atmospheric, painterly feel rather than a harsh photograph look.
Color and Light the Sky
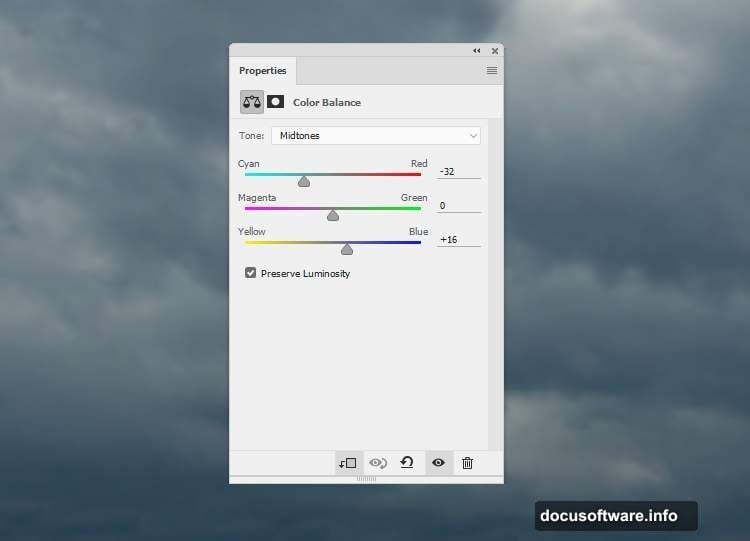
Here’s where the sky starts feeling alive. Add a Color Balance adjustment layer and clip it to the sky layer as a Clipping Mask.
Adjust the Midtones values toward cyan and blue. This cools the sky down and gives the whole scene a contemplative mood that fits the “journey of life” concept perfectly.
Then add a Curves adjustment layer to darken the overall sky. On its layer mask, grab a soft round brush in black and paint over the right side and upper areas. Why? Because you’ll place the main light source there, so those zones need to stay bright.
Finally, add one more Curves layer to brighten the right side specifically. On that layer mask, paint over the left and lower sky areas with black to protect their natural darkness.
Draw the Zigzag Road Shape
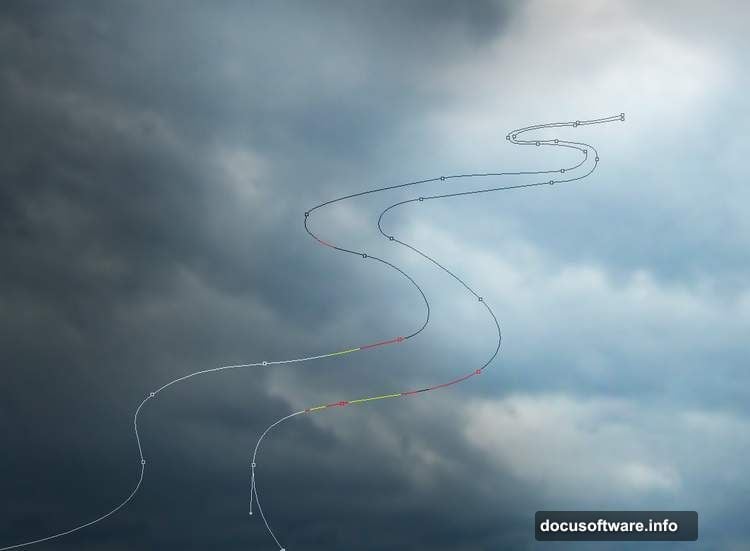
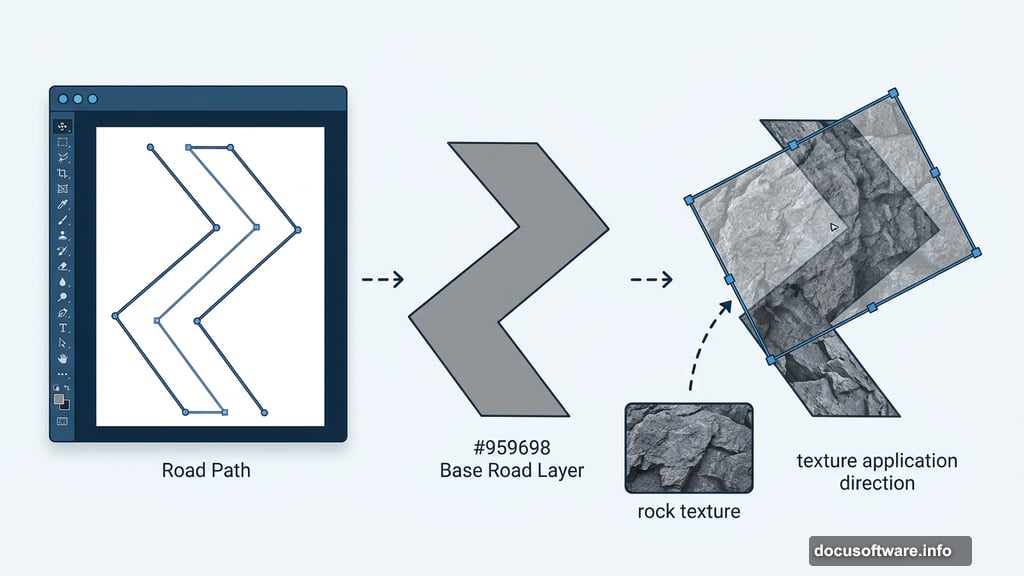
This is the backbone of the entire composition. Select the Pen Tool (P) and carefully draw a zigzag path across the canvas — this represents the winding road of life moving through the scene.
Once your path looks right, hit Ctrl+Enter to convert it into a selection. Create a new layer and fill the selection with the color #959698. That grey tone serves as your base road shape.
Don’t stress about perfection here. You’ll refine the edges significantly in the next step.
Apply the Rock Texture
Open your rock image — the tutorial uses image number 4 from the resource pack, but any similar rocky texture works fine. Drag it into the main document and convert it to a Smart Object.
Use Ctrl+T to rotate and position the rock texture so it aligns naturally with your road shape. Then hold Ctrl and click the base road layer’s thumbnail to load that selection again. With the rock layer selected, click the mask icon at the bottom of the Layers panel. Your rock texture now clips neatly inside the road shape.
Make the Edges Rough and Natural
Here’s a detail that separates good photo manipulations from great ones. Hide your base shape layer, then work directly on the rock layer mask.
Switch to a hard round brush set to about 30-40 px in black. Use short, choppy strokes along the edges of the road shape. The goal is to break up those perfectly clean edges and make them look jagged and rocky instead.
Take your time here. Rough, uneven edges sell the illusion that this is a real stone path rather than a digital cutout.
Add Grass and Natural Ground Cover
Bring the grass image into the document and position it along sections of the road that represent younger, more vibrant periods of life. Use masking techniques similar to the rock layer — load your path selection, add a mask, then refine edges manually with a brush.
The contrast between rocky terrain and green grass is central to the concept. So think carefully about which sections feel “alive” versus weathered and worn.
Place the Man, Trees, and Branches
Now the scene gets its story. Add the old man figure toward the further end of the road — he represents the later stage of life’s journey. Use careful masking to cut him cleanly from his original background.
Trees come next. Position a full leafy tree near the beginning of the road where life feels fresh and full. Then place bare branches toward the end. This visual shift from full foliage to empty branches reinforces the passage of time without needing a single word.
Change the color of the branches and trees using Hue/Saturation adjustment layers clipped to each element. Warm greens for youth, cool grey-browns for age.
Scatter Flying Leaves
Flying leaves tie the whole scene together. They suggest movement, transition, and the natural process of change.
Drag your leaf images in and distribute them naturally across the scene. Vary the sizes and rotation angles so they look genuinely windswept rather than copy-pasted. Some should appear near the trees, others drifting further across the composition.
Use motion blur on individual leaves to suggest they’re actually moving through the air.
Final Color Grading
With all elements placed, the last job is making everything feel like one unified photograph rather than a collage of separate images.
Add global adjustment layers at the top of your layer stack. A Curves layer can add contrast and depth across the whole scene. A Color Balance layer lets you push the overall palette toward cooler, more melancholic tones in the upper portion and warmer tones near the foreground.
A Photo Filter adjustment layer set to a warm orange or sepia tone can unify all the elements beautifully. Keep the opacity low — around 20-30% — so it feels subtle rather than heavy-handed.
Why This Project Teaches So Much
This manipulation packs in nearly every core Photoshop skill in one project. You practice masking, blending, light consistency, color grading, and compositional storytelling all at once.
The conceptual angle matters too. It’s not just about technical skills — it’s about using those skills to communicate something. A winding road moving through seasons is a simple idea. But executed well, it resonates with anyone who looks at it.
Start with the sky, build the road, and let the story unfold layer by layer. By the time you place those final flying leaves, you’ll have a piece worth sharing.