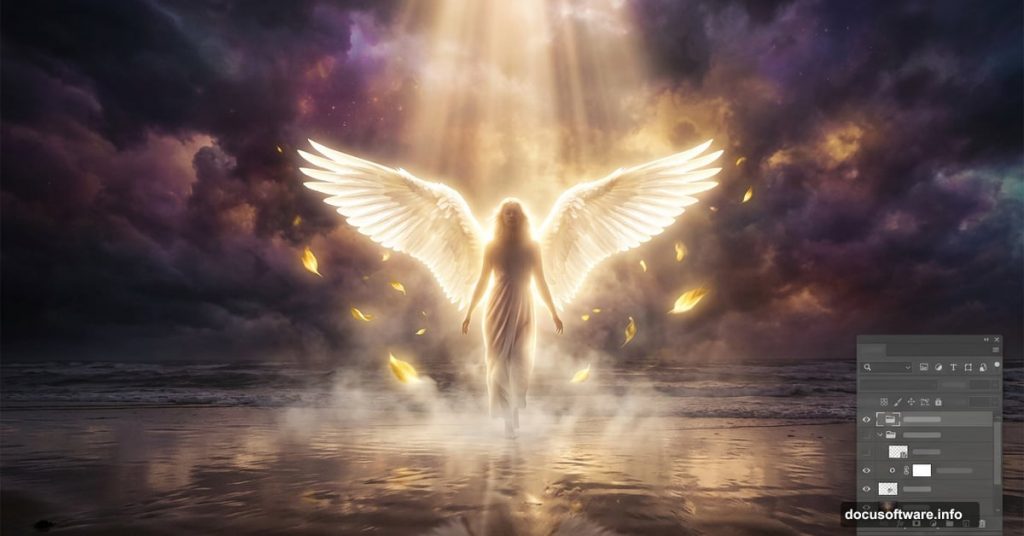
Creating a truly emotional photo manipulation takes more than just knowing where the buttons are. It’s about blending light, shadow, and imagination into something that feels alive.
This tutorial walks you through building a beautiful angel scene in Photoshop from the ground up. You’ll combine multiple stock photos, work with blend modes, match colors across layers, and finish with lighting effects that give your composition real emotional depth. If you’ve been wanting to push your manipulation skills further, this is a great project to take on.
You’ll need Photoshop CS6 or newer to follow along.
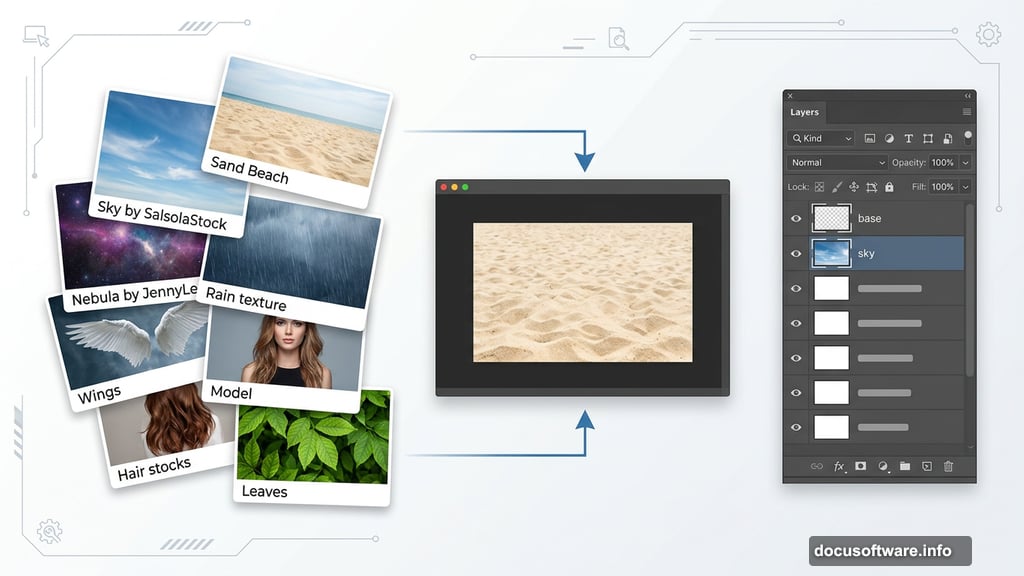
Stock Images You’ll Need Before Starting
Gathering your resources first saves a lot of frustration later. Here’s everything this composition uses:
- Sand Beach from Freeimages.com
- Sky from SalsolaStock
- Nebula by JennyLe
- Rain texture by Koko-Stock
- Beach by Fotophi
- Model by Mjranum Stock
- Hair stocks by CindysArt
- Wing by Wolverine
- Leaves by MaureenOslder
- Debris brush by Zigabooooo
Download everything before you begin. Trust me, stopping midway to hunt for assets breaks your creative flow completely.
Setting Up Your Document
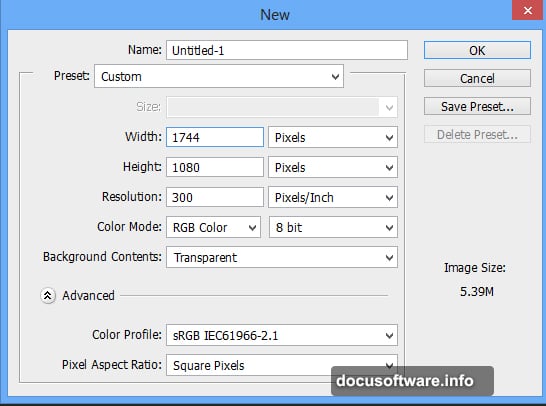
Open Photoshop and go to File > New. Match the document settings shown in the tutorial reference image. Getting dimensions right from the start prevents painful scaling issues down the road.
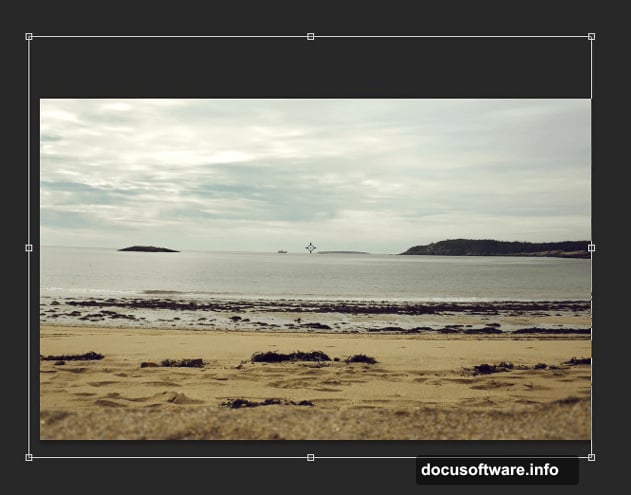
Now place the sand beach image onto your canvas using File > Place. When you use the Place command, Photoshop automatically converts the image into a Smart Object. That’s exactly what you want. Smart Objects let you scale, warp, and adjust non-destructively, so you can always go back and fix things without losing quality.
Name this layer “base” to keep your layer panel organized from the start.
Masking the Base Layer
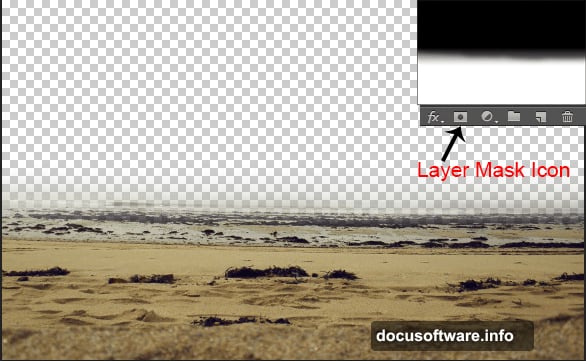
Add a layer mask to your base layer by clicking the second button at the bottom of the Layers panel. Select the Brush tool by pressing B, choose a soft round brush, and set the foreground color to black.
Now gently paint over the areas you want to hide. The key word is gently. Use a low opacity brush and build up gradually. This gives you a soft, natural edge rather than a harsh cutout look. The goal is a base that blends smoothly with the sky you’ll add next.
Adding the Sky Layer
Place your sky image below the base layer in the layer stack. This positioning matters because the sky should sit behind your sand scene, peeking through wherever you’ve painted on the mask.
Next, add Curves and Brightness/Contrast adjustment layers directly above the sky layer. These controls let you match the sky’s tone to your overall vision for the scene. Darken it slightly if you want a moody, dramatic atmosphere. Pull up the midtones for something warmer and more ethereal.
![A digital workspace showing a Photoshop canvas with a sandy beach scene being composited with a dramatic sky, showing layer masks and adjustment layers in the layers panel]
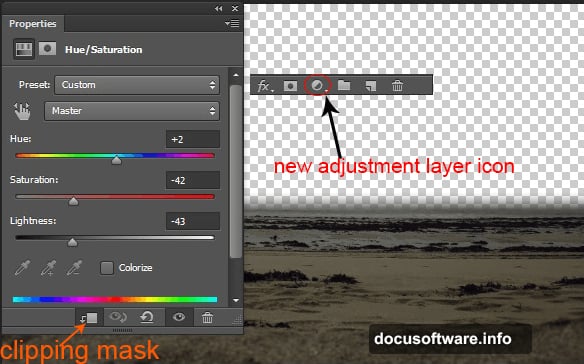
Color Matching With Hue/Saturation
Here’s where many beginners make their first big mistake. They place images without worrying about color harmony, then wonder why the final composition looks obviously fake.
Add a Hue/Saturation adjustment layer above your base layer. Then click the clipping mask button to clip it to the base layer only. This is crucial. Without clipping, the adjustment affects every layer below it. With clipping, it targets just the sand beach.
Adjust the saturation and hue values until the beach color starts to harmonize with your sky. You’re looking for a cohesive color temperature across the whole scene, not two separate photos sitting awkwardly next to each other.
Building the Scene With Nebula and Texture
Place the nebula image into your composition and experiment with blend modes. Screen and Soft Light work beautifully for atmospheric elements like this. These modes let the nebula interact with your existing layers rather than just sitting on top of them opaquely.
The rain texture comes in next, also using blend modes. This layer adds a subtle vignette effect and gives the scene a slightly worn, emotional quality. Think of it as the difference between a clinical stock photo and a photograph that feels like it was taken on a meaningful day.
Adding the Model and Working With Hair
Place your model image and use layer masking again to extract her from her original background. Take your time here. The edges around her hair are the most challenging part of any photo manipulation.
So use a combination of techniques for the hair. The Select and Mask workspace in Photoshop has a dedicated hair-detection tool that handles wispy edges much better than manual masking. Refine the edge output by choosing New Layer with Layer Mask to keep things flexible.
![Close-up view of a Photoshop manipulation showing an angel figure with wing overlay, showing blend mode adjustments and shadow painting techniques for realistic compositing]
Attaching the Wings
Place the wing stock image and position it behind the model layer in your stack. Scale and rotate to match her pose naturally. Wings that look bolted on destroy the illusion immediately, so spend time getting the angle right.
Add a layer mask to the wing layer and gently paint away any hard edges or areas that overlap awkwardly with the model. Then add a Curves adjustment layer clipped to the wing. Darken or lighten it to match the lighting direction you’ve established in your scene.
Painting Shadows and Lights
This step separates good manipulations from great ones. Create a new layer above your model, set its blend mode to Multiply, and clip it to the model layer. Use a soft black brush at low opacity to paint shadows under her chin, along the sides of her body, and wherever the wings would cast shade.
Then create another new layer set to Screen or Overlay. Use a soft white or warm yellow brush to paint where the primary light source would hit her. Think about where your light is coming from and stay consistent throughout.
Plus, add some subtle light on the edges of the wings where they catch the ambient glow of the scene. This rim lighting effect adds tremendous depth.
Placing Leaves and Debris
Scatter leaves through the scene using your leaves stock images. Vary the size and rotation of each leaf to avoid a copy-paste look. Some should appear closer to the camera and therefore larger. Others should feel distant and small.
Use the debris brush to add floating particles throughout the composition. These small details pull the viewer’s eye around the image and reinforce the magical atmosphere. Keep the particle density heavier near light sources and sparser in shadow areas.
Final Adjustment Layers and the Angel Aura
Add your final adjustment layers at the very top of your layer stack. A Color Lookup or Gradient Map layer set to low opacity can unify the entire color palette in seconds. Add a Vibrance layer to boost colors selectively without oversaturating skin tones.
For the angel’s aura or halo circle, create a new layer and use the Elliptical Marquee tool to draw a perfect circle around her head. Stroke the selection with a soft, glowing color, then apply a Gaussian Blur to soften it. Set the layer to Screen mode and reduce opacity until it feels subtle and organic rather than cartoonish.
Pulling It All Together
Photo manipulation at this level is really about telling a story with light. Every adjustment you’ve made, from the sky placement to the final color grading, serves that single purpose.
Review your composition at 50% zoom before calling it done. Things that look fine up close often reveal blend issues at a distance. If any element feels disconnected from the scene, revisit its color temperature, brightness, or edge quality.
The combination of careful masking, consistent lighting direction, and unified color grading is what transforms a collection of stock images into something genuinely emotional and beautiful. Once you complete this project, you’ll have a solid repeatable workflow for any future manipulation you take on.