
Want to create those moody, cinematic landscapes that look ripped from a fantasy film? This tutorial breaks down exactly how to combine stock photos and lighting tricks to build dramatic scenes in Photoshop.
No complex techniques. Just smart layering and color adjustments that transform ordinary photos into something striking.
Let’s jump in.
What You’ll Need
Before starting, grab these stock images:
- Rocky coastline photo
- Ocean waves shot
- Dramatic sky image
- Female model (for the mermaid)
- Flying birds silhouettes
Most stock sites carry similar images. You don’t need the exact photos to follow along. Just match the general mood.
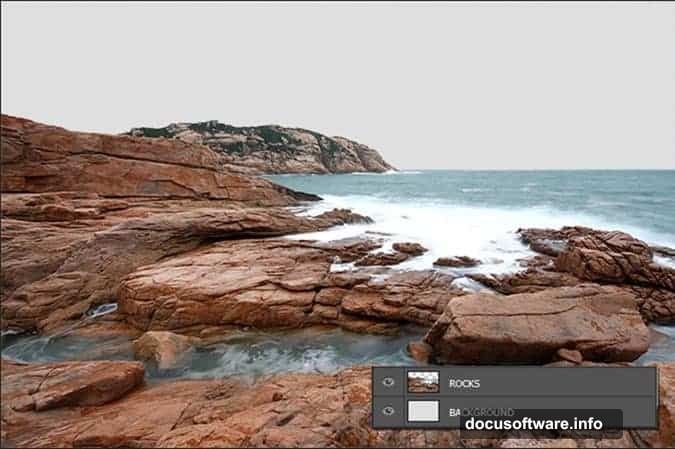
Set Up Your Canvas
First, create your workspace. Hit File > New and set dimensions to 3500 x 2300 pixels. This gives you plenty of room to work without losing quality.
Now drag in your rocky coastline photo. Name this layer ROCKS and place it at the top of your layer stack. Then go to Edit > Transform > Flip Horizontally if your rocks face the wrong direction.
Simple start. The foundation matters more than you’d think.
Strip Out Color for Drama
Here’s where the mood begins. Dramatic landscapes work better with desaturated colors. They feel more ominous and weathered.
Add a Vibrance adjustment layer above everything. Set Vibrance to -30 and change the Blending Mode to Color. This mode only affects color information, not brightness. Your rocks keep their depth while losing that saturated look.
Next, add a Hue/Saturation adjustment layer. Target just the Cyan channel and drop Saturation to -70. This kills the blue-green tones that make water look tropical and cheerful.
Your scene should now feel stormy and cold. That’s the vibe you want.
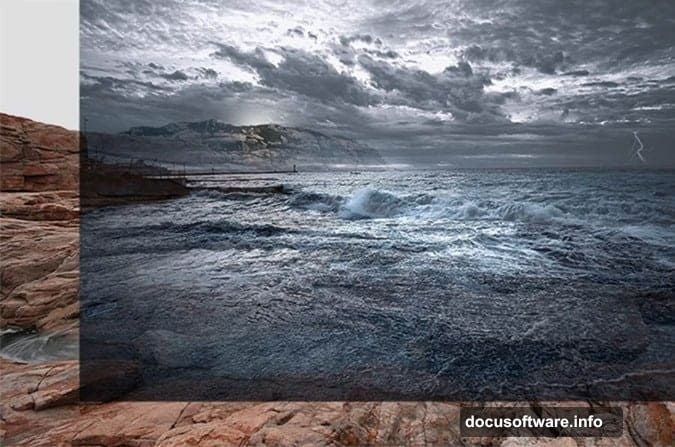
Layer in the Waves
Drag your ocean waves stock photo into the composition. Name it WAVES and position it at the top of the layer stack.
Press Ctrl + T to enter Free Transform mode. Resize the waves to fit your foreground rocks. Make sure the perspective matches your rocky base layer. Then hit Enter to commit the changes.
The waves won’t blend perfectly yet. That’s fine.
Add a layer mask to WAVES using the button at the bottom of your Layers palette. Now you can paint away hard edges where the waves meet the rocks.
Blend with Brush Work
Grab your Brush tool and set it to a soft round brush. Make sure black is your foreground color.
Paint on the layer mask to hide harsh transitions between waves and rocks. Work gently. Build up the mask gradually rather than erasing big chunks at once.
Focus on the areas where foam meets stone. Real waves don’t create perfect lines. They splash, they spray, they blend into crevices.
Take your time here. Good blending sells the illusion.
Drop in Your Sky
Your sky determines the entire mood. Pick something dark and threatening. Heavy clouds work better than clear blue.
Drag the sky image into your composition and name it SKY. Position it behind your ROCKS and WAVES layers. Use Free Transform to fit it properly.
Then add a layer mask and paint away any horizon line from the original sky photo. You only want the cloud cover, not the entire sky image competing with your rocks.
Match Colors Across Elements
Right now your layers probably don’t match tonally. The sky might be too blue while the rocks look too warm.
Add a Curves adjustment layer above everything. Create a subtle S-curve to boost contrast. Then adjust individual color channels if needed.

For this dark landscape style, you typically want to:
- Cool down highlights slightly
- Crush blacks a bit for drama
- Remove any warm yellow or orange casts
Play with the curves until all elements feel like they belong in the same scene. This step makes or breaks photo composites.
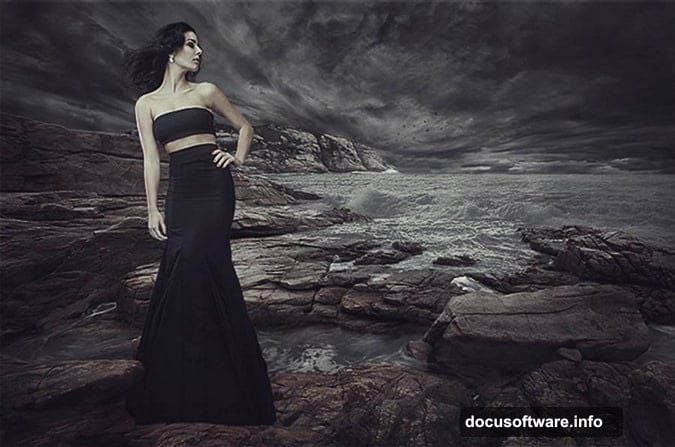
Position Your Mermaid Model
Now comes the fun part. Drag in your model photo and name it MERMAID. Position her on the rocks or partially in the water, depending on your vision.
Cut her out from the background using your preferred selection method. I like the Pen Tool for clean edges, but Quick Selection works fine if the original background contrasts well.
Once you’ve isolated her, add her to your composition. Scale and position her so the perspective matches your rocks. If she looks too small or too large compared to the environment, the illusion fails.
Create Mermaid Tail Effect
This part requires some patience. You need to blend your model’s lower body into the water so it looks like she has a tail beneath the surface.
Create a new layer beneath your MERMAID layer. Name it TAIL BLEND. Use a soft brush to paint water textures over where her legs would be. Sample colors from your WAVES layer to keep everything consistent.
Then lower the opacity of your model’s lower body using a layer mask. Paint gradually to create the effect of her tail disappearing into murky water. You’re not building an actual tail here – just the illusion of something submerged.
Add some water splashes around where her body enters the water. This sells the idea that she’s emerging from or diving into the waves.
Adjust Model’s Lighting
Your model probably came from a photo with different lighting than your landscape. She needs to match the moody atmosphere you’ve built.
Add a Curves adjustment layer above your MERMAID layer. Clip it to affect only the mermaid (Alt + click between layers). Darken her overall to match the stormy lighting.
Then add another adjustment layer for Color Balance. Push the shadows toward blue and cyan to match the cool tones of your environment. Add a slight green tint to midtones if the water reflects green.

This lighting adjustment makes her feel like she belongs in this world instead of pasted on top.
Add Atmospheric Birds
Drag in your bird silhouettes. Place them in the sky to add scale and movement. Birds make empty skies feel more alive and give the eye something to follow.
Keep them small. You want them to feel distant and add to the desolate mood, not dominate the composition.
Arrange them in natural flight patterns – not perfect lines. Real birds fly in loose formations, not rigid geometry.
Fine-Tune With Final Adjustments
Almost done. Now you refine everything with final color grading.
Add a new Curves adjustment layer above all other layers. Make subtle adjustments to nail the exact mood you want. For dark fantasy landscapes, I typically:
- Pull down the highlights a touch
- Add slight blue to shadows
- Create contrast without crushing detail
Then add a Levels adjustment. Push the black point inward slightly to ensure your darkest darks are truly black. This adds punch to the overall image.
Finally, consider adding a subtle vignette. Create a new layer, fill it with black, and add a layer mask. Paint a white circle in the center of the mask to darken the edges. Lower the layer opacity to taste.
Polish and Export
Zoom out to 100% view. Check for any rough blending, color mismatches, or perspective issues. Fix anything that catches your eye.
Then flatten your image (Layer > Flatten Image) and apply a final Unsharp Mask for crispness. Go easy – too much sharpening destroys the dreamy quality.
Save your final piece as a high-quality JPEG or PNG. You’ve just created a dramatic fantasy landscape that looks straight out of a movie production.
The techniques here work for any dark composite scene. Rocky coasts, foggy forests, stormy mountains – the process stays the same. Master color matching and lighting, and you can combine any photos convincingly.
Now go create something moody and dramatic. Your fantasy landscapes are waiting.