
Creating cinematic disaster scenes sounds complex. But you can nail this effect in about an hour with the right approach.
This tutorial breaks down an apocalyptic photo manipulation into manageable steps. You’ll blend multiple images, add meteor effects with premade brushes, and layer lighting to build atmosphere. No advanced techniques required.
The key? Smart blending modes and lighting layers do most of the heavy work for you.
Gather Your Source Images First
Before opening Photoshop, download three essential elements. You need a dramatic sky photo, an urban cityscape, and meteor brushes.
Look for skies with strong cloud formations. These add natural drama without extra work. For the city, choose images with clear building silhouettes. This makes selection much easier.
Premade meteor brushes save hours of manual painting. They give you realistic debris patterns instantly.
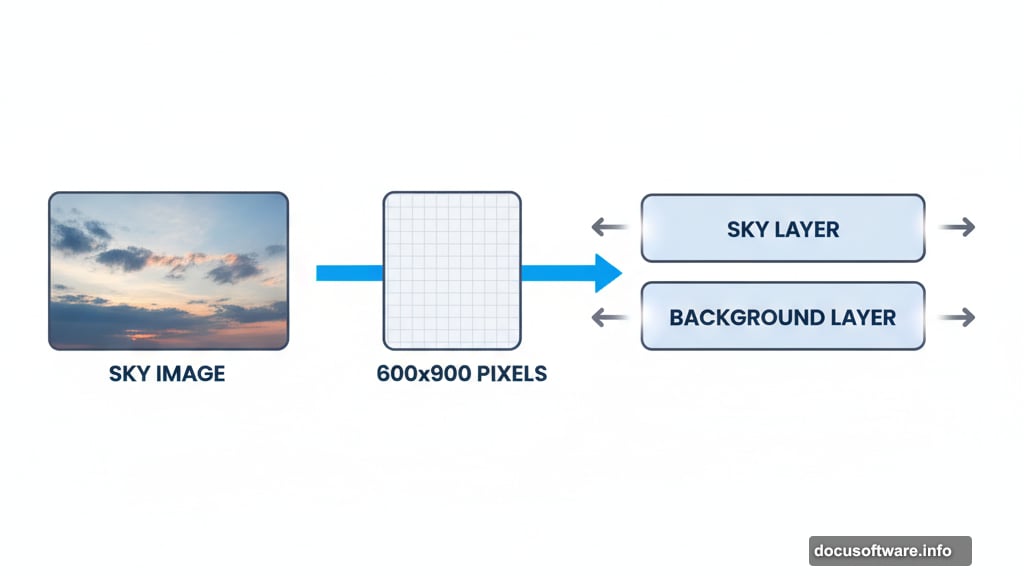
Set Up Your Canvas and Sky Layer
Create a new Photoshop document at 600×900 pixels. This gives you portrait orientation perfect for dramatic vertical compositions.
Drag your sky image into the document. Name this layer SKY. Getting into the habit of naming layers saves massive time later.
Here’s a quick trick most tutorials skip. Grab the Marquee Tool (M) and select just the lower portion of your sky without rooftops. Copy it with Ctrl+C, then paste with Ctrl+V.
Place this new layer under your SKY layer. Name it BACKGROUND. Hit Ctrl+T to transform it and stretch the bottom edge down to fill your canvas.
This creates a seamless base for your cityscape. Nobody will notice the stretched clouds behind your buildings.
Remove Unwanted Elements Cleanly
Add a new empty layer above everything. Name it RETOUCH.
Select the Clone Stamp Tool (S). Use this to paint over any rooftops or distracting elements from your original sky photo. Work patiently here because clean backgrounds make the final composite look professional.
Your sky should now show only clouds and atmosphere. Save your work before moving forward.
Add Your City Using Smart Blending
Most people overcomplicate adding cities to these scenes. Here’s an easier method that skips tedious masking.
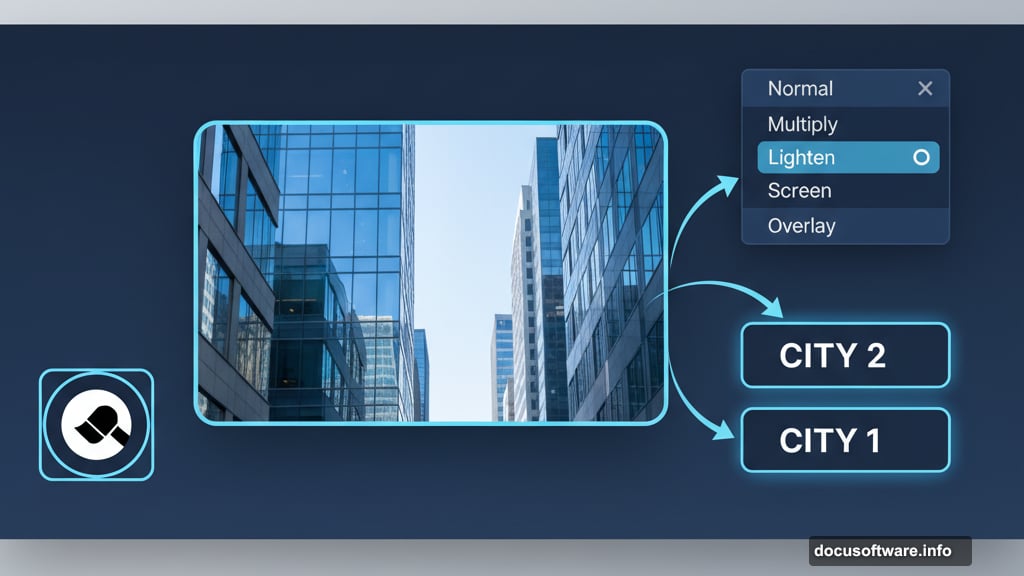
Drag your city image into your document. Place it above all other layers and name it CITY 1. Right-click this layer and choose Duplicate Layer. Name the duplicate CITY 2.
Why create two identical city layers? Each one gets different blending treatment. This gives you more control over the final look.
Make CITY 2 invisible by clicking the eye icon. You’ll work with CITY 1 first.
Blend the First City Layer
With CITY 1 visible, change its blend mode to Lighten or Screen. This makes darker areas transparent while keeping bright building lights and reflections.
The exact blend mode depends on your source image. Test both options to see which works better.
Add a layer mask to CITY 1. Use a soft black brush at low opacity to paint away any harsh edges. Focus on the bottom and sides where the city meets your sky.
This gradual fade looks far more natural than hard cutoffs.
Fine-Tune With Your Second City Layer
Now make CITY 2 visible. Set its blend mode to Multiply or Overlay.
This layer adds depth and shadow detail your first layer lost. The combination of both layers creates realistic dimension.
Add another layer mask here too. Paint away areas that look too dark or compete with your first city layer. You want both layers working together, not fighting each other.
Adjust the opacity of CITY 2 between 40-60%. This subtle approach beats heavy-handed effects every time.

Drop Meteors Into Your Scene
Load your meteor brushes into Photoshop. Create a new layer above your city layers and name it METEORS.
Select a brush and adjust its size. Paint several meteors falling at different angles. Vary the sizes to add depth. Larger meteors in the foreground, smaller ones toward the background.
Here’s the trick most people miss. Don’t just stamp identical meteors everywhere. Rotate your brush between strokes. Change the opacity. This variation makes the effect believable.
Add a slight motion blur to each meteor. Go to Filter > Blur > Motion Blur. Use an angle that matches the meteor’s trajectory and a distance of 15-20 pixels.
Build Atmospheric Lighting Effects
Lighting sells the apocalyptic mood. Create several new layers above everything and set them to Screen or Overlay blend mode.
Use a soft orange brush at 10-20% opacity. Paint glowing areas where meteors would illuminate clouds and buildings. Focus on the tops of structures and the undersides of clouds.

Add red-orange glows around meteor impact areas. These should be brighter and more intense than ambient lighting.
Create another layer for blue-white highlights. Paint these on building edges facing your brightest light sources. This rim lighting adds professional polish.
Don’t overdo any single lighting layer. Multiple subtle layers beat one obvious effect.
Add Smoke and Atmospheric Haze
Real disaster scenes include dust and smoke. These elements add crucial realism.
Create a new layer and fill it with black. Go to Filter > Render > Clouds. Set this layer to Screen mode at 15-25% opacity.
Use a layer mask to paint away clouds from areas that should stay clear. Keep the haze concentrated in the middle distance and background.
For ground-level smoke, use a large soft brush with low opacity. Paint white or light gray wisps rising from the city. Vary the opacity across different areas.
This atmospheric depth pushes your background elements back visually.
Fine-Tune Colors With Adjustment Layers
Add a Curves adjustment layer above everything. Create a gentle S-curve to boost contrast. This makes your lights brighter and darks deeper.
Add a Color Balance adjustment layer. Push the shadows toward blue and the highlights toward orange-red. This color split creates that apocalyptic sunset feel.
Try a Vibrance adjustment layer next. Increase vibrance by 20-30 points. This saturates muted colors without destroying skin tones or already-saturated elements.
Each adjustment should be subtle. Stack multiple gentle adjustments rather than making extreme changes with one.
Polish With Final Details
Zoom in to 100% and scan your entire image. Look for rough edges, color mismatches, or areas that need refinement.
Use the Spot Healing Brush to clean up small imperfections. Soften hard edges with a blur tool set to 10% strength.
Add a final sharpening pass. Create a merged copy of all visible layers with Ctrl+Alt+Shift+E. Go to Filter > Sharpen > Smart Sharpen. Use an amount of 80-100% with a radius of 0.5-1.0 pixels.
This brings back detail lost during blending without creating obvious halos.
Save Multiple Versions
Save your working PSD file with all layers intact. You’ll want to adjust this later.
Also save a flattened JPEG at maximum quality. This gives you a clean final image for sharing.
Consider saving alternate versions with different color grades or lighting intensities. Having options lets you choose the strongest composition later.
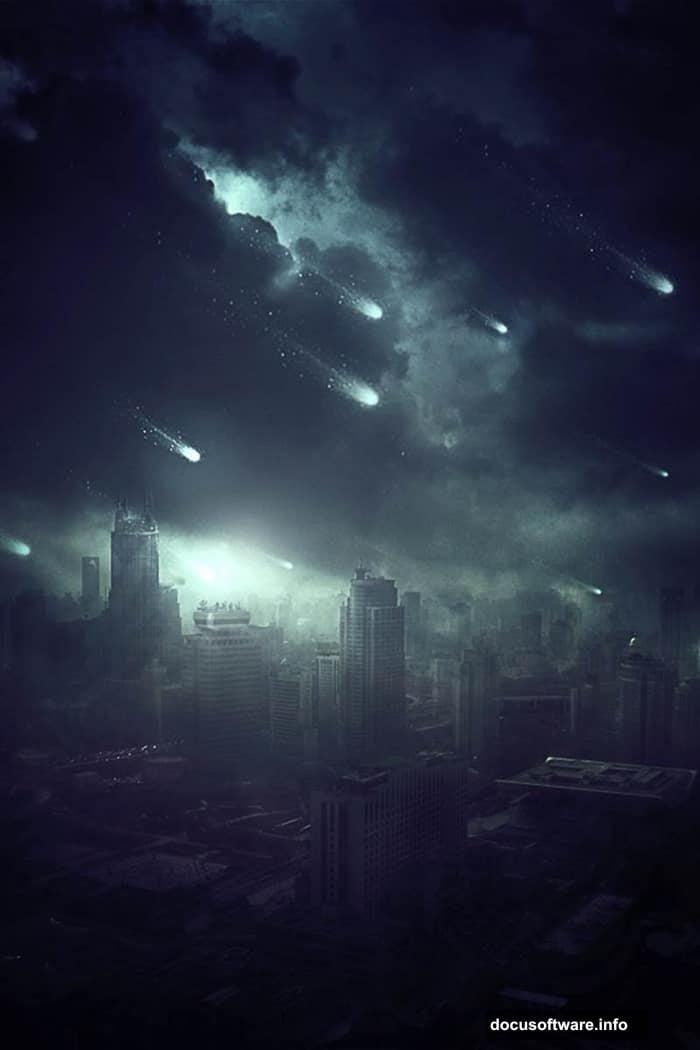
Your apocalyptic scene is complete. The combination of smart blending, layered lighting, and atmospheric effects creates a cinematic result without advanced techniques.
This same workflow adapts to countless photo manipulation projects. Master these basics and you’ll handle far more complex composites with confidence.