So you want to create something magical in Photoshop. We’re talking elephants, sparkling stars, glowing portals, and crescent moons all blended into one stunning fantasy scene. Sounds ambitious, right? But this tutorial breaks everything down into manageable steps that even intermediate Photoshop users can follow with confidence.
Let’s walk through how it all comes together.
What You’re Building
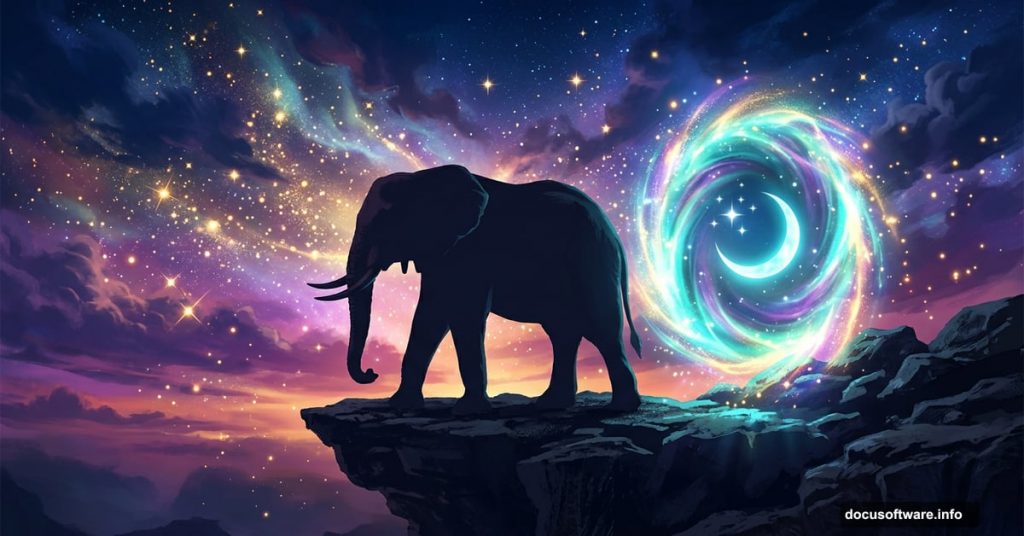
The final piece features an elephant standing on a rocky cliff, surrounded by a dramatic sky filled with flying stars and a glowing portal. Inside and outside that portal, a fantasy sky comes alive with a crescent moon and clusters of sparkling light.
It’s a lot of elements. But each one layers on top of the last in a logical, satisfying way.
Before you dive in, gather your resources. You’ll need two sky images, two mountain shots, a cliff, a rock, an elephant photo, a portal image, a moon, and a set of glitter brushes. Having everything ready saves time and keeps your creative momentum going.
Setting Up Your Canvas
First, create a new document at 1968 by 1300 pixels and fill it with white. Think of this as your blank stage before the curtain rises.
Open your first sky image and drag it onto the canvas using the Move Tool (V). Then use Free Transform (Ctrl+T) to scale it down to about 60%. This gives you room to position it exactly where you want without it overwhelming the composition.
Shaping the Sky with Curves Adjustments
Here’s where the magic of adjustment layers starts. Go to Layer, then New Adjustment Layer, then Curves. Set it as a Clipping Mask so it only affects the sky layer beneath it.

Increase the lightness to brighten things up. Then, on the layer mask, grab a soft round brush set to black. Lower the opacity to somewhere between 20 and 40 percent. Use this brush to gently reduce brightness on the top and middle of the sky. The result feels naturally lit rather than flat and overexposed.
Add a second Curves layer for more atmosphere. This one cranks up that dreamy, hazy quality. On its mask, paint out the effect in the top left corner and along the bottom edge of the canvas. You’re essentially sculpting the light, keeping the brightest glow right where your composition needs it most.
Bringing in the Mountains

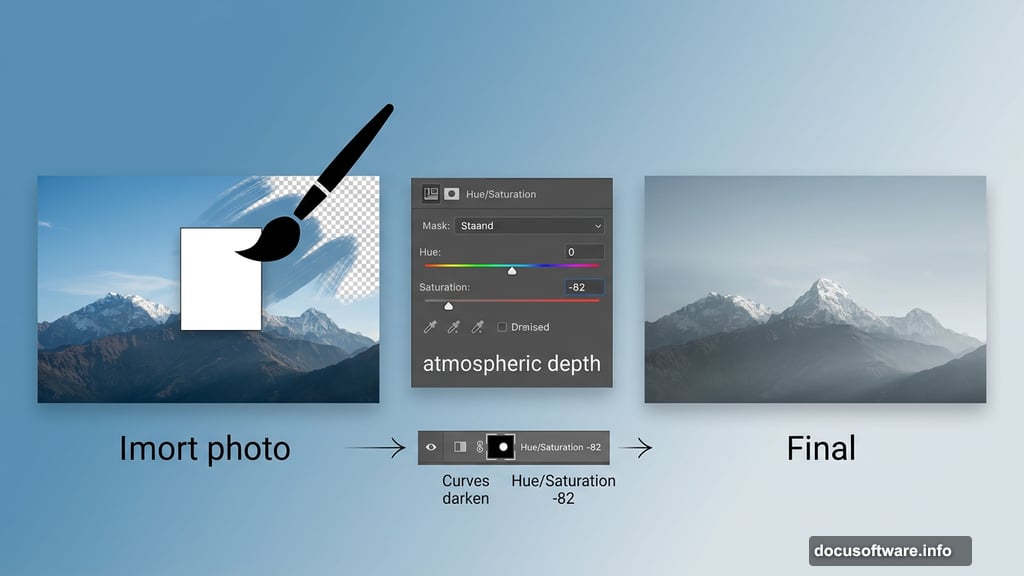
Open your first mountain image and drag it in. Add a mask to this layer by clicking the second icon at the bottom of the Layers panel. With a soft black brush, erase the sky portion and the mountain edge on the right side. This blends it seamlessly into the sky you already built.
Add a Curves adjustment layer clipped to this mountain layer and darken it slightly. Then stack a Hue/Saturation adjustment layer on top and pull the Saturation down to negative 82. That desaturation creates distance and atmospheric depth, making the mountain feel far away and slightly ethereal.
Adding the Second Mountain Layer
Isolate the second mountain from its original photo and place it in the middle right of your canvas. Add a mask here too. Use your soft black brush to erase the sea portion and carefully blend this mountain with the existing sky.

The goal is to make it appear behind the first mountain. That depth creates a convincing sense of scale and distance. Your scene is starting to feel like a real place now.
Add another Curves adjustment clipped to this second mountain. This time, reduce the contrast and overall visibility slightly. Mountains that recede into the background should feel softer and less defined than elements in the foreground. This is a simple trick that adds serious depth to the composition.
Where the Real Fun Begins
Once the background is locked in, the next phase brings in the cliff, rock, and elephant. These foreground elements get blended using the same masking and brush techniques you’ve already practiced. The adjustment layers handle lighting consistency so everything feels like it belongs in the same world.

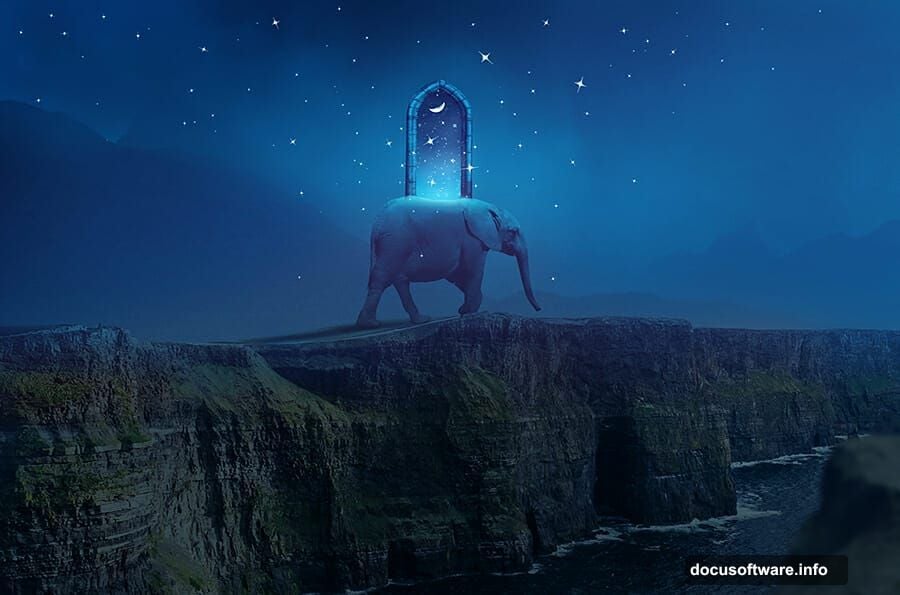
Then comes the portal. Adding a glowing circular portal opens up the most creative part of the whole piece. Inside it, you’ll build a separate fantasy sky using color adjustments and blending modes. Outside it, the crescent moon and glitter brush stars scatter across the scene with beautiful, organic randomness.
Finally, a Vibrance adjustment layer ties everything together. Vibrance is gentler than Saturation and works especially well for fantasy scenes. It boosts colors without making skin tones look unnatural, and it gives the whole image that rich, polished glow you see in professional photo manipulations.
Why This Tutorial Works So Well
What makes this project genuinely satisfying is how it teaches you transferable skills. Clipping masks, adjustment layers, soft brush masking, and blending modes are tools you’ll use in practically every composite you ever create.
Plus, the combination of natural photography with fantastical elements is a great way to train your eye. You start noticing things like light direction, color temperature, and atmospheric perspective. Those observations make every future edit better.
If you’re building your Photoshop skills, this kind of fantasy photo manipulation is one of the most enjoyable ways to do it. You’re solving creative problems at every step, and the reward at the end is genuinely impressive work you can be proud of.
Give it a try. Work slowly through each step, and don’t stress if your first attempt isn’t perfect. Every layer you build teaches you something new about how Photoshop thinks, and more importantly, how your own creative instincts develop over time.