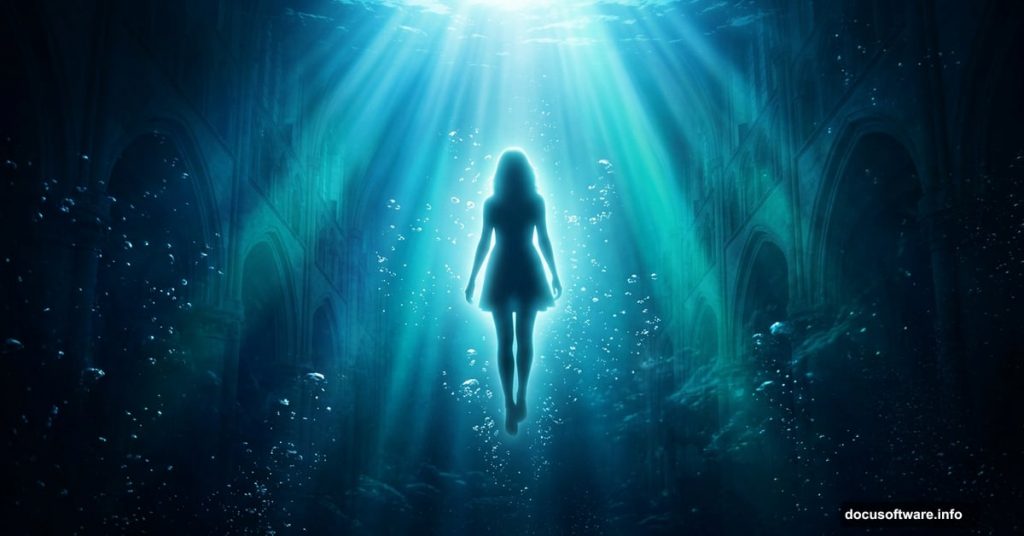
Ever wanted to place a girl inside a glowing, dreamy underwater world full of light rays and floating bubbles? This tutorial walks you through exactly that. Step by step, you’ll build an emotional fantasy scene using photo manipulation techniques that work beautifully in Adobe Photoshop CC.
By the end, you’ll have a finished underwater dreamscape that feels cinematic and surreal. Plus, you’ll pick up practical skills in masking, blending modes, color adjustments, and brush work that carry over to any future matte painting project.
Setting Up Your Underwater Background
Start by opening the underwater image directly in Photoshop using Ctrl+O. This becomes the foundation layer for everything that follows.
First, convert the background layer into a regular layer. Double-click the background thumbnail to open the New Layer dialog box. Give it a clear name like “underwater” so your Layers panel stays organized.
Next, you’ll flip the image horizontally. Hit Ctrl+T to activate Free Transform, then right-click on the canvas to reveal the transform options. Choose Flip Horizontal. This repositions the light rays to the left side of the frame, which sets up a more dramatic composition later.
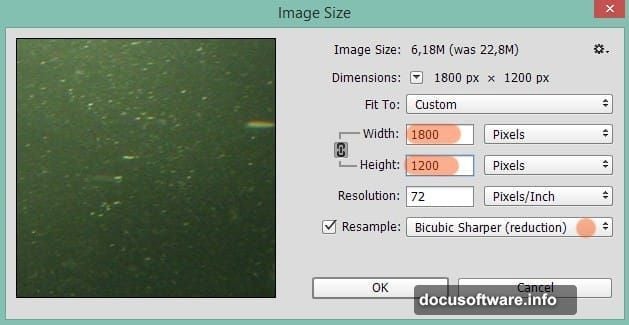
Finally, head to Image > Image Size and set the document to 1800 pixels wide by 1200 pixels tall. That gives you plenty of canvas to work with throughout the project.
Blending the Cathedral with Overlay Mode
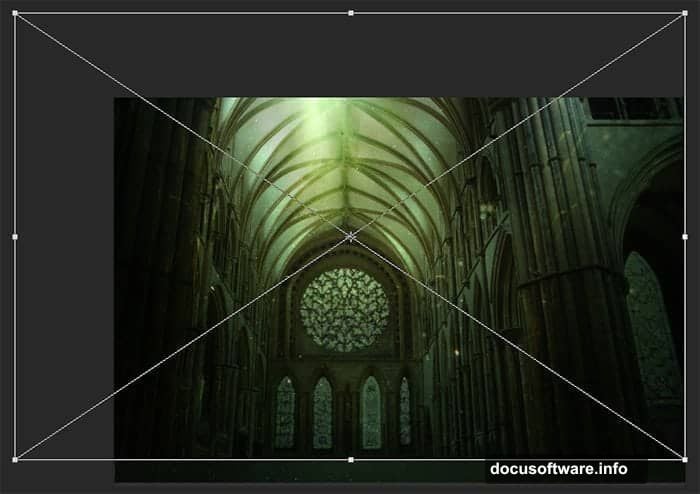
Now bring in the cathedral image. Hold-click and drag it from your folder directly into the open Photoshop document. This method places it as a Smart Object, which keeps your edits flexible.
Change this cathedral layer’s blending mode to Overlay. Then scale and position it so the architectural ceiling aligns with the light rays in your underwater background. Set the layer opacity down to about 20%. At that level, the structure feels like a ghostly presence rather than a hard element.
The blending still won’t look quite right, though. Certain parts of the cathedral, like the lower sections, the sides, and edges near the windows, need to fade out naturally.
Using Layer Masks to Refine the Cathedral Blend
Go to Layer > Layer Mask > Reveal All to add a white layer mask to the cathedral layer. This keeps everything visible at first, then lets you paint areas away with black.
Select the Brush tool (B) and pick a very soft round brush. Set hardness to 0% and drop the opacity down to around 15-20%. That low opacity lets you build the mask gradually rather than cutting hard edges.
Paint with black over the areas you want to hide. Focus on the lower portions of the building, the left side, and the ceiling edges. Work in light, repeated strokes rather than one heavy pass. The goal is a gentle fade that makes the cathedral feel like part of the underwater environment rather than a pasted overlay.
This masking technique is one of the most useful skills in photo manipulation. And once it clicks, you’ll use it constantly across every future project.
What You’ll Build Throughout This Tutorial
This project covers a solid range of Photoshop skills in one place. Here’s a quick overview of what gets covered across all the steps:
- Masking and layer organization
- Overlay and blending mode techniques
- Brush tool work for soft transitions
- Filters for atmosphere and depth
- Color adjustments for emotional tone
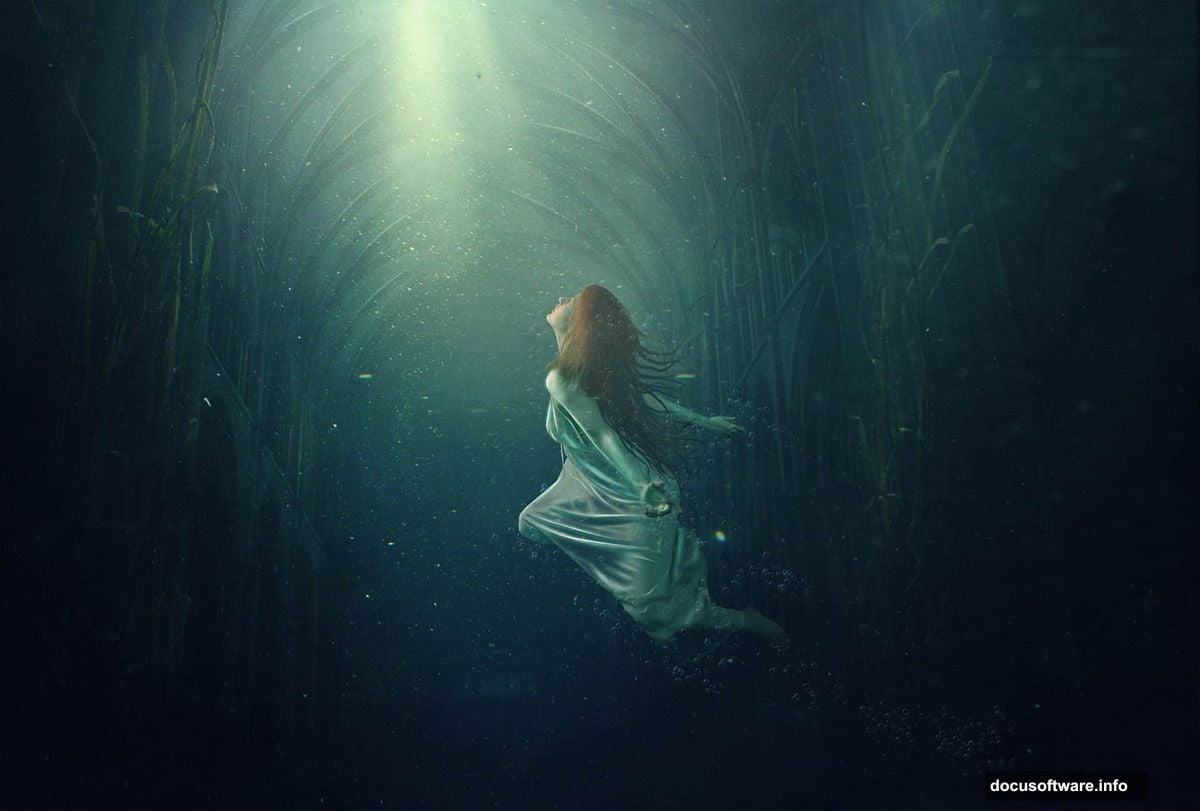
- Adding a subject (the girl) with hair detail work
- Placing bubbles to complete the scene
The hair masking step trips up a lot of beginners. But this tutorial covers it with enough detail to make it manageable, even if it takes a few tries to get right.
Resources You’ll Need
Before you start, grab these three free stock images:
- Girl – from lockstock on DeviantArt
- Underwater scene – from koko stock
- Cathedral – from kippa2001 (an alternative link is also available)
All three are available through DeviantArt stock resources. Download them before you open Photoshop so everything’s ready to go.
Also, Adobe Photoshop CC is required for this tutorial. Some filters used in the later steps aren’t available in older CS versions. So if you’re still on CS, a few steps may need workarounds.
A Note on Photoshop Actions and Workflow
One thing this project reinforces is how much smoother your workflow gets when you think in layers and masks from the start. Blending modes like Overlay might feel unpredictable at first. But as you build this scene, you’ll start to see the logic behind them.
The same goes for opacity settings. Dropping the cathedral to 20% isn’t random. It’s a deliberate choice that lets the underwater mood stay dominant while the architecture adds texture and dimension.
Each technique you practice here, whether it’s painting masks or adjusting blend modes, stacks up over time. And projects like this one, where many techniques combine into a single image, are some of the best ways to build that instinct fast.
So grab your coffee, set up your layers panel, and start building. The scene comes together more quickly than you’d expect.