
Creating a jaw-dropping sports wallpaper from scratch sounds intimidating. But with the right approach, even a beginner can pull together splatters, textures, particles, and photo elements into one cohesive, high-energy design.
This tutorial walks you through building a widescreen sports wallpaper in Photoshop. Along the way, you’ll pick up some genuinely useful non-destructive editing habits that will make your everyday Photoshop work faster and smarter.
Here’s what you’ll need before diving in: a subject photo (a girl in a sports pose), a tea stain texture, a ball, plant, goalpost, ground, skyline, three splatter brushes, a galaxy image, spray paint pack, and a watercolor texture pack. All resources come from SXC, Deviantart, and MediaMilitia.
Setting Up Your Widescreen Canvas
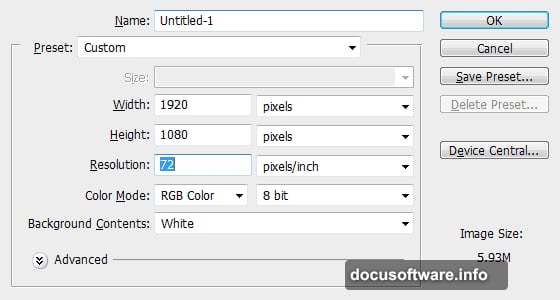
First, create a new file sized for a widescreen wallpaper. Think 1920 x 1080 pixels at 72dpi — the standard for most desktop displays.
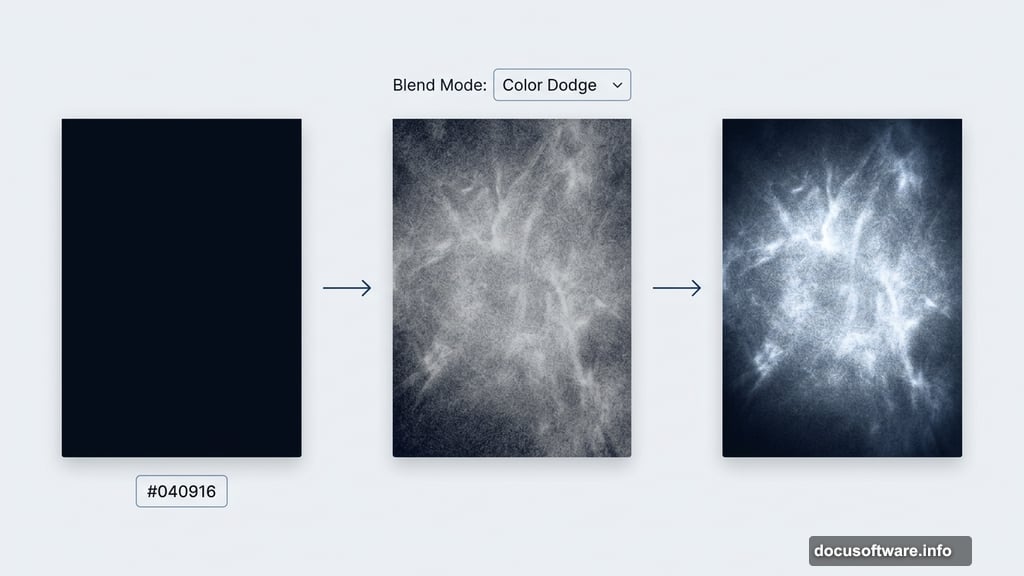
Next, create a new layer in the Layers palette. Set your foreground color to #040916, a deep near-black navy. Then hit Alt + Backspace to fill the layer with that color. This dark base gives all your future elements room to pop and glow.
Smart Objects Make Everything Easier
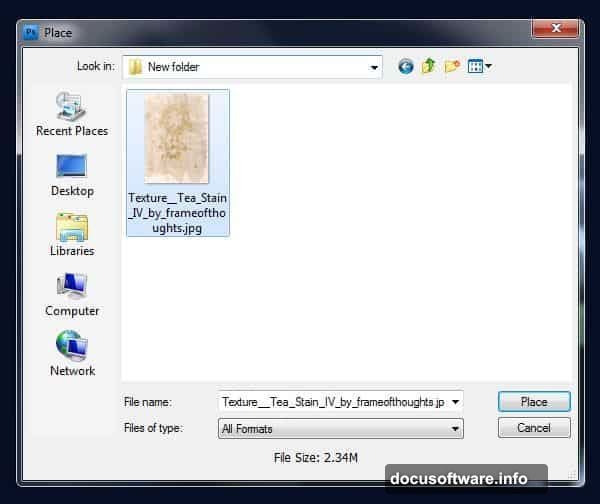
Here’s where a crucial habit kicks in. Instead of dragging images directly into your document, use File > Place to import them as Smart Objects.
Why does this matter? Smart Objects protect your original image data. You can scale, rotate, apply filters, and make adjustments without ever permanently damaging the source. It’s a non-destructive approach that saves you from a lot of frustrating backtracking.
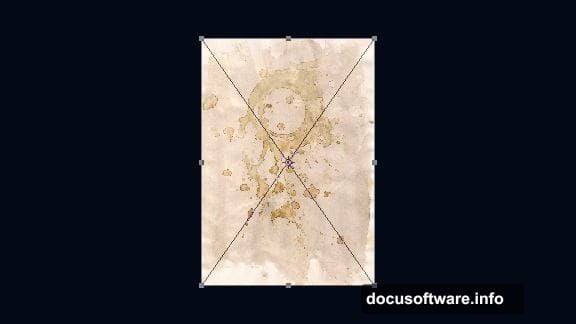
So go ahead and place your tea stain texture using File > Place. Once it lands in your document, hit Ctrl + T to enter Free Transform mode. Right-click and choose “Rotate 90 Degrees CCW,” then resize it until it covers the entire canvas. Hit Enter to confirm.
Desaturating and Inverting the Texture

With your texture placed, add a Hue/Saturation adjustment layer directly above it. Drag the Saturation slider all the way down to -100. This strips out all color, leaving a clean grayscale texture.
Now clip that adjustment layer to the texture below it. You can do this by pressing Ctrl + Alt + G or clicking the “Clip to Below Layer” option. Clipping means the adjustment only affects the layer directly beneath it — not everything else in your stack.
Next, you need to invert the texture. Because it’s a Smart Object, you can’t invert it directly in the main document. Instead, double-click the Smart Object thumbnail to open its contents in a separate window. Press Ctrl + I to invert the image, then Ctrl + S to save and close. Your main document updates automatically.
Blending the Texture Into the Background
Now set the texture layer’s blend mode to Color Dodge. This blending mode brightens underlying layers based on the texture’s tones, creating a subtle, luminous effect that adds depth without overwhelming the dark background.
If the texture still feels too subtle, add a Levels adjustment layer clipped to the texture. Adjust the midtone input slider to bring out more contrast and visibility. Small nudges here make a big visual difference.
Building Out the Scene
With your background sorted, it’s time to bring in the scene elements. Import the ground layer the same way — File > Place — so it enters as a Smart Object too.
Use the Lasso Tool to make a rough selection along the ground edge. Precision isn’t critical here. You just want to blend the ground naturally into the dark background rather than leaving hard, obvious edges. The goal is to make everything feel like it belongs in the same space.
From here, the process follows a similar rhythm for each element: place as a Smart Object, transform to fit, blend using layer modes, and use masks or adjustments to integrate it with the rest of the composition. The splatters, spray paint textures, watercolor washes, and galaxy layer all layer up progressively to build that energetic, chaotic-but-controlled sports aesthetic.
Why Non-Destructive Editing Matters
One thing worth pausing on is how much this workflow relies on Smart Objects and adjustment layers. It might feel like extra steps early on. But trust the process.
Every Smart Object you place can be reopened, edited, and resaved without affecting anything else. Every clipped adjustment layer targets only its companion layer. So if something looks wrong two hours into the project, you can fix one element without rebuilding everything around it.
Professional designers work this way by default. It’s one of those habits that feels slightly slower upfront and saves enormous time when revisions inevitably happen.
Putting It All Together
The final wallpaper combines a dark cosmic background, textured ground, a dynamic figure, goal post silhouette, splatter effects, paint sprays, and layered watercolor washes. Each element blends into the next using blend modes like Color Dodge, Screen, and Multiply.
What makes the composition work is restraint. Not every splatter needs to be full opacity. Not every texture needs to scream for attention. The dark base color (#040916) acts as glue, letting all these busy elements coexist without fighting each other.
If you’re newer to Photoshop, this project is genuinely worth attempting even if some steps feel challenging at first. The techniques — Smart Objects, clipping masks, blend modes, non-destructive adjustments — show up in almost every intermediate and advanced Photoshop workflow. Mastering them here pays off on every project you tackle after.