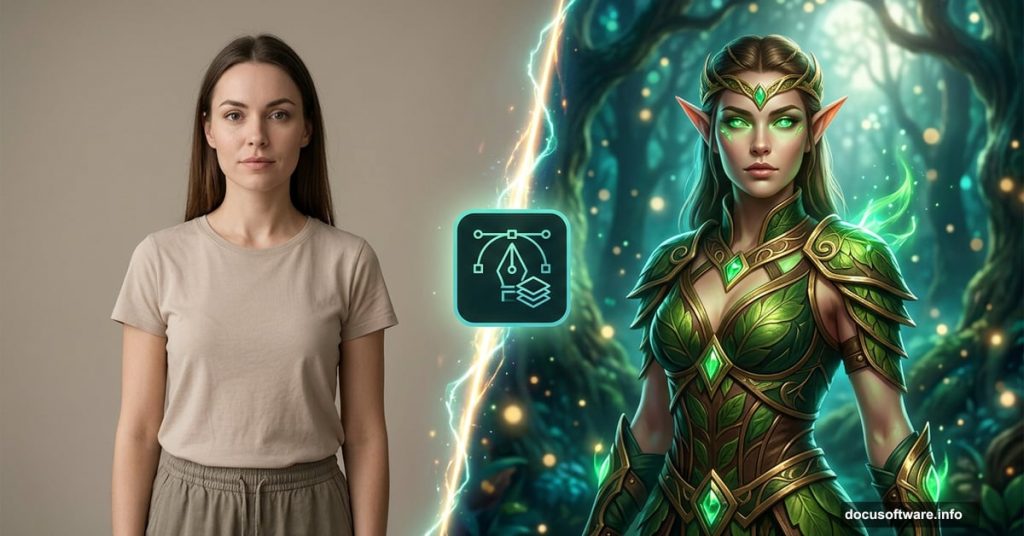
Creating a fantasy character from a real photo sounds intimidating. But with the right techniques, you can turn an ordinary model shot into a breathtaking elf warrior that looks straight out of a fantasy film.
This walkthrough covers everything from skin retouching to forest backgrounds, armor blending, custom ear painting, and final color grading. So whether you’re new to photo manipulation or looking to sharpen your compositing skills, this project teaches you techniques you’ll use over and over again.
Here’s a quick look at what you’ll build and how to get there.
Setting Up Your Canvas and Placing the Model
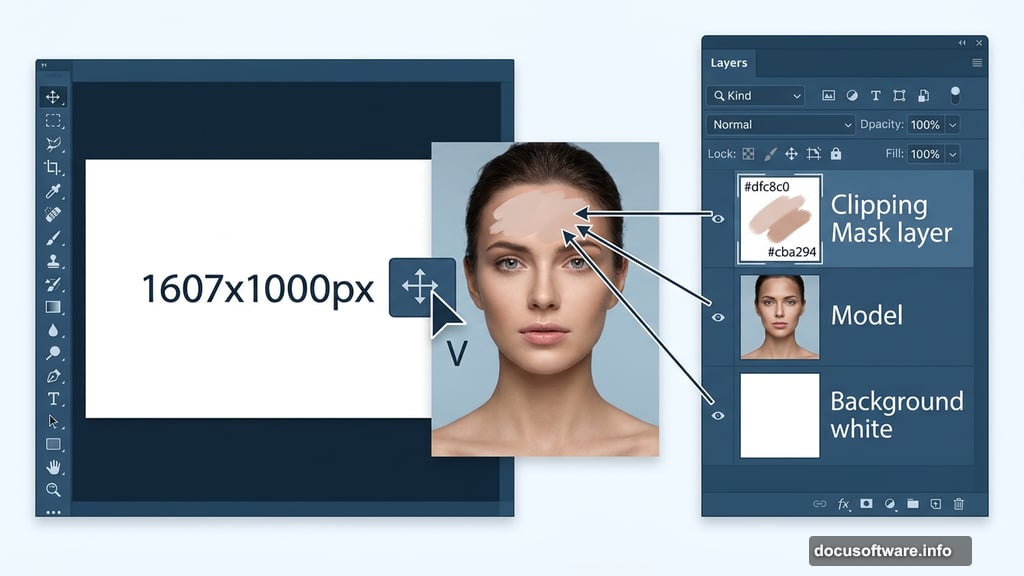
Start by creating a new document in Photoshop. Set it to 1607×1000 pixels and fill the background with white. Then open your model image and drag it onto the canvas using the Move Tool (V). Center her in the frame.
This gives you a clean foundation before any editing begins.
Retouching the Forehead and Removing the Headpiece
The model comes with an existing headpiece on her forehead. You’ll want to remove it completely before adding the elf headpiece later.
Hit Ctrl+Shift+N to create a new layer and set it as a Clipping Mask. Grab a soft round Brush Tool (B) and use color #dfc8c0 to paint over the forehead area. This covers the original headpiece with skin-matched tone. Then create another layer and switch to color #cba294 to paint soft shadows on both sides of the forehead. That adds natural depth and makes the painted area look like real skin rather than a flat patch.
Cloning Out Distractions and Rebuilding Hair
Next up is the Clone Stamp Tool (S). Use it to remove the branch in the foreground and any remaining headpiece fragments near the hair on both sides.
After cloning, you’ll notice some hair looks patchy or missing. Fix this by creating three separate layers and using colors #d1b8af, #dfc8c0, and #e3e7e8 to paint back the missing hair sections. Painting across multiple layers gives you flexibility to adjust each tone independently without affecting the others.
Refining the Lips and Facial Details
Small details make a huge difference in photo manipulation. Create a new layer and use a fine brush with color #d4b8ae to trace the lower lip contour. This subtle adjustment makes the lips appear slightly smaller and more refined, which fits the elegant elf aesthetic perfectly.
Dodge and Burn for Skin Depth
This step separates flat retouching from truly dimensional skin. Create a new layer, change its blend mode to Overlay, and fill it with 50% gray.
Now activate the Dodge and Burn Tool (O). Set it to Midtones range with an Exposure of 10 to 15 percent. Use Dodge to brighten areas that catch light and Burn to deepen shadows. The Overlay mode hides your gray fill entirely, so only the light and shadow adjustments show through. Switch to Normal mode temporarily if you want to see exactly where you’ve painted.

Color Grading the Background With Adjustment Layers
Here’s where the mood starts shifting toward fantasy. Add a Hue/Saturation adjustment layer and target the Cyans channel. Adjusting this channel changes the background color without touching the model’s skin tones.
Then stack a Color Balance adjustment layer on top. Tweak the Midtones and Highlights sliders to push the overall palette toward your desired mood. On this layer’s mask, paint with a soft black brush over both cheeks, the shoulders, and the hair resting on the right shoulder. That protects those areas from the color shift so they keep their natural warmth.
Adding the Forest Background and Armor
With the model retouched and the base color established, the next phase brings in the forest environment and armor pieces. Each element gets blended using adjustment layers, careful masking, and brush work to match lighting and color across every layer.
The key here is patience. Zoom in close when masking edges and use a low-opacity brush to build transitions gradually. Hard edges instantly break the illusion of a composite image.
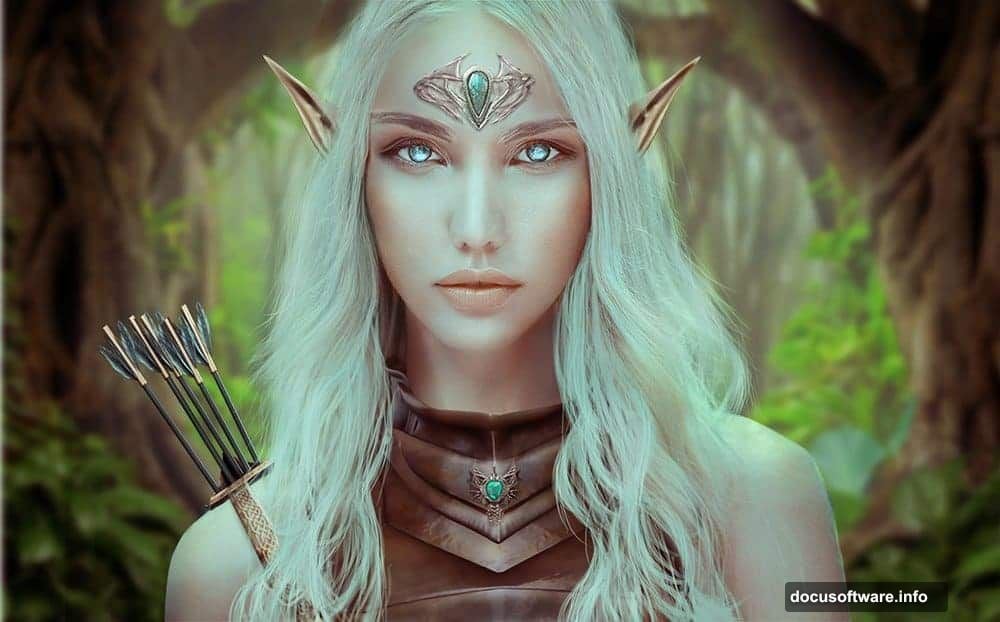
Building the Elf Headpiece and Decorating the Armor
The headpiece layers combine two separate source images. Bring them both in, position them carefully on the model’s head, and use masks to blend the join points. Add decorative elements and jewelry on top using similar masking techniques.
For the armor decoration, small adjustments in brightness and color matching go a long way. Your goal is to make every piece feel like it belongs in the same lighting environment as the model.
Painting the Ears and Hair
Elf ears require a bit of freehand painting. Import the ear resource and blend it with the model’s existing ears using masks and color matching. Then refine the edges with a fine brush to make the transition seamless.
Hair painting comes next. Using a small brush and colors sampled from the existing hair, extend and shape the hair to flow naturally around the headpiece and ears. Building this up across multiple layers keeps individual strands controllable.
Final Adjustment Layers and Color Enhancement
The last phase ties everything together. Stack several adjustment layers above all your content to unify the color palette across the model, armor, background, and painted elements.
Push the highlights slightly cool and the shadows slightly warm for a cinematic forest feel. Small contrast boosts help the armor catch the light convincingly. And a final check on every mask edge ensures nothing looks cut out or artificially placed.
Photo manipulation projects like this one teach you more about Photoshop than almost any other exercise. Each step builds a new skill, from retouching and cloning to compositing, painting, and color grading. By the time you finish, you’ve touched nearly every major tool in the application.
The result is a complete fantasy portrait that feels cohesive and handcrafted rather than assembled from random stock images. And honestly, seeing that final image come together makes every hour of masking completely worth it.