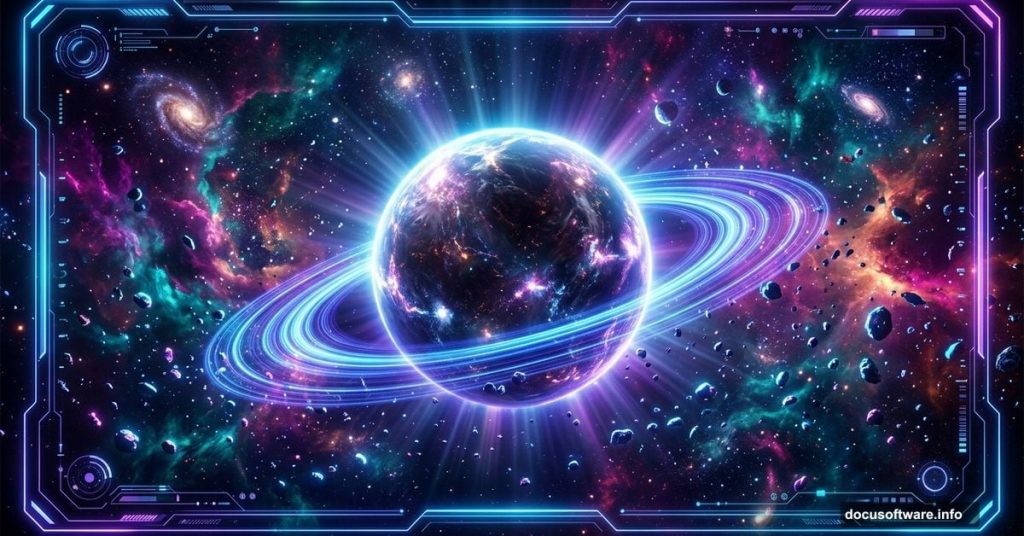
Space has always fired up the human imagination. The idea that we carry a little bit of the cosmos inside us — some stardust, some fire, some mystery — is genuinely beautiful. So what better way to explore that feeling than building your own galaxy scene in Photoshop?
This tutorial walks you through creating a dramatic, explosive space composition. You’ll layer planets, asteroids, glowing light effects, and deep-space textures into something that looks like it belongs on a sci-fi movie poster. Let’s get into it.
Setting Up Your Canvas the Right Way
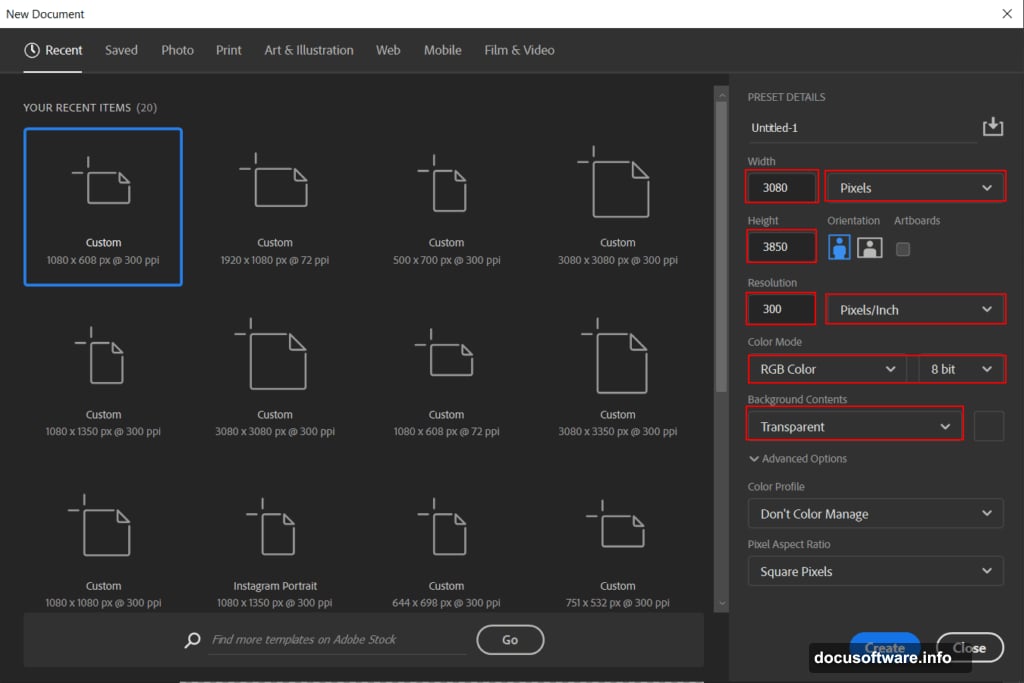
Before anything else, you need a canvas built for high-quality output. Go to File > New and enter these values:
- Preset: Custom
- Width: 3080px
- Height: 3850px
- Resolution: 300px
- Color Mode: RGB Color, 8-bit
- Background Contents: Transparent
That resolution and size combination gives you sharp, print-ready results. Working at 300px per inch means your final image holds up beautifully at large sizes, not just on screen.
Placing Your Background Star Field
Now bring in your background. Go to File > Place and select your stars photo. Once it lands on the canvas, grab the transform tool with Ctrl/Cmd + T. Hold Alt + Shift and scale it to cover the full canvas. In Photoshop CC, just holding Alt handles all sides at once, which saves a step.
Position it so the stars feel natural and balanced. You want depth here, not just a flat pattern. A good star field gives your whole scene the cosmic scale that makes everything else pop.
Adding the Planet and Masking It Cleanly
Next, place your planet image the same way. File > Place, then use the transform tool to position and scale it. Think about where it sits in the composition — slightly off-center tends to feel more dynamic than dead center.
Once you’re happy with placement, create a layer mask. Select the Brush Tool (B), choose a soft round brush, set your foreground color to black, and paint over the edges of the planet. This blends it smoothly into the star field instead of leaving hard, cut-out edges.
This masking step is where your scene starts feeling real rather than collaged.
![A digital artist building a galaxy scene in Photoshop with planet layers and glowing space elements]
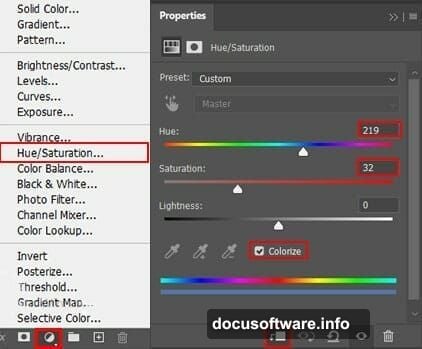
Hue and Saturation: Tying Colors Together
Add an Adjustment Layer > Hue/Saturation above your planet layer. This lets you shift the planet’s color temperature to match your overall scene. Pushing toward cool blues and purples tends to feel very space-like, but experiment with what feels right for your composition.
Adjustment layers are non-destructive, so you can always come back and tweak. That flexibility is one of the best parts of working this way.
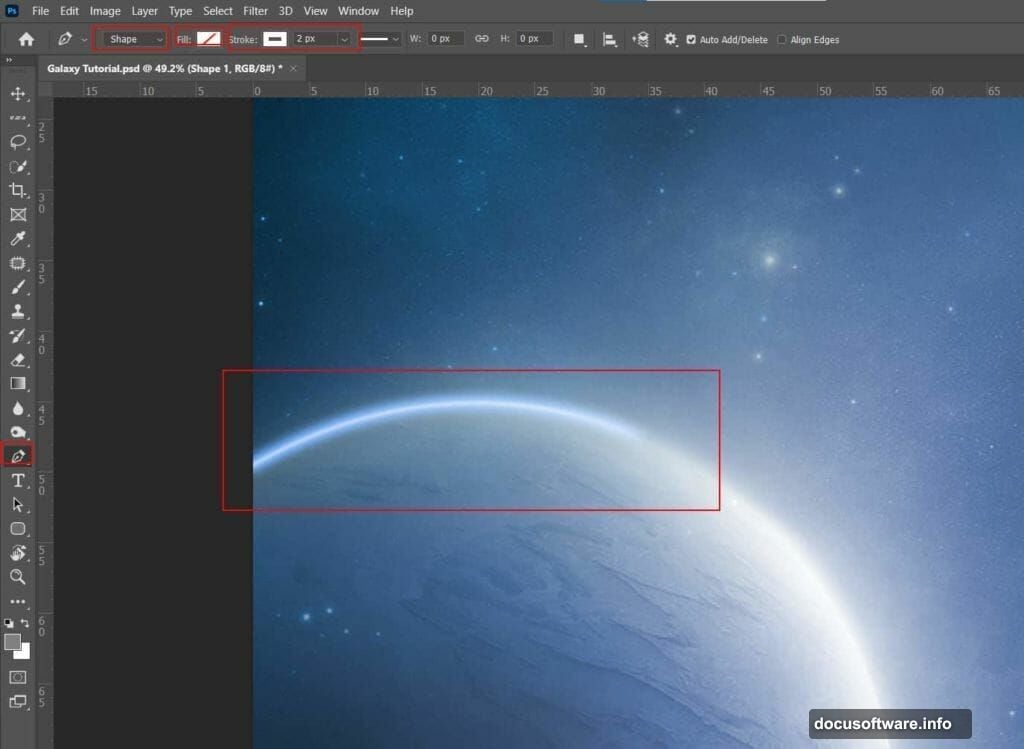
Creating the Planet’s Glowing Ring Effect
This is where things get visually exciting. Create a new layer and convert it to a Smart Object. Then grab the Pen Tool (P), set it to Shape mode, set Fill to none, and choose a white Stroke at 2px.
Draw a curved line across the top of the planet. Think of it as a light ring or orbital glow catching some distant sun.
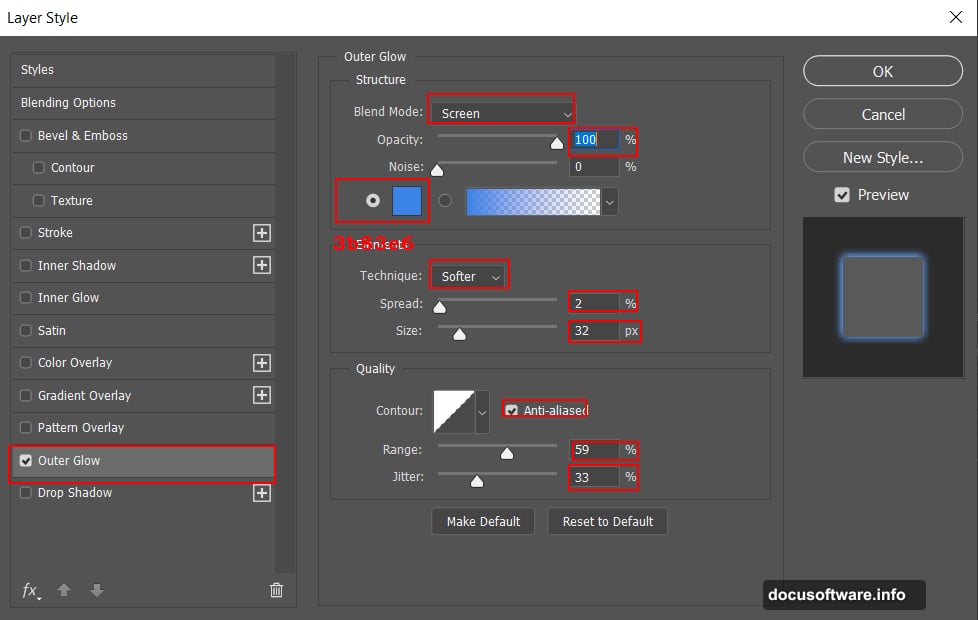
Right-click the layer and select Blending Options. Turn on Outer Glow and set it up like this:
- Blend Mode: Screen
- Opacity: 100%
- Color: #3b83e6 (a vivid electric blue)
- Technique: Softer
- Spread: 2%
- Size: 32px
- Anti-aliased: Checked
- Range: 59%
- Jitter: 33%
Finally, go to Filter > Blur > Gaussian Blur and apply 4px. That slight blur softens the glow so it looks like light diffusing naturally through space rather than a sharp digital line.
Building Depth With Asteroids and Extra Elements
From here, the tutorial layers in asteroids, a second planet, a space hole, the moon, additional star layers, and a texture overlay. Each element follows the same general process — place, transform, mask, and adjust blending to match the scene’s overall light and color story.
The asteroids add mid-ground detail and give the eye something to travel through. The second planet creates a sense of scale. The texture layer adds grain and tactility that keeps the image from feeling too clean and digital.
Stack these carefully, keeping your layers organized. Naming each layer as you go sounds tedious but saves serious frustration later.
Final Polish With Camera Raw Filter
The last step brings everything together. Go to Filter > Camera Raw Filter and treat your flattened composition like a photograph. Adjust clarity, add a vignette to pull focus toward the center, and push the color grading toward whatever mood feels right for your scene.
Camera Raw is incredibly powerful for this kind of final pass. It lets you color grade the whole image consistently, which unifies all those separate elements into something that looks cohesive and intentional.
The difference between a good composite and a great one often comes down to this final color pass. Don’t rush it.
Resources You’ll Need for This Tutorial
To follow along, you’ll need these image assets:

- Background stars photo
- Planet image
- Space Galaxy 2 texture
- Asteroids photo
- Second planet image
- Space hole graphic
- Moon photo
- Stars overlay
- Texture image
All of these are listed in the tutorial resources section. Having everything downloaded and organized before you start keeps the workflow smooth.
Building a scene like this takes patience, but the process teaches you something valuable about Photoshop along the way. Every step — masking, blending, glowing effects, Camera Raw finishing — is a skill that transfers directly to other projects. By the end, you’ll have a dramatic galaxy scene and a much stronger handle on how Photoshop’s tools work together.